Showing posts with label side dishes. Show all posts

Wednesday, December 19, 2012

Roasted Autumn Vegetables

I'm back! Or at least, I hope to be. The short delay I'd intended with my blogging turned into more of an indefinite leave of absence as the hubby and I have been adjusting to our new schedules. As I mentioned many, many moons ago, we bought our local newspaper and now find ourselves working nearly four full-time jobs between the two of us. A few things had to give in the schedule, like blogging. And cleaning.

But not cooking. In fact, I find myself cooking as much now as I ever have. A big part of that is because I write a weekly food column in the paper, so I'm constantly testing new recipes, or remaking favorites with new, newspaper-friendly photos.

But I do miss blogging, and I'm hoping to get back to it, although maybe not as often as I did before. And probably with fewer step-by-step photos. And I promised my fellow publishers that I'd put any new recipes in print, first -- although I'm not sure if my column is that hot a commodity!

I'll start by attempting to backfill some of the recipes I've worked on the past several months, so some of them might seem a bit out of order or out of season. And then once I catch up, hopefully things will get back to normal!

I'll start with Roasted Autumn Vegetables, which might not sound terribly exciting, but is a healthy and tasty side dish that's especially great around the holiday season. This dish is simple and colorful, and pretty hand-off.


Notes:
  • Swap in other root vegetables or change the quanitites according to your preferences.
  • If you double the recipe, put the vegetables on two pans and rotate them halfway through the cooking process.
  • Leftovers taste great in soup. Saute some shallot (or a little onion and garlic), add broth, and then add leftover vegetables and cooked tortellini. Season to taste with salt, pepper, and crushed red pepper flakes.
Roasted Autumn Vegetables
Makes 6 servings
  • 1/2 pound baby carrots, halved
  • 1 medium red onion, cut in 16 wedges and separated
  • 1 small butternut squash, peeled, seeded and cut in 1-inch chunks
  • 1 large sweet potato or yam, peeled and cut in 1-inch chunks
  • 2 medium Yukon gold potatoes, scrubbed and cut in 1-inch pieces
  • 1 clove garlic, minced
  • 2 tablespoons olive oil
  • 1 teaspoon dried (rubbed) sage
  • 1 teaspoon dried rosemary, crushed
  • 1/2 teaspoon salt
  • 1/4 teaspoon pepper
  1. Preheat oven to 425 degrees F. Spray large jelly roll pan with nonstick cooking spray.
  2. Place vegetables in pan. Pour oil over vegetables. Sprinkle with seasonings and stir to coat.
  3. Bake 35-45 minutes, or until vegetables are tender.

Thursday, January 12, 2012

Roasted Cauliflower

This very simple, healthy, not-even-a-recipe recipe is something I made to entice my mother to have supper with us recently.

Yes, I have to shamelessly bribe her with vegetables.

I'm not a huge fan of steamed cauliflower, but when roasted, it takes on a much sweeter and more complex flavor. Needless to say, Mom loved this. I got to try a few bites, and we loaded some on the little man's plate. But the rest of the cauliflower went to Mom.

And when the little man (who eats in sprints) took a quick break from eating and left the room, the cauliflower mysteriously disappeared from his plate before he returned. Hmm ...

Roasted Cauliflower
Serves 2-3, or my mom

1 head cauliflower, cut in florets
2 tablespoons olive oil
3 cloves garlic, minced or pressed
Salt and pepper

1. Preheat oven to 400 degrees F.

2. Toss cauliflower with olive oil and garlic, and place in a baking dish. Sprinkle with salt and pepper.

3. Cover and bake 15 minutes.

4. Remove cover, increase oven temperature to 425 degrees F, and bake another 10-15 minutes until cauliflower starts to crisp up.

Friday, December 30, 2011

Cheesy Olive Bread

Belated happy holidays, from Angel in the Kitchen, the hubby, and the little man!

I hope you can tell who's who in this pic.

We've been busy, to say the least. But we had a wonderful Christmas, and it was so much fun now that Jack is getting old enough to understand more. Jack loves Santa. Jack loves carols. Jack loves Christmas cookies. And Jack loves opening presents.

We're all in withdrawal now.

But back to the food! I'm always on the lookout for easy bread recipes to go with soups and such, and I've been eying this Taste of Home recipe for the hubby. He loves mayo-based cheese breads, and this one looked especially ooey and gooey.

I don't care for mayo, and the spread was a bit too strong for me from that standpoint. But the hubby is a mayo fan, and he really enjoyed it.

Note that this makes a ton of bread, and it's pretty rich. And this is only half the recipe. I did leave off the onions and mushrooms, as per the hubby's wishes, but if I were a mayo and cheese spread kind of person, I think I'd prefer them on.

Cheesy Olive Bread
Serves 8-12

2 cups shredded mozzarella cheese
1/2 cup butter, softened
1/2 cup mayonnaise
4 scallions, thinly sliced
4 ounces canned mushrooms, drained and chopped
1 4.5-ounce can chopped olives
1/2 loaf (1/2 pound) unsliced French bread, halved lengthwise

1. Preheat oven to 350 degrees F. Line a baking sheet with foil.

2. Combine cheese, butter, mayonnaise, scallions, mushrooms, and olives in a medium bowl. Spread on bread.

I actually had help with this part. Meet Kitty.

Kitty keeps Jack company while he's sleeping. Jack also sleeps with a second kitty, aptly named Other Kitty. Other Kitty did not join us in the kitchen this evening.

3. Bake 15-20 minutes, or until cheese is melted. (Pop it under the broiler if it needs some help.)

4. Cut into slices to serve.

Tuesday, October 25, 2011

Sally's Oriental Coleslaw

Asian salads are among my favorites because they typically have all these fun, crispy, crunchy, salty goodies, and dressings that are tasty but not all heavy and creamy. And my friend Sally's Oriental coleslaw is one of the best that I've tasted.

Fun, crispy, crunchy, salty goodies: Check. Dressing that is tasty but not heavy and creamy: Check.

Plus, it's pretty. (Just like Sally.)

This makes a big batch, so it's perfect for potlucks. You can pack the ingredients separately and toss together right before serving.

Sally's Oriental Coleslaw
Makes 10-12 servings

Salad
1 package beef-flavored ramen noodles, seasoning packet reserved for dressing
1 1-pound bag of coleslaw mix
1 cup slivered almonds
1 cup sunflower seeds
3 scallions, sliced

Dressing
Seasoning packet from ramen noodles
1/3 cup vinegar (I used white wine vinegar)
1/2 cup oil, such as vegetable oil
1/2 cup sugar
1 teaspoon toasted sesame oil (optional)

1. Preheat oven to 350 degrees F.

2. Crumble ramen noodles onto a baking sheet. Toast in oven until golden, about 7-10 minutes.

Just for kicks, I threw in the almonds, too. Because I love me a toasted almond.

3. Combine coleslaw mix, almonds, sunflower seeds, and scallions in a large bowl.

4. In a small jar, combine seasoning packet, vinegar, oil, sugar, and dark sesame oil. Shake until well combined.

5. Just before serving, toss the salad with the dressing and the ramen noodles.

Sunday, September 18, 2011

Oven Baked Beans

Earlier this year, the litte man and I road-tripped across the state for my cousin's high school graduation. In North Dakota, the standard graduation celebration is the afternoon open house. They're casual, laid-back, and full of food.

My uncle did the cooking for the open house, and he made a huge pot of baked beans that included a few varieties of beans. And the little man went nuts for them. (I may have mentioned once or twice or 641 times that he loves beans.) I typically make my baked beans on the stovetop, and they're quite BBQ-y and cooked down. These, on the other hand, didn't have any overwhelming flavors. And the beans still retained their shape and some firmness, so they were easy for the little man to pick up with his fingers. (For those who enjoy eating baked beans using silverware, that still works, too.)

When I asked my uncle for the recipe, he couldn't quite remember where he got it. He says he typically types a recipe name into a search engine and attempts the most popular recipe. (Hey, whatever works.) I found a similar version on allrecipes.com, and made some modifications to it to suit our tastes. And, because the recipe still relies on canned beans, everything bakes up really quickly.

Oven Baked Beans
Serves 6-8

1/2 pound ground beef
1/2 pound bacon, diced
1 medium onion, chopped
1/3 cup packed brown sugar
1/4 cup ketchup
1/4 cup barbecue sauce (I typically use Famous Dave's Rich & Sassy)
A few dashes of liquid smoke
1 tablespoon prepared mustard
1/2 teaspoon pepper
1/2 teaspoon chili powder
1 16-ounce can pork and beans, undrained
1 16-ounce can kidney beans, rinsed and drained
1 16-ounce can Great Northern beans, rinsed and drained

1. Preheat oven to 350 degrees F. Grease a 2 1/2-quart baking dish, or spray it with cooking spray.

2. In a large skillet, cook beef, bacon, and onion until meat is done and onion is tender. Drain any fat.

Please pretend there is bacon here. I didn't have any thawed, and the beans are still quite good without the bacon. Of course, as with most foods, they do taste best with bacon.

3. Combine all remaining ingredients except beans.

4. Add to meat mixture and mix well. Stir in beans. Pour mixture into prepared dish.

5. Bake, covered, for 1 hour or until heated through and bubbly.

Tuesday, August 16, 2011

Easy and Light Fried Rice

I really like fried rice, but I still tend to use it as a base for stir-fries rather than eating it on its own. So I like my fried rice to have a pretty mild flavor.

I've tried making fried rice several times at home, and while it looks so simple, it's been troublesome for me. I tend to to overdo it with the soy sauce, and my rice tends to get really, really salty.

This recipe had about the perfect ratio of rice to soy sauce to suit my tastes (and the lite soy sauce certainly helped), and is incredibly easy to make. And while I went pretty basic, you can certainly add any veggies that you like -- mushrooms, bell peppers, broccoli, etc. But if you add more veggies, you might want to serve the fried rice with some extra soy sauce on the side, just in case your spreading your flavor too thin.

Easy and Light Fried Rice
Serves 4

1/2 c. shredded carrot
1/2 c. finely chopped onion
1/2 tsp. minced fresh ginger
1 clove garlic, minced
4 c. cold cooked brown rice
3-4 Tbsp. lite soy sauce
2 eggs, beaten
1/8 tsp. pepper
1/3 c. frozen peas

1. Spray large wok or nonstick skillet with cooking spray. Heat over medium-high heat until hot. Add carrot, onion, ginger, and garlic. Cook and stir about 1-2 minutes.

2. Stir in rice and soy sauce. Cook over low haet 4-5 minutes, stirring occasionally.

3. Move rice mixture to one side of skillet. Add eggs and pepper to the other side. (I added an extra quick shot of cooking spray to the side of the skillet before adding the eggs.)

4. Cook over medium-low heat 3-4 minutes, stirring occasionally, until eggs are cooked. Add peas to rice and egg mixture and stir thoroughly to combine.

5. Heat through, and serve with extra soy sauce, if needed.


Tuesday, March 8, 2011

Green Goodness Veggie Stir-fry

The little man's gotta-have-it food of the week is ... broccoli. (Admit it. You're broccoli-green with envy, aren't you?)

My favorite way to serve broccoli is in any sort of stir-fry. We threw together this light dish to go with our Chinese crab cakes the other night, so the little man wouldn't stare down in his plate in disgust, wondering where his veggies have gone.

I also added in a few other veggies (a purging of the crisper, if you will), and threw in some frozen edamame just to see what the little man though. I mean, he loves beans. So he should love soybeans. Right? Right. (And he did.)

The sauce in this dish is very light -- it doesn't weigh down the veggies like a lot of stir-fry sauces, so you actually get to taste the veggies. I don't think it could stand alone as an entree in our carnivorous house, but it's a wonderful side, especially when serving other dishes with stronger flavors.

Green Goodness Veggie Stir-fry
Serves 4-6

1 tsp. vegetable or canola oil
1 head broccoli, cut in bite-sized pieces
1 small onion, cut in chunks
2 bell peppers, cut in chunks
1 carrot, peeled and cut in matchsticks
1 c. frozen edamame
(Any other vegetables you like)
3/4 c. chicken broth
1 Tbsp. soy sauce
1 clove garlic, finely chopped
1/2 tsp. grated fresh ginger
3 tsp. cornstarch

1. Heat oil in wok over medium-high heat. Meanwhile, combine broth, soy sauce, garlic, ginger, and cornstarch in a small bowl.

2. Add veggies to wok.

3. Stir-fry until crisp-tender, about 5 minutes.

4. Add sauce. Cook, stirring, until sauce thickens.

Monday, January 31, 2011

Hashbrown Casserole

I got a hankering for this casserole recently when some coworkers and I -- a globally dispersed group -- were discussing the concept of cookie salad, which is a phenomenon that seems to be pretty specific to the Midwest. It's good standard potluck fare, and any North Dakotan worth his or her salt loves a good potluck. (I'm generalizing, but I'm also right.)

One thing led to another in my mind, and I was thinking about this potato dish, which I first tasted -- yes, here it comes -- at a potluck. My coworker Jo brought it, and it was a huge hit. She has since told me that it's a pretty common recipe from community cookbooks and such, there are several variations, and you can't mess it up.

Basically, you take frozen hash browns, add some condensed soup, sour cream and cheese, add something crunchy on top, and bake it into this yummy, cheesy pile. And really, who doesn't love a yummy, cheesy pile?

Hashbrown Casserole
Serves 8-12

2 lb. shredded hashbrown potatoes, thawed
1/4 c. butter, cut in thin slices
1 can condensed soup, such as cream of chicken or cream of celery
8 oz. sour cream (light works)
8 oz. shredded cheese (such as cheddar or Colby-Jack)
Onion salt and pepper
1 1/2 c. crushed potato chips

1. Preheat oven to 350 degrees. Spray a 9x13 casserole dish with cooking spray.

2. Combine hash browns, butter, soup, sour cream, and cheese until well combined, and spread evenly in dish. (I combined this right in the dish.)

3. Sprinkle with onion salt and pepper, and then top with crushed potato chips.


4. Cover and bake for 1 hour.

5. Let set a few minutes before serving.


Saturday, July 24, 2010

Steakhouse Onion Rings

The hubby and I are both huge fans of steak, and we grill that more than anything else throughout the summer months. And some of the winter months, as well. (We don't have much for in-between seasons in North Dakota.)

We're always looking for yummy side dishes, and onion rings are one of my favorite steak accompaniments -- not necessarily the onion rings that I'd eat with a burger or a hot dog (like Dave's), but really crispy onion rings with a fried chicken-like coating. I like to eat the steak and onion in the same bite, so the salty, crunchy taste of the coating adds to the flavor of the steak.

This recipe is based on one from Cuisine at Home, and is super simple to make. Plus, the onion rings are so crispy that they can sit at room temp for a long time before they get soggy. I couldn't help but snack on the leftovers all evening long.

Steakhouse Onion Rings
Serves 4

1 large yellow onion (preferably Vidalia), sliced into rings
2 c. buttermilk
2 c. flour
2 tsp. kosher salt
1 tsp. baking powder
1 tsp. black pepper
1 tsp. paprika
1/2 tsp. cayenne pepper
Vegetable oil, for frying

1. Dip onions rings in buttermilk. In a separate bowl, combine flour and seasonings. Dredge onion rings in the flour mixture, a few at a time.

Cuisine at Home had this genius idea of using a wooden skewer to move the onion rings around between the wet and dry batters, and for dropping them into the hot oil. Worked like a charm!

2. Dip rings into buttermilk a second time.

3. And then back in the flour mixture, we go.

4. Set rings on a rack adn refrigerate them while the oil heats, about 15 minutes.

This sets the batter so it's less likely to pull away from the onion rings when they're dropped in the oil.

5. Heat 1" of oil to 365 degrees in a large pot over medium-high heat. Fry onion rings in batches until light brown, about 2-3 minutes per batch.

6. Drain on paper towels, and season with additional kosher salt while the onion ring are still hot.

Saturday, July 10, 2010

Creamy, Red-Skinned Smashed Potatoes

Just a note that it's not too late to enter the Good Earth giveaway!

I'd also like to mention that I received a late-night delivery, courtesy of the Foodbuzz Tastemaker Program, and Nature's Pride, which included three bags of Nature's Pride Premium Harvest buns. I'm a picky bread eater and not a huge fan of prepackaged breads, but these were surprisingly soft and tasty. I couldn't eat three bags in three days, however, so I put some of the extra deli rolls to good use in a steak, tomato, and bacon panini.

With about 45 minutes to spare before supper the other night, the hubby asked me to throw together some garlicky mashed potatoes. I stared at him blankly, blinked, and said, "You mean like from a box?" He said, "No, REAL mashed potatoes."

I started laughing. I need at least two hours' notice to make real mashed potatoes. I peel potatoes at about a rate of one every 8 minutes. Sadly, I'm not joking. The hubby, on the other hand, is a speed demon with a paring knife. He actually peels potatoes faster than I can cut them. But he was busy with other food.

So, I took the lazy way out -- red-skinned smashed potatoes. No peeling required, lumps welcome. I based this recipe off a previous blog post, but I took a few shortcuts, and made some ingredient substitutions. They were a cinch. And the hubby said that aside from our chipotle-cheddar mashed potatoes, these were the best he'd ever had.

(I apologize for the lack of preparation photos. I sincerely thought these wouldn't turn out.)

Creamy, Red-Skinned Smashed Potatoes
Serves 6-8

1 head garlic
Olive oil, for drizzling
2 lbs. red potatoes, scrubbed and cut in large chunks
4 Tbsp. butter
3/4 c. half-and-half
2 Tbsp. cream cheese
Plenty of kosher salt and freshly ground black pepper, to taste

1. Preheat the oven to 425 degrees.

2. Slice off the top of the head of garlic and drizzle cut side with olive oil. Wrap in foil. Bake about 35 minutes. Let cool.

I skipped that last part. It hurt me hands, man.

3. Meanwhile, place potatoes in a large pot filled with water. Add salt and bring to a boil. Cook until fork tender and drain.

4. Remove the cloves of garlic and mash with a wooden spoon.

5. Smash the potatoes. Stir in mashed garlic, butter, half-and-half, and cream cheese, and continue smashing to the desired consistency. Season to taste with salt and pepper, and serve hot.

Friday, June 25, 2010

Grilled Corn with Garlic Butter and Parmesan

So along with his splendid flank steak last weekend, the hubby made grilled corn that was, hands down, the best corn on the cob I've ever had. We typically boil corn on the cob, just because it's kind of an afterthought and we don't have to keep an eye on it that way. I've grilled it a time or two with so-so results, and it just didn't seem worth the effort.

But the hubby found this recipe -- again, from Taste of Home -- that called for soaking the corn and leaving the husks on. I don't know if it was that step or the garlic butter that made the corn so tender and tasty, but by golly, something did. I can't wait to try this one again.

Grilled Corn with Garlic Butter and Parmesan
Makes 8 servings

8 ears sweet corn, husks on
1/3 c. butter
1 clove garlic, minced
1/4 tsp. salt
1/4 c. grated parmesan cheese

1. Soak corn in cold water for 20 minutes. This is a crucial step toward not turning your corn into a burnt pile.

2. In a small saucepan, combine butter, garlic, and salt. Cook and stir over medium heat until butter is melted. Set aside 2 Tbsp.

3. Peel back corn husks to within 1" of the bottom. Remove the silk.

The hubby is a farmkid. He's good at shuckin' corn.

4. Brush the corn with the garlic butter.

5. Rewrap the corn in the husks, and secure the husks with kitchen twine.

6. Grill corn, covered, over medium heat for about 25 minutes, turning occasionally.

7. Cut the strings and peel back or remove the husks. Drizzle with the reserved butter, and sprinkle with parmesan.

Saturday, June 19, 2010

Guest Post: Dave's Battered Onion Rings

I have a guest blogger! I have arrived. Or maybe not. Today's post is from Dave, photojournalist extraordinaire, and owner of Milestones Photography. He is a Dave of all trades, not the least of which is cooking. I've been begging him for a peek inside his kitchen, and he finally relented. I'll let Dave explain in his own words.

P.S. Dave, next time I must insist on a sample before I post your dish. In the interests of quality control.


When you find a food that your 2- and 5-year-old girls love (and that you do, too), you want to make that dish as often as possible. Unfortunately, deep-fried onion rings aren't the healthiest thing to make for the family, so they do end up being more of an occasional item.

For a fairly simple food, there is a wide range of breading styles for onion rings, ranging from a light coat of flour or bread crumbs for a thin, crispy onion to a much thicker milk or beer based batter. My taste falls somewhere in between – I prefer the texture of a batter but I don't like it so thick that the onion doesn't crisp up slightly.

Battered Onion Rings
Makes 4 servings

2 large onions
3 c. flour
1 Tbsp. baking powder
1 Tbsp. garlic powder
2 Tbsp. Creole seasoning
1 1/2 - 2 1/2 c. milk or buttermilk
Canola oil, for frying

1. Slice the onions about 1/4" thick and separate the individual layers into rings. Set aside.

I used Vidalia onions, because they're in season and have a sweeter flavor.

2. Add 2 c. flour to a container that is wide enough for dredging the onions. Add the baking powder, garlic powder, and Creole seasoning. (If you like your food spicy, add another tablespoon of Creole seasoning.)

3. To the dry mixture add the milk, starting with 1 1/2 c., and mix well.

A thicker batter will create a thicker, bread-like coating on the onion, so if you want a thinner, crisper coating, add more milk to thin the mixture. I make my batter so it's thinner than a pancake batter but not so thin as to seem watery.

4. In another shallow container, add 1 c. flour.

This will be used to precoat the onions so the batter will adhere better to the onion and won't pull away when fried.

5. Add enough canola oil to be 1 1/2" to 2" deep, and heat to 350 degrees.

My candy thermometer doubles nicely as a deep-fry thermometer, and I don't deep fry without it. The few times I haven't used it, the oil was either too cold and the food absorbed too much oil, or it was too hot and I ended up with a nicely cooked exterior and raw interior. Bleh.

I love my cast iron Dutch oven and it's perfect for deep frying because it keeps a good, even temperature.

6. Take the individual rings and lightly coat in the plain flour.

Use one hand for this and the other hand for working with the onions in the wet mixture. That way, you'll have one fairly clean hand and another coated in goop.

7. Use a fork or your hand to thoroughly coat the onions in the wet mixture.

8. Carefully place the onions in the hot oil, making sure you don't splash.

9. The cooking time varies, depending on the thickness of the batter. When one side is a light golden brown, flip to cook the other side.

10. Remove and drain on a cooling rack in a sheet pan.

If you'd like to season with additional salt, this is the time to do it. The salt adheres better to the hot rings.

Enjoy!

Thursday, March 11, 2010

Ponzu Lime Dressing

At the risk of jinxing anything, we're slowly but surely feeling better at our house. Cross your fingers that things keep improving. I expect our upcoming good health to last approximately three days. (But a good three days of sleep, they shall be!)

But less germs, more food. As part of the Foodbuzz Tastemaker Program, I recently received a bottle of Ponzu Lime sauce from Kikkoman, and I thought it would be lovely in an Asian dressing.

Ponzu is a citrusy sauce that's commonly used in Japan as a dipping sauce for sushi. I've seen some recipe call for a combination of soy sauce and lemon juice as a substitute, if that gives you an idea of the flavor. Or, in this case, soy sauce with lime juice.

The lime flavor in the sauce definitely comes through, which is very refreshing and summery. And I think the sauce would work very well as a substitute for the soy sauce in my favorite fajita marinade. Grilling weather is just around the corner, right? (Right?)

Ponzu Lime Dressing
Makes about 1/2 c. dressing

2 Tbsp. dry sherry
2 Tbsp. rice wine vinegar
4 Tbsp. Ponzu lime sauce (or soy sauce)
1/2 Tbsp. hoisin sauce
½ tsp. granted gingerroot
4 Tbsp. sugar
1/2 Tbsp. dark sesame oil


1. Combine all ingredients in a bowl or container, and stir or shake until very well combined.

2. Serve over your favorite Asian salad.

Or, if you don't have the ingredients for your favorite Asian salad, just throw anything together and top it with mandarin oranges. They're an excellent distraction.

Wednesday, August 26, 2009

Creamy Roasted Garlic Smashed Potatoes

Laura at Hey What's For Dinner Mom? has a weekly food photo contest that I've been thinking about entering for a few weeks, but I don't think my photos are up to snuff. It seems like everyone else's look cookbook quality, whereas mine look suspiciously like they were taken by a rank amateur in a windowless kitchen. (What a coincidence!)

I'm looking for good food photography tips. Is it my point-and-shoot camera? Is it the lack of natural light in my house? Is it my eagerness to just get to the eatin', already? Please pass on any secrets.

But I digress. I've been meaning to post this recipe for a few days, but I got sleepy. Really, that's not just a pathetic excuse. I can't even go shopping for wrapping paper for 15 minutes without turning into a zombie.

So anyway, these are the potatoes that the hubby and I made over the weekend. The hubby wanted some sort of restaurant-quality, garlicky smashed red potatoes, and I saw this, which is a Neely's recipe. The potatoes were very easy to make (no peeling!), and were easily some of the best garlic smashed potatoes I've had.

Creamy Roasted Garlic Smashed Potatoes
Serves 6-8

1 head garlic
Olive oil, for drizzling
2 lbs. red potatoes, scrubbed and cut in large chunks
5 Tbsp. butter
3/4 c. cream
Kosher salt and freshly ground black pepper

1. Preheat the oven to 425 degrees.

2. Slice off the top of the head of garlic. Drizzle with olive oil.

3. Wrap in foil. Place on a sheet tray and bake about 35 minutes. Let cool.

Weird. It looks so alien.

4. Remove the cloves and mash with a wooden spoon.

5. Place potatoes in a large pot filled with water. Add salt and bring to a boil. Cook until fork tender and drain. Smash the potatoes to the desired consistency.

6. Meanwhile, in a small saucepan, heat butter, cream, roasted garlic, and some salt and pepper over medium-low heat until butter melts.

7. Add the cream mixture to the potatoes and mash together. Season to taste with additional salt and pepper, and serve hot.

Thursday, July 30, 2009

Crash Hot Potatoes

When we had supper with my family over the weekend, we also needed potatoes (Dad is very much a meat and potatoes type). The hubby usually makes his much-loved spicy grilled potatoes, but he was already manning the Weber grill down in the yard, and I didn't want him to have to run back and forth between that and the gas grill up on the deck.

Safety first, that's me.

So I made this recipe that I've been drooling over for months. I first saw it on the Pioneer Woman's site, and have since seen it on cooking shows and in several magazines. Apparently it's the latest thing with potatoes.

I used to the Pioneer Woman's recipe, because I was too tired to search through my cookbooks yesterday. The Internet is a lazy girl's best friend.

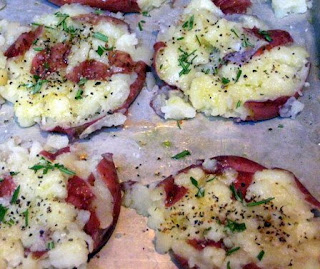
The potatoes were a hit, although I had to bake mine for quite a bit longer (and eventually use the broiler on low) to get them to crisp up on top. The results were very yummy. I highly recommend these as a side dish to just about anything.

Crash Hot Potatoes
Serves 6

18 new potatoes, well scrubbed
2-3 Tbsp. olive oil, for drizzling on pan
Kosher salt and freshly ground black pepper
About 1/4 c. olive oil, for brushing potatoes
2 Tbsp. minced fresh rosemary, or other herbs

1. Add potatoes to a large pot of salted water and bring to a boil. Cook potatoes until fork-tender, about 30 minutes.

2. Meanwhile, preheat oven to 450 degrees.

3. Drizzle a sheet pan with olive oil. Place potatoes on sheet pan. Using a potato masher, gently push down on each potato until it's slightly mashed. Rotate the masher 90 degrees and do it again.

4. Brush the potatoes with olive oil and sprinkle with plenty of salt and pepper. Top with rosemary.

5. Bake about 25 minutes or so until golden brown. (And use the broiler with caution, if necessary.)