Showing posts with label pizzas. Show all posts

Thursday, December 1, 2011

Pizza on a Stick

We're lucky in that our little man has been a wonderful eater so far, for a 2-year-old. Sure, he requests inordinate amounts of ketchup and occasionally dips his sandwiches in his milk, but he loves to try new foods, enjoys his vegetables, and usually eats most of what we put in front of him.

And I finally (finally!) got him to eat homemade cookies recently.

My next obstacle? Pizza. He'll eat a few bites here and there on rare occasions (or when dipped in jalapeno cheese dip), but on the whole, my little guy rejects the notion of pizza. Which is weird. He loves lasagna. He loves sandwiches. Isn't pizza a little like an open-faced lasagna sandwich?

So this is my latest attempt: Pizza on a stick. I saw this idea in Food Network magazine when they ran a feature on state fair foods. Apparently toddlers, like fair-goers, appreciate any food that is served on sticks. So it seemed like it was worth a try.

And did it work, you might be asking? Yes, indeed. Jack thought the pizza sauce was ketchup and went through three bowls' worth, but he gobbled down his pizza ... until it fell off the stick.

Pizza on a Stick
Makes 8 sticks

1 tube refrigerated pizza dough
Flour, for dusting
1 cup pizza sauce
1 1/2 cups shredded mozzarella cheese
1/2 cup grated Parmesan cheese
3/4 cup chopped toppings, such as pepperoni, olives, and mushrooms
8 popsicle sticks or lollipop sticks
Extra-virgin olive oil, for brushing
Dash of garlic powder
Dash of oregano
Extra pizza sauce, for dipping

1. Preheat oven to 425 degrees F. Line a baking sheet with parchment paper.

2. Roll out pizza dough on lightly floured surface to about 12" by 16".

3. Cut in fourths, and then cut each quarter in half diagonally to make 8 triangles.

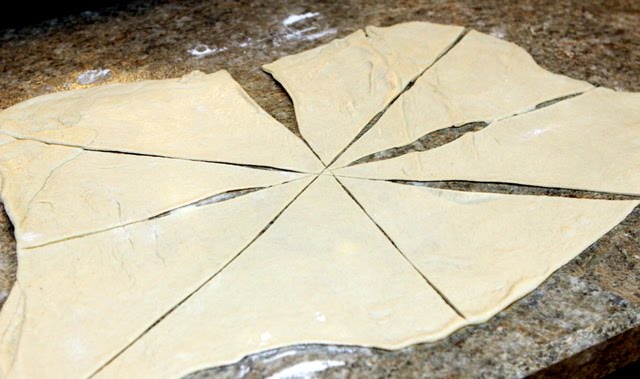
4. Brush each triangle with pizza sauce, leaving a 1/2" border around the perimeter.

5. Sprinkle with cheese and add toppings.

6. Slightly fold in the two far corners of each triangle, and then roll up the dough from the long side first, sort of like a burrito or egg roll. Press gently to seal.

7. Lay each roll on the baking sheet, and carefully insert popsicle or lollipop sticks.

8. Brush rolls with olive oil and sprinkle lightly with garlic powder, oregano, and Parmesan cheese. Add any remaining toppings, as well.

9. Bake until golden, about 20 minutes. Serve with heated pizza sauce, for dipping.

Monday, December 14, 2009

Three-Meat Calzones

Like most people, I love my pizza any way I can get it. And I like to order calzones in restaurants, but I prefer making them at home because I can stuff 'em any way I want 'em. However, they seem intimidating because you have to make dough (which is scary), and then roll the dough (which might be scarier).

Making calzones was my first forray into the dough world, and it was rough going. Let's just say that I started at about 2 p.m. Three attempts and six hours later, I was bawling in the kitchen because we were never going to get suh-uh-uhp-per and I was a horrible co-oo-oo-ook. (Yes, they were heaving sobs.) I've learned a lot since then, so I will attempt to impart a few tips that make dough t less frightening for me.

But first, a funny calzone story. And some background that might get me disowned by my mother. When I was growing up, my family took a very low-maintenance approach to food. The oven was used pretty much for frozen pizza and the occasional batch of cookies. And the stovetop was virtually off-limits. That's what the microwave was for. If it could possibly be cooked in the microwave, we did it. Eggs. Bacon. Hot dogs. Mac 'n' cheese. Hamburger Helper (including the hamburger itself).

Case in point: My mother was visiting last week, and she got hungry. She raided the fridge, hoping for some sandwich fixin's. We were out of deli meat, so she ate half a jar of pickles, and two bagels slathered in ketchup and Dijon mustard. And then she grabbed a can of Chunky Baked Potato soup from the cupboard. I got out a saucepan -- because I use the stovetop whenever possible -- and Mom said, "Oh, that's not necessary." I said, "You want to mic it?" She said, "Oh, no need." And she proceeded to eat the soup cold. From the can.

But back to my story. Last year the hubby and I went to Florida with his sisters. And I talked my brother, Cory, into house- and pet-sitting for us. (He was quite the trouper; I was too busy at Disneyworld to answer my phone when he accidentally locked himself out of the house and was hoping I'd hidden a spare key. And when he called for advice while walking the dogs because one of the dogs was "stuck," I hung up on him because we were deep-sea fishing in the Gulf of Mexico and a pair of dolphins were racing our boat.)

We stocked the house with Cory-friendly food before we left, including a few frozen calzones. I told Cory to call us if he planned on eating them, and I'd explain how to bake them; it seemed like too much info to put in a note.

At one point I called Cory to check in. I asked how the food situation was going. He informed me that he'd eaten all the pizza in the house, and also the calzones. And they were pretty good. I said, "Oh, how did you bake them?" He said he put them in the microwave. I said, "Uh, you were supposed to BAKE them, not just heat them up."

He said, "Alyssa, we're not all as particular as you are when it comes to food. I'm sure they would've been better in the oven, but the microwave was just fine."

I explained that this wasn't an issue of food snobbery. "The calzones weren't prebaked. The dough was raw when I froze them. They'd NEVER BEEN COOKED."

[Long pause]

"Oh, I get it. But oh well. I thought they were a tad doughy. But they were still pretty good. I dipped them in the pizza sauce that you left me, and they were just fine."

Anyway, the recipe for this dough is a modified version of a Cuisine at Home recipe. I made my own filling, but you can certainly substitute anything you like -- any meats, veggies, cheeses, etc. You want about one cup of filling for each calzone, and you don't want it too watery, or it will make your dough soggy.

Three-Meat Calzones
Makes 4

Dough
Cooking spray
1 c. warm water*
1 pkg. active dry yeast (2 1/4 tsp.)
1/4 tsp. sugar plus 1 Tbsp., divided
2 Tbsp. olive oil, plus more for brushing
3 c. bread flour
1 Tbsp. table salt

Filling
1/4-1/3 lb. hamburger or sausage, browned, drained, and cooled
3/4 c. chopped ham or Canadian bacon
3/4 c. chopped pepperoni
8 oz. fresh mozzarella cheese, cubed
1/2 c. pizza sauce, plus more for dipping

*The recommended temperature is between 105 and 115 degrees Fahrenheit. I drove myself crazy with a thermometer the first time I made dough, and it didn't work. The hubby, who had more dough experience, showed me the right temperature, so I could get accustomed by feel. Now when I make dough, I get the water as warm as I would for a baby's bath. Conversely, when the hubby is running water for the Jack-baby's bath, I tell him to make it as warm as he would for his pizza dough.

1. Coat a large bowl and a small sheet pan with cooking spray.

2. In a small bowl, combine yeast, sugar, and water. Let stand for 15 minutes, and then stir in 2 Tbsp. olive oil.

This is "proofing" the yeast -- basically, making sure that it's still alive. The warm water activates it, and the sugar gives it something to eat. The yeast should bubble and froth as it expels gas (yummy). If your mixture isn't foamy after 15 minutes, your yeast be dead.

You can learn a lot from Alton Brown.

3. Using a stand mixer with the dough hook attachment, briefly combine bread flour, 1 Tbsp. sugar, and salt. Slowly add the yeast mixture until a ball forms around the hook. Turn your mixer to medium speed and knead for about 10 minutes.

If your dough just isn't coming together, it might be because of the weather or altitude. You can add a bit of water -- such as a teaspoon or two -- to give it some more moisture.

4. Turn your dough out onto the counter and knead by hand a few times. Form the mixture into a ball and place in the bowl that is sprayed with cooking spray. Cover and let rise in a warm, draft-free place for 1 hour.

I have a problem finding a "warm" place in my kitchen without turning on the oven. So I usually take a mug of hot water and heat it in the microwave for 1 minute. I push that into the corner of the microwave, and then put my dough in and close the microwave. The steamy water makes it warm, and it's certainly draft-free.

5. Punch down the dough and divide it into four equal pieces. Form each into a ball. Place on the greased baking sheet, cover, and let rise for another 30-40 minutes.

6. Preheat the oven to 500 degrees and generously spread cornmeal on a baking sheet.

7. Combine hamburger or sausage, ham, pepperoni, cheese, and 1/2 c. pizza sauce in a medium bowl.

8. For each calzone, roll a piece of the dough in about a 10-inch circle. Perfect circles need not apply.

9. Place about 1 c. filling in the center of one side of the circle.

10. Brush the edges of the dough with water to help with the seal, and then fold over one side of the dough. Crimp the edges of the dough with a fork to seal them.

11. Place the calzones on cornmeal-covered baking sheet.

I usually bake two and freeze two for later.

12. Bake 10-15 minutes, or until crust is golden. Brush with a bit of olive oil, and serve with heated pizza or marinara sauce.

And be careful, because that filling is piping hot!

Sunday, February 15, 2009

Spinach-Stuffed Pizza

When the hubby and I were in Chicago in November, we went on a walking food tour with Chicago Food Planet. It was easily one of the highlights of the trip, and I’d recommend it to anyone.

We went on a chilly, blustery day, and the three-hour tour ended at Bacino’s Pizzeria for their award-winning spinach-stuffed pizza. I was a bit disappointed when I heard this, because I’m all carnivore when it comes to my pizza. However, “open mind” was the theme of the day. So it was our first taste of Chicago pizza, and while it could have been the circumstances – we were hungry for something warm and filling – it was easily one of the best pieces of pizza either of us had ever eaten.

The pizza was stuffed rather than traditional deep-dish, meaning that it’s baked in a deep-dish pan and has the sauce on top, but there’s an extra layer of crust between the toppings and the sauce. It really is a big-a pizza pie.

Re-creating this at home has been on my list of to-dos, so the hubby and I gave it a try today. This presented several challenges: I’ve never made a deep-dish pizza of any kind, I haven’t made too many homemade pizzas in general, I struggle with doughs, and we had absolutely no idea what we were doing.

But hey, life’s a cabaret. I modified a version of a crust recipe that I found online, and made up my own filling and sauce recipes.

I did veer from the traditional in that I didn’t actually bake the pizza with the sauce on top. This is mostly for storage reasons; I knew the hubby and I would never finish a whole pizza, and I thought that storing it in the fridge with the sauce on top would be messy and make the pizza too soggy. The downside was that the top crust got crispier than we recalled; so maybe I’ll try the traditional method next time to see what I end up with. (If you want to do this, I’d recommend not adding the sauce until the last 10 minutes of baking time.)

I might experiment with some more crust recipes just to see what kind of a difference they make. If I find one that I like better, I’ll post an update. Happy cheese eating!

Spinach-Stuffed Pizza
Serves 4-6

Crust
1 pkg. active dry yeast
½ tsp. sugar
1½ c. warm water
½ c. virgin olive oil
1 tsp. salt
5 c. bread flour

Filling
2 tsp. olive oil
2 cloves garlic, grated or minced
½ tsp. crushed red pepper flakes
1½ lb. spinach, stemmed, washed, and dried
Salt and pepper, to taste
1½ lb. fresh whole-milk mozzarella, grated

Topping
1 28-oz. can crushed tomatoes
½ tsp. dried oregano
½ tsp. dried basil
1 tsp. dried Italian seasoning
A few pinches of sugar
Salt and pepper to taste
Shredded parmesan cheese

1. In a stand mixer, combine yeast, sugar, and water. Let sit about 10 minutes.

2. Using the dough hook attachment, stir in oil, salt, and flour on low speed, until most of the flour is combined. Turn to medium speed and knead the dough about 8-10 minutes, or until it is smooth and elastic.

3. Knead the dough by hand a few times, and then place in a greased bowl. Cover and let rise 2 hours, or until dough is doubled.

4. Meanwhile, heat oil over medium-high heat in a large skillet. Add garlic and crushed red pepper, and then add spinach, seasoning with salt and pepper.

5. Cook until spinach is complete wilted and most of the liquid has evaporated, about 10 minutes. Transfer spinach to a colander and let it drain until you’re ready to use it.

6. Preheat oven to 500 degrees.

7. When dough has doubled, punch it down, and then knead by hand for about 1 minute. Set aside about 1/3 of the dough and cover it.

8. If you’re using a metal deep-dish pan, lightly grease it. If you’re using a stoneware pan, sprinkle it with cornmeal.

9. Roll larger section of dough into a large circle. (This is enough dough for a 15” pan; if you’re using a 12” pan, you can discard about 1/8 of the dough.) Place dough in pan, and push against sides about 2” up.

10. Combine spinach and cheese, and place in dough shell.

Yes, my dough wants to squeeze back to the bottom. It's stubborn.

11. Roll out remaining 1/3 of dough and place over filling. Roll the bottom edge of the dough over the top, sealing the two pieces tightly. Prick top of dough with a fork a few times to let the steam escape.

12. Bake 10 minutes. Reduce heat to 400 degrees, and bake another 20-25 minutes.

13. Meanwhile, heat crushed tomatoes in a saucepan. Add seasonings and let simmer while pizza is baking. (You can add this to the pizza the last 10 minutes of baking, or pour over the top before serving.)

14. Let pizza cool about 10 minutes before serving. (I didn’t do this, but the filling needs to sit a bit.)

15. Serve with sauce and parmesan cheese.

Sunday, November 30, 2008

Hand-Tossed Pizza

My favorite Thanksgiving leftovers:

We’ve tackled those first four already, and after several days of sammiches, I needed to switch gears tonight and try some pizza. Now that I think I’ve created the perfect grilled pizza crust, I’m on a quest to perfect my indoor pizza versions, whether thin-crust, deep-dish, or hand-tossed.

This is a good, sturdy, hand-tossed pizza crust. It's a bit breadier and less chewy, so it can hold a lot of toppings. (I think this would be fabulous with a seasoned hamburger topping or for a taco pizza.) I also threw together some homemade sauce that went really well with the pepperoni, but might be a bit too strong to stand up to milder toppings.

And, of course, I tested this recipe with ham and pepperoni. Although I love most kinds of pizza toppings, this combo is my favorite. If it doesn't taste good with ham and pepperoni, it just won't do.

The dough recipe makes enough for about two 14” pizzas, and the sauce recipe is enough for at least 2 or 3 pizzas. You can bake the pizza on a regular pizza pan, but you might want to lower the oven temp and prebake the crust a bit to ensure that it cooks through before your toppings are annihilated by the heat.

Hand-Tossed Pizza
Makes 2 14”pizzas

Dough
1 pkg. active dry yeast
1 tsp. sugar
1 c. lukewarm water
¼ c. olive oil
2 tsp. salt
3 c. flour

Sauce
6 oz. tomato paste
8 oz. tomato sauce
¼-½ c. water (depending on your preferred thickness)
2 tsp. Worcestershire sauce
½ Tbsp. dried parsley
¾ Tbsp. Italian seasoning
1 tsp. garlic powder
½ tsp. sugar
½ tsp. dried basil
¾ tsp. dried oregano
½ tsp. pizza seasoning
½ tsp. salt
1/8 tsp. pepper

Preferred toppings (chopped ham and pepperoni, in my case)
Cheese (I used about ¾ c. of a pizza blend and ¼ c. of mozzarella)

1. Preheat a pizza stone in your oven at 500 degrees.

2. In a stand mixer bowl with the dough hook attached, combine yeast, sugar, and warm water. Let sit about 10 minutes. Add olive oil and salt. Turn mixer on low and slowly add flour. Turn mixer to medium and knead dough about 3-5 minutes, or until thoroughly combined and dough is starting to come up around the edges of the bowl. Remove dough and knead by hand a few times. Form a ball and place in a greased bowl. Cover and let rise about an hour, or until dough is doubled in size.

3. Remove dough from bowl and divide in half. Form into two balls and return to bowl. Cover and let rest about 10 minutes.

4. Meanwhile, combine sauce ingredients in a small bowl.

5. Using a rolling pin or your hands (or both), spread dough into a 14” circle. Top with desired amount of sauce, toppings, and cheese.

6. Transfer pizza to stone and bake about 10-12 minutes, or until crust is cooked through.


Saturday, November 15, 2008

Pizza

The hubby and I were ranch-sitting for my mother-in-law this weekend, and when we’re at the homestead, we tend to make the more traditional recipes that we grew up with. This recipe has been in the hubby’s family for years and years; my mother-in-law received the recipe when she was younger, so it was a staple in their household, and is now a staple in ours.

The hubby first made this for me when we had just started dating, and it wasn’t at all what I expected when he said he was making pizza. (Although who isn’t impressed by a man who can make his own pizza dough? Huh? Huh?) It’s a thicker, bready crust with a mild tomato sauce, topped with hamburger and Colby cheese. This is also a great meal for kids. There’s nothing scary about it, it’s not too spicy, and seriously, what kid doesn’t like hamburger and cheese?

I have to admit that I was surprised to see the hubby put raw hamburger on this pizza when he first made it. I was worried that it wouldn’t cook through. But because the crust is thicker and takes a while to cook, the hamburger cooks through completely. I would recommend a leaner hamburger (we prefer 93% lean) to keep the top of the pizza from getting too greasy.

Longhorn Colby is the best option for this pizza, but regular Colby will do, too. We never buy preshredded Colby, because my only job is to shred the cheese while the hubby does everything else. (He says I’m great at cutting the cheese. I have NO idea what he’s talking about.)

Pizza
Serves 4

Crust:
3 Tbsp. sugar
1 c. warm water
2 packets quick-rise yeast
½ tsp. salt
4 Tbsp. shortening
3–3½ c. flour

1 8-oz. can tomato sauce
1 can condensed tomato soup
Onion salt
Garlic salt
Dried oregano
Dried parsley
1 lb. lean hamburger
16 oz. (4 c.) Colby cheese

1. Preheat oven to 375 degrees.

2. Combine sugar and water. Add yeast and let sit 3 minutes. Add salt and shortening, and stir. Gradually add flour and knead it into the dough.


3. Cover and let rise at least an hour, or until dough has doubled.

This is how you know it’s done. There’s a thumbs-up next to it.

4. Grease an 11½” x 17” pan and spread dough out. (You might not need all the dough to cover the entire pan.)

5. Combine tomato sauce and condensed soup. Spread sauce onto crust. (Again, you might not need it all.) Sprinkle liberally with onion salt, garlic salt, oregano, and parsley.

6. Spread hamburger in a thin layer over the salt. (Keeping the layer flat will help it cook and brown more evenly.)

7. Top with cheese. You must use all the cheese. It's a rule.

Oh, and try to get the cheese as close to the edge as possible. That way it bubbles over the edge of the pan, falls onto the bottom of the oven, and smokes up the entire house. The hubby LOVES it when I do this.

8. Bake about 20-25 minutes, or until crust is baked and hamburger is cooked through. (You can lift the crust with a spatula to see if it’s sufficiently brown on the bottom.)

Sunday, September 7, 2008

Grilled Pizza with Ham and Pepperoni

You know how sometimes when you’re sick and you kind of lose your appetite, and then you start to get better and you realize that you’re REALLY hungry, but only for one specific food? (Or maybe that only happens to me?) Anyway, today I was hungry for grilled pizza, and nothing else would do.

Earlier this year, I decided that my goal for the summer was to make world’s best grilled flatbread pizza. (Yes, I really reach for those stars.) This posed two main challenges for me: I’d never grilled pizza, and I’m terrible with doughs.

The latter took quite a bit of trial and error, and many packages of active dry yeast. Try as I might, I couldn’t get the little yeasty dudes to do their little yeasty thing. Apparently the water temperature really is important; you need the water warm enough to activate the yeast, but not so hot that you kill the poor suckers where they sit. Kudos to my super-smart, dough-proficient hubby for showing me the perfect temp. I now use water that’s about the temperature of a baby’s bathwater, rather than a steaming hot tub. I also discovered that I lack the patience (and strong forearms) to knead dough for long periods of time. So I highly recommend a stand mixer with a dough hook.

The grilling was much easier than I expected. You can actually put the dough directly on the grill grate without dire consequences. (I had visions of the dough somehow adhering to the grill, and I’d spend the rest of my summer scraping off the charred remains.) Just be sure to brush both sides with a light coating of olive oil, and all will be well.

As far as toppings go, the world is your oyster. When I crave grilled pizza, I crave this version – a very basic mix of ham and pepperoni, with a few different cheeses, and some fresh basil.

Grilled Pizza with Ham and Pepperoni
Makes 3-4 small pizzas

1 pkg. active dry yeast
1 tsp. sugar
1 c. warm water
1 Tbsp. kosher salt
2 Tbsp. olive oil
3 c. flour
Olive oil, for coating bowl and brushing dough
Italian seasoning, for sprinkling on dough
Pizza sauce (homemade, or your favorite storebought brand)
Diced ham
Diced pepperoni
Fresh mozzarella cheese, thinly sliced
Shredded mozzarella cheese
Shredded white cheddar cheese
Fresh basil, finely chopped

1. Put yeast and sugar in stand mixer bowl. Add warm water and let sit 15 minutes. Add salt and olive oil. Start mixer on low with dough hook attached, and gradually add flour. Turn mixer to medium for 5 minutes. Check dough. If it’s still a bit too sticky, add a tablespoon or two of flour and mix thoroughly.

2. Remove dough from mixer bowl and knead by hand a few times. Form a ball and place in a bowl coated with olive oil. Cover bowl with a dishtowel and put in a warm, draft-free place. Let rise 1 hour.

3. Remove dough from bowl and cut in three or four pieces, depending on whether you like thicker or thinner crust. Form each piece into a ball. Return to bowl, cover, and let sit 15 minutes.

4. Remove a piece of dough, leaving the others covered. Roll out to desired shape and thickness. (I prefer mine very thin, and because of the width of my grill grates, an oblong shape works best.) Place dough on a sheet of waxed paper brushed with olive oil. Brush olive oil on top side and sprinkle with Italian seasoning. Repeat with other pieces of dough.

5. Heat grill on medium-low and place dough directly on grill grate. Grill until dough starts to puff, then flip.

6. Add sauce and toppings to cooked side of dough.

7. Grill until crust is baked and cheese is melted, moving to indirect heat if necessary. (I move mine to the upper grate after a few minutes so the toppings can heat through without the crust burning.)