Thursday, August 18, 2011

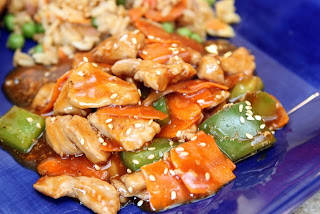
Saucy Pork Stir-Fry

I'm always on the lookout for yummy stir-fries that I can make at home, and that taste even remotely close to the restaurant stir-fries that I crave. However, I'd also like them to be lower in fat than restaurant dishes, and not be loaded with sodium.

This is a pretty sauce dish, but the sauce is packed with flavor, so that's OK by me. The sauce has just a bit of sweetness and spice, and the tomato paste gives it an extra depth of flavor and a sort of heaviness (in a good way) that some stir-fry sauces lack.

This sauce recipe is based on a Cuisine at Home recipe, but I made several changes and substitutions and math errors, so I really have no idea what the original recipe was supposed to be like.

And did I mention the dish is saucy? If I'd had twice as many vegetables on hand, I would have added them, and there would have been plenty of sauce. So that's what I'm going to suggest for the recipe, and next time, I'll throw in a bunch of broccoli or something. There's plenty of sauce to soak up, so you might as well load the dish up with as many veggies as you can!

Saucy Pork Stir-Fry
Serves 4-5

16 oz. pork loin, cut in thin strips
6 Tbsp. lite soy sauce, divided
1 c. low-sodium chicken broth
1/2 c. dry sherry
2 Tbsp. cornstarch
2 Tbsp. honey
2 Tbsp. tomato paste
2 tsp. minced garlic
1 tsp. minced fresh ginger
Pinch of freshly ground black pepper
Pinch or two of cayenne pepper
2 tsp. canola oil, divided
2 Tbsp. minced garlic
1 Tbsp. minced fresh ginger
4 c. fresh vegetables, chopped (bell peppers, carrots, broccoli, mushrooms, etc.)

1. Combine pork and 2 Tbsp. soy sauce in a dish. Cover and refrigerate while preparing the sauce.

2. Stir together 4 Tbsp. soy sauce, broth, sherry, cornstarch, honey, tomato paste, 2 tsp. garlic, 1 tsp. ginger, pepper, and cayenne for the sauce. Set aside.

3. Preheat a wok over medium-high heat. Add 1 tsp. oil.

4. Stir-fry pork until it's cooked through, about 4-5 minutes.

5. Remove pork from wok and set aside.

6. Add remaining 1 tsp. oil to wok. Add 2 Tbsp. garlic and 1 Tbsp. ginger and stir-fry about 30 seconds. Add veggies.

7. Return pork to wok and add sauce. Cook until sauce thickens, about 2-3 minutes.

Tuesday, August 16, 2011

Easy and Light Fried Rice

I really like fried rice, but I still tend to use it as a base for stir-fries rather than eating it on its own. So I like my fried rice to have a pretty mild flavor.

I've tried making fried rice several times at home, and while it looks so simple, it's been troublesome for me. I tend to to overdo it with the soy sauce, and my rice tends to get really, really salty.

This recipe had about the perfect ratio of rice to soy sauce to suit my tastes (and the lite soy sauce certainly helped), and is incredibly easy to make. And while I went pretty basic, you can certainly add any veggies that you like -- mushrooms, bell peppers, broccoli, etc. But if you add more veggies, you might want to serve the fried rice with some extra soy sauce on the side, just in case your spreading your flavor too thin.

Easy and Light Fried Rice
Serves 4

1/2 c. shredded carrot
1/2 c. finely chopped onion
1/2 tsp. minced fresh ginger
1 clove garlic, minced
4 c. cold cooked brown rice
3-4 Tbsp. lite soy sauce
2 eggs, beaten
1/8 tsp. pepper
1/3 c. frozen peas

1. Spray large wok or nonstick skillet with cooking spray. Heat over medium-high heat until hot. Add carrot, onion, ginger, and garlic. Cook and stir about 1-2 minutes.

2. Stir in rice and soy sauce. Cook over low haet 4-5 minutes, stirring occasionally.

3. Move rice mixture to one side of skillet. Add eggs and pepper to the other side. (I added an extra quick shot of cooking spray to the side of the skillet before adding the eggs.)

4. Cook over medium-low heat 3-4 minutes, stirring occasionally, until eggs are cooked. Add peas to rice and egg mixture and stir thoroughly to combine.

5. Heat through, and serve with extra soy sauce, if needed.


Saturday, August 13, 2011

Double-Chocolate Zucchini Bread

I got an unexpected delivery of zucchini from my mother-in-law the other day, and I was caught totally off-guard. Is it that time of year already? Not wanting this precious produce to go to waste, I tried something that I've never made before: zucchini bread.

I'll be the first to admit that I'm not a fan of zucchini bread. Or banana bread. Or anything of that ilk. I don't know if it's the texture or the spices used with them, but they've just never really been my thing.

But if you add chocolate, well, that's a completely different story.

This zucchini bread, based on a Food Network Kitchens recipe, is studded with dark chocolate chips, and also has some cocoa in the batter. The cocoa isn't overwhelming ... it still has a bit of zucchini-bread flavor, but actually has a taste and texture that's more like cake than bread.

And did I mention the chocolate chips?

This bread is tasty on its own, but would be incredible topped with some whipped cream. Or cream cheese. And maybe some more chocolate chips. I deserve a reward. I hit the treadmill today. For 10 whole minutes, too.

Double-Chocolate Zucchini Bread
Makes 2 loaves

2 1/2 c. flour
1/4 c. unsweetened cocoa
1 tsp. baking soda
1/2 tsp. ground cinnamon
1 c. butter, softened
1 1/2 c. sugar
1/4 c. vegetable oil
2 eggs, at room temperature
1 tsp. vanilla extract
1/2 c. buttermilk, at room temperature
2 c. shredded, unpeeled zucchini (8 oz.)
6 oz. dark chocolate chips

1. Preheat oven to 350 degrees. Grease and flour two 9"x5" loaf pans.

2. Whisk the flour, cocoa, baking soda, and cinnamon in a medium bowl.

3. Using a mixer, beat the butter and sugar on medium-high spped until light and fluffy, about 4 minutes.

4. While mixing, drizzle in the oil and beat until incorporated. Beat in the eggs, one at a time, mixing well after each addition.

5. Add the vanilla to the buttermilk.

6. Slowly mix 1/3 of the flour mixture into the butter mixture, and then 1/2 the buttermilk mixture. Mix in another 1/3 of the flour mixture, the remaining buttermilk, and then the last of the flour mixture.

7. Fold zucchini and chocolate chips into the batter.

8. Divide the batter between the two pans.

9. Bake until a toothpick in the center of the bread comes out clean, about 45 minutes for a glass pan and 55 minutes for a metal pan. (I tried one of each.)

10. Cool in pans on rack before removing loaves from pans.


Thursday, August 11, 2011

Open-Faced Italian Chicken Sandwiches

This super-quick, super-cheap, super-yummy dish shouldn't really count as a recipe, because it's so simple. And yet, it totally hits the spot. I saw the idea in a Betty Crocker cookbook, using turkey legs instead of chicken breasts, but I'm a white-meat kind of gal.

This chicken would make a great panini sandwich filling, as well. I think the key is garlic bread or Texas toast -- the garlicky flavor totally compliments the tomato sauce on the chicken.

And did I mention that you don't even have to thaw the chicken first? I throw my chicken breasts in straight from the freezer. The chicken is supposed to cook for eight hours, but who's gone for work for exactly eight hours? I figure that using frozen chicken helps keep it from overcooking while I'm gone. It's not that I'm lazy. Really.

Open-Faced Italian Chicken Sandwiches
Serves 4-6

2 whole boneless, skinless chicken breasts
1 6-oz. can Italian-style tomato paste
2 8-oz. cans Italian-style tomato sauce
½ c. water (more if needed)
½ tsp. dried Italian seasoning
Salt and pepper to taste
8 slices Texas toast, cooked according to package directions
2 c. shredded mozzarella cheese


1. Combine chicken, tomato paste, tomato sauce, water, and Italian seasoning in slow cooker. Cook on low 8 hours.

2. Remove chicken from slow cooker and shred meat with two forks. Return to slow cooker and season with salt and pepper. You can also add more water to keep the chicken saucy. (I like a saucy chicken.)

3. Serve chicken on hot Texas toast and top with cheese.

Tuesday, August 9, 2011

Quick Taco Casserole

Since the move, I've been commuting to work instead of the hubby. Luckily, my company is very flexible about my working from home a few days a week, which I love. I feel like I have the perfect combination of social interaction and alone time so I can focus, and our little family also gets a few more hours of together time on the days when I work from home.

The days when I commute can get a little hectic, though, because I return home right about the time when the little man is starting to demand his supper. (And let's be honest, I'm ready to demand mine, too.)

Meals like this are perfect for those evenings, because I can assemble this dish quickly the night before, and the hubby can just pop it in the oven when he gets home from work.

This isn't fancy cuisine, by any means, but as the hubby says, "It tastes good and it's warm." And the little man gobbled his right up.

Quick Taco Casserole
Serves 6-8

1 lb. ground beef
1 small onion, chopped
1 c. (8 oz.) taco sauce
3/4 c. water
1 4-oz. can diced green chiles (optional)
1 pkg. taco seasoning
12 white or yellow taco shells, or about 6 oz. tortilla chips, divided
2 c. shredded cheddar or Colby-Jack cheese, divided
Shredded lettuce, diced tomatoes, sliced olives, and other assorted toppings


1. Preheat oven to 375 degrees. Grease an 11x7-inch pan, or spray with cooking spray.

2. Cook ground beef and onion over medium-high heat until browned. Stir in taco sauce, water, green chiles, and taco seasoning. Cook over medium-low heat for 3-4 minutes.

3. Layer half the broken taco shells or chips on bottom of baking dish.

I'm not quite certain why I felt this photo was important.

4. Cover with half the meat mixture and half the cheese.

5. Repeating with remaining taco shells, meat mixture, and cheese.

6. Bake, uncovered, for 20-25 minutes, or until hot and bubbly.

7. Let cool slightly before serving, and serve with toppings.

Saturday, August 6, 2011

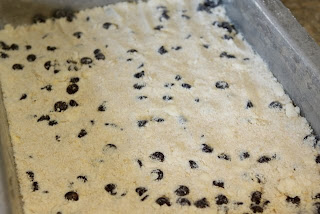
Dark Chocolate Chip Toffee Bars

The hubby and I recently had our families over for a house-lukewarming party. (We're not quite ready for an official house-warming just yet.) I was just going to skate by on dessert and doctor up some brownies from a mix, but ha, I didn't have any.

Did I mention that it was just a few hours before everyone was supposed to show up?

With limited time and ingredients, I flipped through a few cookbooks and discovered a version of these in a Hershey's cookbook. I made several adjustments, though, and wowza, were these suckers good. The crust is like a shortbread, and the addition of salt with the toffee makes the bars sweet, but not overwhelmingly so. And I love the dark chocolate with these. (I, like the rest of the civilized world, have been obsessed with the combination of dark chocolate and sea salt.)

I'm happy to report that these bars have already earned a permanent spot in the recipe rotation.

Dark Chocolate Chip Toffee Bars
Serves 16-20

2 1/3 c. flour
2/3 c. brown sugar
3/4 c. (1 1/2 sticks) butter
1 egg, slightly beaten
1/2 tsp. salt
2 c. Hershey's Special Dark chocolate chips, divided
1 14-oz. can sweetened condensed milk
1 3/4 c. (10 oz.) toffee bits, divided
1/4 tsp. fine sea salt

1. Heat oven to 350 degrees. Grease a 9x13 pan or spray it with cooking spray.

2. Combine flour and brown sugar in large bowl. Cut in butter with pastry blender until mixture resembles coarse crumbs.

3. Add egg and 1/2 tsp. salt; mix well. The mixture will be very, very crumbly, but it will come together. Stir in 1 1/2 c. chocolate chips.

4. Reserve 1 1/2 c. mixture. Press remaining mixture in bottom of pan.

5. Bake 10 minutes. Remove from oven and pour sweetened condensed milk evenly over crust.

6. Top with 1 1/2 c. toffee bits and sprinkle with fine sea salt.

7. Sprinkle reserved crumb mixture and remaining 1/2 c. chocolate chips over top.

8. Bake 25-30 minutes, or untili golden. Sprinkle with remaining 1/4 c. toffee bits.

9. Cool completely before cutting into bars and serving.

Thursday, August 4, 2011

The Chili I've Been Dreaming Of

It’s official; I’m a delinquent blogger.

Moving, kitchen packed up, blah, blah, blah. Had to unpack, couldn’t find the camera, yadda, yadda, yadda.

What it boils down to is that I’ve been neglecting my blog. But that’s done with, I assure you. We’ve only been the house for a few weeks, so we’re not exactly unpacked yet. (We might never be unpacked.) But the kitchen is fairly put together. I’m still missing various pots and pans and a half-dozen or so small appliances, but I can get by. I’ve actually cooked more in the past few weeks than the past several months, combined. (And we’ve probably had more dinner guests than in the past few years, combined.)

I really like my new kitchen. It’s very spacious and has a ton of counter space and double ovens.* And it’s YELLOW.**

Anyway, the chili. I’ve been on a quest for my perfect chili for quite some time now, because I like a thicker, meatier, more cumin-y chili that has lots of flavor but not a ton of heat. But everything I tried was too something. Too salty. Too thick. Too thin. Too chili powderish.

And then, I tried this. This is a recipe from Slow Cooker: The Best Cookbook Ever by Diane Phillips, and it’s perfect. And you can’t mess it up. I’ve followed the recipe to the letter. I’ve halved it. I’ve cooked it on the stovetop. I’ve forgotten to toast the spices. I’ve added beans. I’ve forgotten half the tomato sauce. And it always tastes amazing.

You can serve this chili with your choice of toppings. The little man likes his topped with plenty o’ black beans. I like mine with cheese. My brother likes cheese and jalapenos. We all like to use tortilla chips in place of a spoon.

You must try this chili.

*One oven is about the same as age me.
**Yes, the yellow paint was my decision. It’s a happy kitchen.

The Chili I've Been Dreaming Of (a.k.a. Ryan's Chili)
Serves 6-8

2 Tbsp. oil
2 lbs. 85% lean ground beef
2 tsp. ancho chile powder
1 tsp. dried oregano
1/2 tsp. ground cumin
Salt
Pinch of cayenne pepper
2 tsp. cornmeal
2 c. beef broth
4 c. tomato sauce
Salt and freshly ground black pepper
Tortilla chips, shredded cheddar cheese, beans, jalapenos, etc. for topping


1. Heat oil in large skillet over medium-high heat. Add ground beef and crumble, and cook until brown. Transfer meat to slow cooker.

2. Add chile powder, oregano, cumin, 2 tsp. salt, and cayenne to the skillet and cook until spices are fragrant, about 45 seconds. Add cornmeal and stir until mixture thickens. Add broth and whisk until smooth. Transfer to slow cooker and stir in tomato sauce.

3. Cover and cook on low 6-7 hours, or until chili is thickened. Season to taste with salt and pepper. Serve with toppings.