Showing posts with label vegetarian. Show all posts

Wednesday, December 19, 2012

Roasted Autumn Vegetables

I'm back! Or at least, I hope to be. The short delay I'd intended with my blogging turned into more of an indefinite leave of absence as the hubby and I have been adjusting to our new schedules. As I mentioned many, many moons ago, we bought our local newspaper and now find ourselves working nearly four full-time jobs between the two of us. A few things had to give in the schedule, like blogging. And cleaning.

But not cooking. In fact, I find myself cooking as much now as I ever have. A big part of that is because I write a weekly food column in the paper, so I'm constantly testing new recipes, or remaking favorites with new, newspaper-friendly photos.

But I do miss blogging, and I'm hoping to get back to it, although maybe not as often as I did before. And probably with fewer step-by-step photos. And I promised my fellow publishers that I'd put any new recipes in print, first -- although I'm not sure if my column is that hot a commodity!

I'll start by attempting to backfill some of the recipes I've worked on the past several months, so some of them might seem a bit out of order or out of season. And then once I catch up, hopefully things will get back to normal!

I'll start with Roasted Autumn Vegetables, which might not sound terribly exciting, but is a healthy and tasty side dish that's especially great around the holiday season. This dish is simple and colorful, and pretty hand-off.


Notes:
  • Swap in other root vegetables or change the quanitites according to your preferences.
  • If you double the recipe, put the vegetables on two pans and rotate them halfway through the cooking process.
  • Leftovers taste great in soup. Saute some shallot (or a little onion and garlic), add broth, and then add leftover vegetables and cooked tortellini. Season to taste with salt, pepper, and crushed red pepper flakes.
Roasted Autumn Vegetables
Makes 6 servings
  • 1/2 pound baby carrots, halved
  • 1 medium red onion, cut in 16 wedges and separated
  • 1 small butternut squash, peeled, seeded and cut in 1-inch chunks
  • 1 large sweet potato or yam, peeled and cut in 1-inch chunks
  • 2 medium Yukon gold potatoes, scrubbed and cut in 1-inch pieces
  • 1 clove garlic, minced
  • 2 tablespoons olive oil
  • 1 teaspoon dried (rubbed) sage
  • 1 teaspoon dried rosemary, crushed
  • 1/2 teaspoon salt
  • 1/4 teaspoon pepper
  1. Preheat oven to 425 degrees F. Spray large jelly roll pan with nonstick cooking spray.
  2. Place vegetables in pan. Pour oil over vegetables. Sprinkle with seasonings and stir to coat.
  3. Bake 35-45 minutes, or until vegetables are tender.

Thursday, January 12, 2012

Roasted Cauliflower

This very simple, healthy, not-even-a-recipe recipe is something I made to entice my mother to have supper with us recently.

Yes, I have to shamelessly bribe her with vegetables.

I'm not a huge fan of steamed cauliflower, but when roasted, it takes on a much sweeter and more complex flavor. Needless to say, Mom loved this. I got to try a few bites, and we loaded some on the little man's plate. But the rest of the cauliflower went to Mom.

And when the little man (who eats in sprints) took a quick break from eating and left the room, the cauliflower mysteriously disappeared from his plate before he returned. Hmm ...

Roasted Cauliflower
Serves 2-3, or my mom

1 head cauliflower, cut in florets
2 tablespoons olive oil
3 cloves garlic, minced or pressed
Salt and pepper

1. Preheat oven to 400 degrees F.

2. Toss cauliflower with olive oil and garlic, and place in a baking dish. Sprinkle with salt and pepper.

3. Cover and bake 15 minutes.

4. Remove cover, increase oven temperature to 425 degrees F, and bake another 10-15 minutes until cauliflower starts to crisp up.

Friday, December 30, 2011

Cheesy Olive Bread

Belated happy holidays, from Angel in the Kitchen, the hubby, and the little man!

I hope you can tell who's who in this pic.

We've been busy, to say the least. But we had a wonderful Christmas, and it was so much fun now that Jack is getting old enough to understand more. Jack loves Santa. Jack loves carols. Jack loves Christmas cookies. And Jack loves opening presents.

We're all in withdrawal now.

But back to the food! I'm always on the lookout for easy bread recipes to go with soups and such, and I've been eying this Taste of Home recipe for the hubby. He loves mayo-based cheese breads, and this one looked especially ooey and gooey.

I don't care for mayo, and the spread was a bit too strong for me from that standpoint. But the hubby is a mayo fan, and he really enjoyed it.

Note that this makes a ton of bread, and it's pretty rich. And this is only half the recipe. I did leave off the onions and mushrooms, as per the hubby's wishes, but if I were a mayo and cheese spread kind of person, I think I'd prefer them on.

Cheesy Olive Bread
Serves 8-12

2 cups shredded mozzarella cheese
1/2 cup butter, softened
1/2 cup mayonnaise
4 scallions, thinly sliced
4 ounces canned mushrooms, drained and chopped
1 4.5-ounce can chopped olives
1/2 loaf (1/2 pound) unsliced French bread, halved lengthwise

1. Preheat oven to 350 degrees F. Line a baking sheet with foil.

2. Combine cheese, butter, mayonnaise, scallions, mushrooms, and olives in a medium bowl. Spread on bread.

I actually had help with this part. Meet Kitty.

Kitty keeps Jack company while he's sleeping. Jack also sleeps with a second kitty, aptly named Other Kitty. Other Kitty did not join us in the kitchen this evening.

3. Bake 15-20 minutes, or until cheese is melted. (Pop it under the broiler if it needs some help.)

4. Cut into slices to serve.

Saturday, December 3, 2011

Spinach, Artichoke, and Roasted Red Pepper Dip

The hubster and I were lucky enough to host a Thanksgiving potluck this year, which I love doing. We invite both sides of our immediate family, so we're the lucky ones who get to spend the holiday with all our favorite people. And we get the best of all food worlds. My dad's hamkey gravy. My mother-in-law's stuffing and pie. My sisters'-in-law cookie salad and sweet potatoes.

The hubby signed us up for mashed potatoes and corn. I said, "Wow, fun. Thanks." So he told me to make an appetizer, too.

This is my take on a Paula Deen recipe, the photos of which I've been drooling over for months. Plus, you can make this ahead of time and bake it right before your guests arrive, so it's a great recipe for entertaining.

I like regular spinach and artichoke dip, but this recipe has a little more zing and character because of the roasted red peppers and a little spice. My little brother really, really liked this one, and said it tasted like something you'd order in a restaurant.

That actually wasn't quite true. We ordered spinach and artichoke dip in a restaurant a few days later, and when I asked if it was as good as mine, both my brother and the hubby responded with a resounding, "No!" My brother said, "This is something nice and warm to dip the chips in. But yours actually had flavor." So there you go.

Spinach, Artichoke, and Roasted Red Pepper Dip
Makes about 1 1/2 cups

1 tablespoon butter
1/2 cup chopped onion
2 cloves garlic, minced
1 6-ounce jar marinated artichoke hearts, drained and roughly chopped
1/4 cup chopped roasted red peppers
5 ounces baby spinach
1/4 cup half and half
3 ounces cream cheese, cubed and softened
1/4 cup sour cream
Dash of freshly grated nutmeg
1/4 cup shredded pepper jack cheese
1/2 teaspoon salt
1/4 teaspoon cayenne pepper
1/4 cup shredded Italian cheese blend
Toasted baguette, pita crisps, or crackers, for serving

1. Preheat oven to 425 degrees F. Spray a 2-cup ovenproof dish with cooking spray.

2. In a medium saucepan, heat butter over medium heat. Add onion and garlic, and cook until tender, about 7-10 minutes.

3. Add artichoke hearts and roasted red peppers. Cook about 2 minutes.

4. Add half the spinach, and cook until it wilts slightly, about 1-2 minutes.

5. Add remaining spinach. Cook until spinach is completely wilted, about 4-6 minutes.

6. Transfer mixture to a strainer and press lightly to release any excess liquid. Set aside.

7. In the same saucepan, heat the half and half over medium heat. Stir in cream cheese, sour cream, and nutmeg. Cook until cream cheese is melted and mixture is smooth.

8. Add spinach mixture, pepper jack cheese, salt, and cayenne, stirring to combine. Pour mixture into baking dish.

At this point, if you're making the dip ahead of time, slightly cool the mixture, cover it, and refrigerate it for up to 24 hours. Let the mixture come to room temperature before moving on to the next step.

9. Sprinkle the dip with the Italian cheese.

10. Bake 20-25 minutes, or until bubbly. Serve with baguettes, pita crisps, or crackers.

And then go get a manicure. Quickly. Go!

(I'm happy to report that my nails are now a lovely shade of Gettin' Miss Piggy With It red.)

Tuesday, October 25, 2011

Sally's Oriental Coleslaw

Asian salads are among my favorites because they typically have all these fun, crispy, crunchy, salty goodies, and dressings that are tasty but not all heavy and creamy. And my friend Sally's Oriental coleslaw is one of the best that I've tasted.

Fun, crispy, crunchy, salty goodies: Check. Dressing that is tasty but not heavy and creamy: Check.

Plus, it's pretty. (Just like Sally.)

This makes a big batch, so it's perfect for potlucks. You can pack the ingredients separately and toss together right before serving.

Sally's Oriental Coleslaw
Makes 10-12 servings

Salad
1 package beef-flavored ramen noodles, seasoning packet reserved for dressing
1 1-pound bag of coleslaw mix
1 cup slivered almonds
1 cup sunflower seeds
3 scallions, sliced

Dressing
Seasoning packet from ramen noodles
1/3 cup vinegar (I used white wine vinegar)
1/2 cup oil, such as vegetable oil
1/2 cup sugar
1 teaspoon toasted sesame oil (optional)

1. Preheat oven to 350 degrees F.

2. Crumble ramen noodles onto a baking sheet. Toast in oven until golden, about 7-10 minutes.

Just for kicks, I threw in the almonds, too. Because I love me a toasted almond.

3. Combine coleslaw mix, almonds, sunflower seeds, and scallions in a large bowl.

4. In a small jar, combine seasoning packet, vinegar, oil, sugar, and dark sesame oil. Shake until well combined.

5. Just before serving, toss the salad with the dressing and the ramen noodles.

Thursday, October 6, 2011

Spicy Garlic Dipping Oil

I've recently declared my newfound love for take 'n' bake bread, which isn't perfect, but has become a lifesaver in a town devoid of a bakery. Or even a grocery store with a real bread section. But what to do with all that tasty, fresh-baked goodness? Just what you'd do in a restaurant -- dip it in some equally tasty dipping oil.

You can buy ready-made dipping oil, but it's so easy to make at home, and you can add whatever you want. I like this combination, which is garlicky and slightly spicy.

Spicy Garlic Dipping Oil
Serves 4-6

1/2 cup extra-virgin olive oil
4 cloves garlic, smashed
3/4 teaspoon crushed red pepper flakes
1/2 teaspooon dried oregano
1/4 teaspoon freshly ground black pepper
Crusty bread, for dipping


1. In a small pan or skillet, heat oil, garlic, red pepper flakes, oregano, and pepper over medium heat, until bubbly and fragrant.

2. Remove from heat and cool.

3. Remove garlic, and then spoon into serving dishes and serve with warm bread.

Sunday, September 25, 2011

Crispy Roasted Chickpeas

Roasted chickpeas have become quite the fad in the past several months, and I've seem them with all manner of seasonings. They always look fantastic, but I've had little luck with the recipe.

But I kept trying, because I figured I had to be doing something wrong. On this fateful attempt, whilst transferring my chickpeas to dry, I noticed the skin peeling off some of the chickpeas.

Chickpeas have skin?

I know! I was surprised, too. I'm usually just dumping them into a pot of soup, so I don't handle them much. But as I peeled away the skin, out popped what appeared to be a shiny, new chickpea -- with a harder, nuttier texture.

And hurray, crispy roasted chickpeas!

You can use any seasoning blend that you prefer on these. I opted for a milder mixture this time around, but I think I'll go with something zestier next time, like a Cajun or Creole blend.

Crispy Roasted Chickpeas
Makes about 1 cup

Chickpeas
1 15-ounce can chickpeas (garbanzo beans)
2 tablespoons extra-virgin olive oil
Seasoning blend, to taste
Kosher salt, for sprinkling (I used a smoked chipotle salt)

Seasoning blend
1 teaspoon smoked sweet paprika
1/8 teaspoon ground cumin
1/8 teaspoon ground cinnamon
1/8 teaspoon cayenne pepper

1. Preheat oven to 400 degrees F. Combine seasoning blend ingredients.

2. Rinse and drain chickpeas.

You're welcome for this helpful photo of how to drain chickpeas. I'm practicing with all these new lenses that the hubby keeps putting on the camera.

3. Remove skins from chickpeas, if you have the time and inclination. For most, you simply have to sort of squeeze the chickpea, and it pops right out of its skin.

The skins creep me out, in a haunted-house-"guess-what's-in-the-bowl"-game sort of way.

4. Lay the chickpeas on a few paper towels, and blot them with another paper towel to dry. It was such a nice, bright, sunny day in my kitchen that does not yet have blinds put on the windows, so I let my chickpeas soak up some rays to dry.

5. Place the chickpeas on a baking sheet and drizzle with olive oil. Toss with your hands to ensure the oil is evenly distributed.

6. Roast for 30-40 minutes, stirring once, until chickpeas are brown and crispy.

7. Sprinkle immediately with seasoning blend and salt. Then serve 'em up!

These are addictive, so it shouldn't be any problem to eat them in one sitting. If you have extras, store tightly covered. But they don't seem to keep well for more than a couple of days.

Sunday, September 4, 2011

Grandma's Soup

I apologize for the lag in postings. I had a half-dozen or so recipes ready to post, but then ... well, it's a long story.

On an unrelated note, if anyone happens to find an SD card that includes not only pics of delicious-looking food, but also my family's vacation photos from Florida, please contact the hubby.

My mom stopped by the other day, bearing gifts. (Even though we live only two blocks away now, and we see my mother almost every day, she still prefers to bring gifts when she visits. I'm sure the novelty of our close proxemity will wear off soon.) This time, her gift was a Taste of Home cooking magazine ... with a request. "Can you make me some soup like this?"

The next morning, the little man and I hightailed it up to our local grocery store, where the little man informed everyone we saw that we "got Grandma's soup." ("Got" is his catch-all verb.) We had to make a few ingredient substitutions, and then we added in some other stuff that we thought would be good, and then invited Grandma over for lunch to eat her super-healthy, Italian vegetable soup.

Grandma's Soup
Makes 6 servings

2 ribs celery, diced
1 medium onion, chopped
1 medium carrot, chopped
1 small zucchini, chopped
2 cloves garlic, minced
1 Tbsp. olive oil
2 c. water
1 15-oz. can cannellini beans, rinsed and drained
1 14.5-oz. can diced tomatoes, undrained
1 14.5-oz. can chicken broth, plus 1/2 c.
1 tsp. dried basil
1 tsp. dried marjoram
1 tsp. dried oregano
1 tsp. dried thyme
Salt and pepper, to taste
1 c. small pasta (I used mafalda)
4 c. torn baby spinach (I used about 1/2 a package of frozen spinach)


1. In a Dutch oven or soup pot, heat oil over medium heat. Saute celery, onion, carrot, zucchini, and garlic until tender.

2. Stir in the water, beans, tomatoes, broth, and seasonings.

And, of course, taste as you go along. Even the ingredients themselves. Jack lets no bean go untasted.

3. Bring to a boil, and then stir in pasta.

4. Reduce heat; simmer, uncovered, about 13-15 minutes, or until pasta is tender. Add spinach during the last few minutes of cooking.


Tuesday, August 16, 2011

Easy and Light Fried Rice

I really like fried rice, but I still tend to use it as a base for stir-fries rather than eating it on its own. So I like my fried rice to have a pretty mild flavor.

I've tried making fried rice several times at home, and while it looks so simple, it's been troublesome for me. I tend to to overdo it with the soy sauce, and my rice tends to get really, really salty.

This recipe had about the perfect ratio of rice to soy sauce to suit my tastes (and the lite soy sauce certainly helped), and is incredibly easy to make. And while I went pretty basic, you can certainly add any veggies that you like -- mushrooms, bell peppers, broccoli, etc. But if you add more veggies, you might want to serve the fried rice with some extra soy sauce on the side, just in case your spreading your flavor too thin.

Easy and Light Fried Rice
Serves 4

1/2 c. shredded carrot
1/2 c. finely chopped onion
1/2 tsp. minced fresh ginger
1 clove garlic, minced
4 c. cold cooked brown rice
3-4 Tbsp. lite soy sauce
2 eggs, beaten
1/8 tsp. pepper
1/3 c. frozen peas

1. Spray large wok or nonstick skillet with cooking spray. Heat over medium-high heat until hot. Add carrot, onion, ginger, and garlic. Cook and stir about 1-2 minutes.

2. Stir in rice and soy sauce. Cook over low haet 4-5 minutes, stirring occasionally.

3. Move rice mixture to one side of skillet. Add eggs and pepper to the other side. (I added an extra quick shot of cooking spray to the side of the skillet before adding the eggs.)

4. Cook over medium-low heat 3-4 minutes, stirring occasionally, until eggs are cooked. Add peas to rice and egg mixture and stir thoroughly to combine.

5. Heat through, and serve with extra soy sauce, if needed.


Wednesday, April 20, 2011

Guacamole

And I'm back! Although still busy and stressed and scared to mess up my kitchen for fear no one will want to buy our house because it looks like people actually live here.

But back to food. As often happens with me, I was reading a book the other day that inspired a food craving. Nothing strange, just some characters in my book sitting around, eating chips and guacamole. And boy howdy, I had to get me some.

This recipe is a spin on the guacamole served at Bar Abilene in Minneapolis, which I visited with a few friends during a girls' weekend out far too many years ago. (Why haven't we done this again???) The guacamole is all mashed together right at the table, so it's fresh and chunky and yummy. And you have just enough time to perfect it before cinco de mayo!

Guacamole
Serves 4

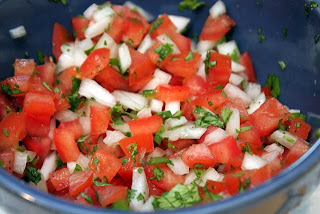
Pico de gallo
5 tomatoes, seeded and diced
¼ white onion, diced
1 serrano chile, minced (I removed the seeds)
2 Tbsp. chopped cilantro
2 Tbsp. freshly squeezed lime juice
¼ tsp. black pepper
½ tsp. kosher salt

Guacamole
3 ripe avocados, flesh removed
6 cloves roasted garlic (drizzled with olive oil, wrapped in foil, and roasted at 350 degrees for 30 minutes)

1/2 c. pico de gallo
1 Tbsp. chopped cilantro
Juice of 1 lime
1 tsp. kosher salt
½ Tbsp. Worcestershire sauce
15 dashes green or chipotle Tabasco


1. Combine all pico de gallo ingredients in a bowl.

2. Mash the avocado and roasted garlic together in a bowl.

3. Mix in 1/2 c. pico de gallo and remaining guacamole ingredients. Serve with chips.

Friday, December 31, 2010

Vanilla and Cinnamon Roasted Almonds

After successfully cloning the hubby's favorite knoephla soup, I've decided to continue my recipe clone attempts. If I never have to leave the house for my favorite foods, I will have successfully attempted my quest to become a hermit.

Or at least I'll never be stuck without my favorites during a blizzard. (There was a 100-vehicle pile-up on the interstate near Fargo yesterday. Really.)

One of my favorite snacks is the cinnamon-roasted almonds that you can buy at state fairs and street fairs and craft fairs and pretty much any kind of fair. They're so yummy, but pretty pricey, and there's no reason we shouldn't be able to eat them anytime we want.

This is a Taste of Home recipe that got rave reviews online, so I decided to try it. Just a disclaimer: This isn't exactly like the cinnamon-roasted almonds at the fair, because the coating isn't as thick or crunchy. They do, however, have a stronger vanilla flavor that comes through when you're not distracted by all that candy coating.

I hope four cups gets me through the weekend.

Vanilla and Cinnamon Roasted Almonds
Makes 16 servings

2 egg whites
6 tsp. vanilla extract
4 c. whole, unblanched almonds
1/3 c. sugar
1/3 c. brown sugar
1 tsp. salt
1/2 tsp. ground cinnamon

1. Preheat oven to 300 degrees and grease two 15" x 10" baking pans. (I just spread parchment paper on the bottoms. I don't like getting messy.)

2. In a large bowl, beat egg whites until frothy. Stir in vanilla extract.

3. Add almonds and stir gently to coat. Combine the sugars, salt, and cinnamon, add to the nut mixture, and stir gently to coat.

4. Spread evenly onto pans. Bake about 30 minutes or until amonds are crisp, stirring once during the baking time.

5. Cool and store in an airtight container.

Saturday, July 24, 2010

Steakhouse Onion Rings

The hubby and I are both huge fans of steak, and we grill that more than anything else throughout the summer months. And some of the winter months, as well. (We don't have much for in-between seasons in North Dakota.)

We're always looking for yummy side dishes, and onion rings are one of my favorite steak accompaniments -- not necessarily the onion rings that I'd eat with a burger or a hot dog (like Dave's), but really crispy onion rings with a fried chicken-like coating. I like to eat the steak and onion in the same bite, so the salty, crunchy taste of the coating adds to the flavor of the steak.

This recipe is based on one from Cuisine at Home, and is super simple to make. Plus, the onion rings are so crispy that they can sit at room temp for a long time before they get soggy. I couldn't help but snack on the leftovers all evening long.

Steakhouse Onion Rings
Serves 4

1 large yellow onion (preferably Vidalia), sliced into rings
2 c. buttermilk
2 c. flour
2 tsp. kosher salt
1 tsp. baking powder
1 tsp. black pepper
1 tsp. paprika
1/2 tsp. cayenne pepper
Vegetable oil, for frying

1. Dip onions rings in buttermilk. In a separate bowl, combine flour and seasonings. Dredge onion rings in the flour mixture, a few at a time.

Cuisine at Home had this genius idea of using a wooden skewer to move the onion rings around between the wet and dry batters, and for dropping them into the hot oil. Worked like a charm!

2. Dip rings into buttermilk a second time.

3. And then back in the flour mixture, we go.

4. Set rings on a rack adn refrigerate them while the oil heats, about 15 minutes.

This sets the batter so it's less likely to pull away from the onion rings when they're dropped in the oil.

5. Heat 1" of oil to 365 degrees in a large pot over medium-high heat. Fry onion rings in batches until light brown, about 2-3 minutes per batch.

6. Drain on paper towels, and season with additional kosher salt while the onion ring are still hot.

Saturday, July 10, 2010

Creamy, Red-Skinned Smashed Potatoes

Just a note that it's not too late to enter the Good Earth giveaway!

I'd also like to mention that I received a late-night delivery, courtesy of the Foodbuzz Tastemaker Program, and Nature's Pride, which included three bags of Nature's Pride Premium Harvest buns. I'm a picky bread eater and not a huge fan of prepackaged breads, but these were surprisingly soft and tasty. I couldn't eat three bags in three days, however, so I put some of the extra deli rolls to good use in a steak, tomato, and bacon panini.

With about 45 minutes to spare before supper the other night, the hubby asked me to throw together some garlicky mashed potatoes. I stared at him blankly, blinked, and said, "You mean like from a box?" He said, "No, REAL mashed potatoes."

I started laughing. I need at least two hours' notice to make real mashed potatoes. I peel potatoes at about a rate of one every 8 minutes. Sadly, I'm not joking. The hubby, on the other hand, is a speed demon with a paring knife. He actually peels potatoes faster than I can cut them. But he was busy with other food.

So, I took the lazy way out -- red-skinned smashed potatoes. No peeling required, lumps welcome. I based this recipe off a previous blog post, but I took a few shortcuts, and made some ingredient substitutions. They were a cinch. And the hubby said that aside from our chipotle-cheddar mashed potatoes, these were the best he'd ever had.

(I apologize for the lack of preparation photos. I sincerely thought these wouldn't turn out.)

Creamy, Red-Skinned Smashed Potatoes
Serves 6-8

1 head garlic
Olive oil, for drizzling
2 lbs. red potatoes, scrubbed and cut in large chunks
4 Tbsp. butter
3/4 c. half-and-half
2 Tbsp. cream cheese
Plenty of kosher salt and freshly ground black pepper, to taste

1. Preheat the oven to 425 degrees.

2. Slice off the top of the head of garlic and drizzle cut side with olive oil. Wrap in foil. Bake about 35 minutes. Let cool.

I skipped that last part. It hurt me hands, man.

3. Meanwhile, place potatoes in a large pot filled with water. Add salt and bring to a boil. Cook until fork tender and drain.

4. Remove the cloves of garlic and mash with a wooden spoon.

5. Smash the potatoes. Stir in mashed garlic, butter, half-and-half, and cream cheese, and continue smashing to the desired consistency. Season to taste with salt and pepper, and serve hot.

Friday, June 25, 2010

Grilled Corn with Garlic Butter and Parmesan

So along with his splendid flank steak last weekend, the hubby made grilled corn that was, hands down, the best corn on the cob I've ever had. We typically boil corn on the cob, just because it's kind of an afterthought and we don't have to keep an eye on it that way. I've grilled it a time or two with so-so results, and it just didn't seem worth the effort.

But the hubby found this recipe -- again, from Taste of Home -- that called for soaking the corn and leaving the husks on. I don't know if it was that step or the garlic butter that made the corn so tender and tasty, but by golly, something did. I can't wait to try this one again.

Grilled Corn with Garlic Butter and Parmesan
Makes 8 servings

8 ears sweet corn, husks on
1/3 c. butter
1 clove garlic, minced
1/4 tsp. salt
1/4 c. grated parmesan cheese

1. Soak corn in cold water for 20 minutes. This is a crucial step toward not turning your corn into a burnt pile.

2. In a small saucepan, combine butter, garlic, and salt. Cook and stir over medium heat until butter is melted. Set aside 2 Tbsp.

3. Peel back corn husks to within 1" of the bottom. Remove the silk.

The hubby is a farmkid. He's good at shuckin' corn.

4. Brush the corn with the garlic butter.

5. Rewrap the corn in the husks, and secure the husks with kitchen twine.

6. Grill corn, covered, over medium heat for about 25 minutes, turning occasionally.

7. Cut the strings and peel back or remove the husks. Drizzle with the reserved butter, and sprinkle with parmesan.