Friday, December 31, 2010

Vanilla and Cinnamon Roasted Almonds

After successfully cloning the hubby's favorite knoephla soup, I've decided to continue my recipe clone attempts. If I never have to leave the house for my favorite foods, I will have successfully attempted my quest to become a hermit.

Or at least I'll never be stuck without my favorites during a blizzard. (There was a 100-vehicle pile-up on the interstate near Fargo yesterday. Really.)

One of my favorite snacks is the cinnamon-roasted almonds that you can buy at state fairs and street fairs and craft fairs and pretty much any kind of fair. They're so yummy, but pretty pricey, and there's no reason we shouldn't be able to eat them anytime we want.

This is a Taste of Home recipe that got rave reviews online, so I decided to try it. Just a disclaimer: This isn't exactly like the cinnamon-roasted almonds at the fair, because the coating isn't as thick or crunchy. They do, however, have a stronger vanilla flavor that comes through when you're not distracted by all that candy coating.

I hope four cups gets me through the weekend.

Vanilla and Cinnamon Roasted Almonds
Makes 16 servings

2 egg whites
6 tsp. vanilla extract
4 c. whole, unblanched almonds
1/3 c. sugar
1/3 c. brown sugar
1 tsp. salt
1/2 tsp. ground cinnamon

1. Preheat oven to 300 degrees and grease two 15" x 10" baking pans. (I just spread parchment paper on the bottoms. I don't like getting messy.)

2. In a large bowl, beat egg whites until frothy. Stir in vanilla extract.

3. Add almonds and stir gently to coat. Combine the sugars, salt, and cinnamon, add to the nut mixture, and stir gently to coat.

4. Spread evenly onto pans. Bake about 30 minutes or until amonds are crisp, stirring once during the baking time.

5. Cool and store in an airtight container.

Wednesday, December 29, 2010

Knoephla Soup

When you're all stuffed up, nothing hits the spot like some chicken soup. Unless you're the hubby. Then nothing hits the spot like some knoephla soup.

If you've never tried knoephla soup, you: a.) Probably aren't German, and b.) Haven't lived.

Knoephla soup is a very simple soup that typically contains potatoes and knoephla, which are dumplings. This soup is a staple at a local diner, which sells it either by the generous bowl or the generous bucket. Yes, you can get your knoephla soup in a big ol' plastic pail.

However, the diner doesn't deliver, and I don't always feel like leaving home when I'm sick. So this is my attempt to replicate -- and perhaps even improve on -- the hubby's favorite.

This attempt was completely off-the-cuff; all I know is that the diner uses potatoes, dumplings, celery, and cream of chicken soup (because those little bits of chicken are unmistakable). I did swap out the celery for some carrot, because the hubby does not like celery and the little man loves him some carrot. And, because I'm the world's slowest potato-peeler, I used thin-skinned yellow potatoes (Klondike Goldust, to be exact) and left the skins on.

The results? Very, very similar to the hubby's favorite. In fact, I thought it was better. But I might be biased.

Knoephla Soup
Serves 6

2 Tbsp. butter
1/2 shallot, minced
1 carrot, diced
2 medium potatoes, diced
Salt and pepper
Bay leaf
1 can condensed cream of chicken soup
1 soup can of water
2 cans chicken broth
2 c. frozen or homemade dumplings
1/4 c. cream (either heavy cream or whipping cream)


1. Heat butter in a soup pot over medium heat. Saute shallot for about 1 minute, and then add carrot and potato. Sprinkle with salt and pepper and add bay leaf. Cook about 2 minutes.

2. Add soup, water, and broth, and stir well.

3. Bring soup to a boil, and then add dumplings.

I cheated-ed-ed and used frozen dumplings. But I used the time that I saved to reorganize my closet, so now the little man can store toys in his closet instead of my shoes.

Welcome to Angel in the Kitchen, where the little details make a difference.

4. Reduce heat to medium-low. Cover and simmer until dumplings, potatoes, and carrots are tender, about 20-30 minutes.

5. Remove pot from heat and stir in cream. Season to taste with salt and pepper.

(Just a quick note that if you're reheating leftover soup, do so slowly and carefully, so the cream doesn't curdle.)
Monday, December 27, 2010

Pillsbury review and some housekeeping

I mentioned in my last post that we'd been inundated with illnesses and work deadlines, and I think I was just jinxing myself for more. Although my work deadlines are now on hold for the holidays, you can't swing a dead cat* in this house without hitting a sick human.

The hubby, little man, and I did not have the chance to celebrate Thanksgiving, unless you count the mozzarella sticks from the hospital cafeteria. (Which, at the time, were about the best thing I've ever eaten.) We had to cancel our family holiday portraits, so those of you on my Christmas card list might be receiving Arbor Day cards. And on the one day that I'd set aside for holiday baking, I woke up with the virus that the little man had earlier in the week.

Jack takes this "season for giving" thing very literally.

We left town for a week, and just returned ... to get sick again. I'm beginning to see a pattern here.

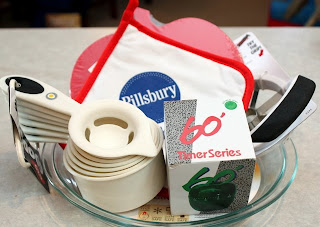
I do have some blog posts planned, because I have actually made a few edible dishes these past few weeks. But in the meantime, I wanted to belatedly post a product review for Pillsbury pie crusts. Pillsbury generously provided a coupon, information, and the following prize pack through MyBlogSpark.


I have to admit that I didn't try anything new and crazy with my pie crust, but as we do every fall, we visited my parents to help with their fall cleanup and their apple-picking. This also entails making a big pot of beef stew and an apple pie with the fresh apples and Pillsbury pie crust.

It feels odd posting a review of Pillsbury pie crust, because I've been a huge fan for years. I use them all the time for pies and other desserts, pot pies, empanadas, you name it. This isn't just an issue of laziness, although it is so much easier just to unroll that package; I honestly haven't had a pie crust that rivals the taste of texture of Pillsbury's.

And, as with the first apple pie of every fall, I'm convinced that this was the best apple pie that I've ever had. But I'm pretty sure I was right this time.

*Note: We do not actually advocate the swinging of cats, dead or otherwise. We like cats.

Sunday, November 21, 2010

Tortellini al Forno

It probably seems as though I'm not cooking as much lately, because I haven't been posting as much. In truth, I've been cooking a lot. But I'm having a recipe drought. I've made a few on-the-fly recipes that have turned out really well, but I wasn't expecting them to, so I didn't take photos. Meanwhile, I've had a slew of recipes with high expectations, lovely photographs, and ... well, meh flavor.

Perhaps I should blog these as what NOT to cook. You know, to save you some time, in case you've got the same cookbooks.

The other night, the hubby and I had an evening out with a few of our siblings, thanks to Jay at Pocket Jacks, his lovely fiancee Donna, and his adorably patient daughter, Macy. They hung out with the little man while we had a quick dinner out, followed by a movie. We ate at an Italian restaurant, and I ordered tortellini al forno, which is one of my favorite dishes. And the little man loved, loved, loved my leftovers the next day, so I decided to whip up a version at home.

Although it looks and tastes impressive, this dish is actually quite easy to make, especially if you use a jarred sauce. And because I broiled it instead of baking it, it just needs a quick zap in the oven.

Tortellini al Forno
Makes 6 servings

1 lb. ground beef
Salt, pepper, onion salt, and garlic salt, to taste
2 24- to 26-oz. jars cheese-flavored red pasta sauce (such as Ragu six-cheese or Classico four-cheese)
1/3 c. cream
1 22-oz. pkg. of refrigerated cheese tortellini (frozen will also work)
8 oz. shredded mozzarella or thinly sliced fresh mozzarella

1. Preheat broiler on low. Meanwhile, spray a large shallow pan or individual baking dishes with cooking spray.

I used these guys, whom I love.

2. Brown ground beef in a pot over medium-high heat, seasoning to taste with salt, pepper, onion salt, and garlic salt. Drain, if necessary, and then add pasta sauce. Cover and cook until bubbly, then reduce heat to a simmer. Stir in cream, and reheat sauce until bubbly.

3. Cook tortellini in salted water according to package directions.

4. Spread some sauce on the bottom of the baking dishes. This will help prevent the tortellini from sticking to the bottom. Nobody likes a sticky tortellini.

5. Drain tortellini and add to remaining sauce in pot, stirring gently so as not to upset your fragile tortellini. Add tortellini to baking dish.

6. Top with cheese, and a bit of dried herbs, if you like the color. And I do.

7. Broil until cheese is melted and just starting to brown, about 7 or so minutes. (Watch it closely, because it can go from barely melted to brown pretty quickly.)

Monday, November 8, 2010

Peanut Butter Swirl Brownies

Working on deadlines until all hours? Garbage disposal on the fritz? Baby cutting his first molars? Hubby has strep throat? You have a cold? Everybody's got the flu?

(Welcome to my past few weeks.)

Have a brownie.

If anyone is looking for me, I'm buried underneath a mountain of laundry.

Peanut Butter Swirl Brownies
Adapted from Betty Crocker
Makes 18 brownies

Peanut butter swirl mixture
1/2 c. peanut butter chips
3 oz. cream cheese, softened
1/4 c. sugar
1 egg

Brownies
1 pkg. supreme chocolate chunk brownie mix (for 9x13 pan)
3 Tbsp water
1/2 c. vegetable oil
2 eggs
1/2 c. chocolate chips

1. Preheat oven to 350 degrees. Grease bottom of 9x13 pan with shortening. (I'm lazy. I use cooking spray.)

2. Melt peanut butter chips on the stovetop or in the microwave until melted. Stir in cream cheese, sugar, and 1 egg, until smooth. Set aside.

Note that this stiffens up very quickly when set aside. Be quick with that brownie batter, you.

3. Combine brownie mix, water, oil, and 2 eggs and stir until well blended.

4. Spread two-thirds of the batter in the pan. Spread peanut butter mixture over the batter.

5. Drop remaining batter by tablespoonfuls onto peanut butter mixture, and swirl lightly with a knife to create that lovely marbled look.

6. Bake 30-34 minutes. Cool completely before serving, and store tightly covered.

Sunday, October 24, 2010

Korean Chicken Noodle Bowls

I love Korean food. Of course, I've only eaten Korean food either at home or at Japanese restaurants, so I have no idea if I love real Korean food. But I do love my version of Korean food.

So I jumped all over this recipe, which I saw in Rachael Ray's Everyday magazine. What's not to like? Stir-fry? Good. Noodles? Good. Kimchi-like sauce? Good.

And it WAS good. However, I did make modifications that I think made it better. Namely, I added extra veggies and reduced the amount of noodles that were called for. But the recipe still made too much of a good thing (after three meals of this, even the little man grew weary), and was too heavy on the pasta for my tastes. I think the recipe would improve with even less pasta, which I adjusted in this recipe.

Even though it takes away from the kimchi nature of the recipe, I think you can swap in any veggies that you've got on hand. And while I like the texture of whole-wheat pasta here, you could use regular old pasta or Asian noodles in its place.

Korean Chicken Noodle Bowls
Serves 4

Salt and pepper
8-10 oz. whole wheat spaghetti
1" piece of ginger, grated
2 large cloves garlic, grated
1/4 c. tamari
3 Tbsp. honey
2 Tbsp. tomato paste
2 Tbsp. rice wine vinegar
1 Tbsp. sesame oil
1 tsp. sriracha
2 Tbsp. vegetable oil
1 lb. boneless, skinless chicken, cut in thin strips
1 c. coleslaw mix
1/2 red bell pepper, thinly sliced
1/2 zucchini, cut in thin strips
1 c. mushrooms, sliced
3 scallions, thinly sliced

1. Bring a large pot of water to boil.

2. In a blender or food processor, combine a splash of the boiling water with the ginger, garlic, tamari, honey, tomato paste, vinegar, sesame oil, and sriracha. Blend until smooth.

And then taste it, and adjust your seasonings accordingly. Rachael Ray is fond of eyeballing measurements, which I did. Mine was a bit on the salty side, so I decided to add some more honey and sriracha to make it sweeter and spicier.

3. Salt water and add pasta, cooking according to package directions. Drain the pasta well.

4. When pasta is almost finished cooking, heat oil in a skillet over high heat. Add chicken and stir-fry, about 3-5 minutes.

5. Add cabbage, pepper, zucchini, and mushrooms, Stir-fry for 2 minutes.

6. Add the ginger sauce and toss for 1 minute.

7. Pour stir-fry over the drained noodles and top with scallions.

Monday, October 18, 2010

M&M Caramel Brownies

I have a confession. I'm addicted to buying seasonal candies. And not just candies that are around only for specific seasons, such as Cadbury Mini Eggs (the world's perfect food). I can't resist the allure of the Reese's peanut butter cups or the Hershey's kisses in all their foil-wrapped loveliness of rotating colors. (I'm convinced that green Hershey's kisses taste better than any other.)

So of course, when I saw the first bags of Halloween M&Ms on store shelves, I had to buy them. The last thing I need are little bowls of M&Ms lying around within reach, so I've been storing the bag in the cupboard, waiting for the perfect recipe, which turned out to be this: an ooey, gooey, ridiculously sweet adaptation of a Pillsbury recipe.

But as I was making the brownies, I discovered that M&M/Mars is taking advantage of those of us with seasonal candy addictions by offering not only Halloween M&Ms, but also autumn colors M&Ms. I expected orange, brown, and black, and ended up with red, gold, and brown. Whatever color your M&Ms, these brownies showcase them nicely.

In other news, I recently received this award from Merut of Eating with My Mouth Open.

Thanks, Merut! Stop by her refreshingly witty blog for a visit -- she's got lovely photos, and even lovelier recipes.

And now, if you'll excuse me, I must go buy my Halloween M&Ms.

M&M Caramel Brownies
Makes about 2 dozen

1 box chocolate fudge cake mix
1/2 c. butter or margarine, melted
1 cup evaporated milk, divided
35 caramels, unwrapped
1-1 1/2 c. M&Ms (miniatures or full-sized)

1. Preheat oven to 350 degrees. Grease a 9x13 pan with shortening.

As usual, I used cooking spray, which was too slippery for this batter. It was miserable. Do as I say, not as I do.

2. Mix cake mix, butter, and 2/3 cup evaporated milk until well blended. Spread half of mixture in pan and bake 15 minutes.

3. Meanwhile, heat caramels with remaining 1/3 cup evaporated milk over low heat. Stir occasionally until caramels are melted.

4. Sprinkle 1/2 cup M&Ms over partially baked crust.

5. Pour caramel sauce over M&Ms. Although the M&Ms may appear to be drowning, resist the urge to rescue them. That caramel is hot.

6. Run fingers under cold water when you can't resist the urge to sample a caramel-covered M&M. Swear you won't include this in your blog post.

7. Drop remaining batter by teaspoonfuls over caramel mixture.

8. Sprinkle with remaining M&Ms and press in lightly.

9. Bake 20-24 minutes longer or until center is set. Cool completely before serving.

Saturday, October 2, 2010

Little Man, Big Birthday

My not-so-little man has had a busy fall. He's been growing like a weed, getting around better than ever, learning to play games, throwing temper tantrums, and growing teeth like nobody's business.

Did I mention he's growing?

Jack also recently celebrated his first birthday. He had Mickey Mouse decorations and balloons. Bunches of presents. And a whole lot of attention.

And lots of Jack's favorite foods, and some of our own. Caprese salad. Marinated mozzarella. Chopped veggies. Fruit with a dip so wonderful that I wish I remembered what I put in it. Beef stew. Biscuits. And cake. I made the chocolate fudge layer cake recipe, with the frosting from Famous Dave's chocolate cake. It was good. It was very, very good.

It's been quite a year. Happy birthday, Jack!

P.S. Why yes, I did just discover the "collage" function in my photo editing software. Quiet, you.

Monday, September 27, 2010

Chocolate Cream Cheese Sugar Cookie Bars

And in my continuing saga of baking pan issues, I bring you Volume III: Chocolate Cream Cheese Sugar Cookie Bars.

This is a Hershey's recipe that combines a sugar cookie crust with a cakier chocolate cheesecake-like topping. And although I never met a cheesecake I didn't like, I actually prefer mine with a cookie crust rather than graham crackers -- so this is right up my alley.

Unlike actual cheesecake, this is a very forgiving recipe. Very, very forgiving.

Chocolate Cream Cheese Sugar Cookie Bars
Makes 16

1 15-oz. pkg golden sugar cookie mix*, mixed according to package instructions**
8 oz. cream cheese, softened
1/4 c. butter or margarine, softened
1/4 c. cocoa
1/2 c. sugar
1 egg
1 tsp. vanilla extract

1. Preheat oven to 350 degrees.

2. Spread prepared sugar cookie dough in a 9" square baking pan.***

3. Using a mixer, beat cream cheese and butter until light and fluffy. Add cocoa and sugar, and mix. Add egg and vanilla, and beat until smooth.

4. Spread cream cheese mixture over cookie batter.

5. Bake 40 minutes**** or until no imprint remains when touched slightly. Cool completely before serving. Store in the refrigerator.*****

* I could only find a 17.5-oz. package.
** My package had different instructions for preparing the dough for drop cookies versus roll-out cookies. I just threw in what I thought would make a good hybrid of the two.
*** I do not own a 9"square baking pan. I used an 8" square baking pan, instead.
**** I have no idea how long I actually baked these. When I last looked, my timer had 10 minutes left, and I ran downstairs to fold some clothes. Which I then decided to put away in Jack's room. But Jack and I both got distracted by his busy ball-popper and shape-sorting barn, and then when I returned to said laundry work, I got distracted by weeding out summer clothes that I figure Jack has grown out of. Eventually, I had a nice, cozy "Mmm ... cookies" thought that turned into "Oh &#!$, my bars!" and ran upstairs. Elapsed time? I'd guess these bars were in the oven for 60-70 minutes. Luckily, I planned ahead by using the wrong size cookie mix and the wrong size pan, so the extra baking time was actually a good thing. Needless to say, no imprint remained when I touched the bars lightly.
***** I remembered to do this the first night. But then I accidentally left them on the counter for a few days. Nobody died.

Friday, September 24, 2010

Shredded Pork Gyros

I'm a big fan of my slow cooker. And a big fan of shredded meat. And a big fan of any recipe that requires 5 minutes or less of preparation. This is a good recipe for me.

I recently saw a recipe for some Greek-style shredded pork, and while the recipe itself didn't speak to me, the idea did. So I threw together a few ingredients in the slow cooker one morning, and voila! Instant gyros. Well, after you toast the pita bread and chop a few veggies and slather on some hummus and yogurt. But really, those steps are optional.

On a side note, I don't typically put hummus on my gyros, but I had some in the fridge and decided to give it a try. I really, really liked it. The hummus and yogurt kind of combine to make a thicker, tangy, slightly more flavorful sauce. And to think, I might never have discovered this otherwise.

Texture-wise, this sort of reminded me of a soft taco. The hummus is kind of like the refried beans, the meat is tender and shredded, and it's topped with fresh veggies and yogurt (instead of sour cream.) In fact, if I handed expended all that energy with my 5 minutes of prep work in the morning, I'd have toasted up some homemade pita chips and served these up nacho style.

Shredded Pork Gyros
Serves 8-10

Pork
1 pork shoulder roast (about 2 1/2 lbs.)
1 1/2 Tbsp. lemon juice
1 1/s Tbsp. Greek seasoning
1 clove garlic, minced
Pinch of crushed red pepper flakes

Other
8-10 good-quality pita breads
Plain yogurt, preferably Greek-style
Hummus (I prefer roasted red pepper)
Chopped cucumber
Chopped tomato

1. Place pork shoulder in slow cooker and top with lemon juice, Greek seasoning, garlic, and crushed red pepper flakes.

2. Cover and cook on low 8-10 hours, or until pork is tender.

3. Remove pork from slow cooker and shred with two forks. Return meat to slow cooker and combine with juices.

4. Toast pita breads in a hot pan quickly on both sides. Add a layer of hummus, and top with pork, cucumber, tomato, and yogurt.


Tuesday, September 21, 2010

Chicken Marinara Soup

The little man turns 1 year old this week (my, how time flies!) and keeping up with him is a challenge. And keeping up with him and cooking dinner every night is just short of impossible.

The good news is that Jack is quite possibly the least picky eater in the house. so far, he's not a huge fan of chicken stroganoff and quiche. Everything else is A-OK by him. (Especially veggies. The kid LOVES his tomatoes, peppers, and zucchini.) The bad news is that his crabbiest, neediest time of day is the 90 minutes between when I pick him up from daycare and when the hubby gets home. A snack won't suffice; the little man wants his supper about a half-hour before the hubby gets home, which is some tricky timing. We're still trying to work out the kinks on this one.

In the meantime, we do a lot of cooking ahead, except for those rare days when the little man comes home and is content to play on his own for about 20 minutes while I throw together some supper that will be ready for him in time, and that will hold for the hubby.

This is one such recipe that the little man loved, because in incorporates some of his favorite foods -- chicken, veggies, and pasta. It comes together quickly, and is great for using up extra produce this time of year.

Chicken Marinara Soup
Serves 6

2 tsp. olive oil, divided
1 lb. boneless, skinless chicken, cut in bite-sized pieces
2 tsp. dried oregano
Salt and pepper
1 green bell pepper, chopped
2 carrots, thinly sliced on the bias
1 26-oz. jar marinara sauce
3 c. chicken broth
2 c. dried rotini pasta
1 medium zucchini, chopped
Additional salt and pepper, to taste
Shredded mozzarella cheese, for topping


1. Preheat 1 tsp. oil over medium-high heat in a Dutch oven. Add chicken. Sprinkle with salt, pepper, and oregano. Cook until brown, and remove from pan.

2. Add remaining 1 tsp. oil to pan and add carrots and green peppers. Cook 2 minutes.

3. Add marinara sauce and broth to pan. Bring to a boil, then reduce heat to simmer, and cook 8 minutes.

4. Return chicken to pan. Add zucchini and rotini, and cook 10 minutes.

5. Season to taste with salt and pepper. Serve soup with mozzarella on top.

Sunday, September 19, 2010

Chocolate Chip Pound Cake

I've decided that my Christmas list this year is going to include some new baking pans, because despite having a kitchen full of pots, pans, and gadgets, I don't seem to have some of the basics that my recipes have been calling for lately. Such as a standard loaf pan.

I agonize over pan sizes. I have no eye for measurements, so I have to get out the tape measure every time a recipe doesn't use my own standard pan terminology. For example, "the bar pan" means a 9x13 pan. The "brownie pan" means an 8" square pan. "The pan you use for homemade pizza" means the 11x15 sheet pan.

And in my world, a loaf pan is a loaf pan. But apparently this isn't the case, which is why my chocolate chip pound cake sort of resembled unsliced chocolate chip biscotti. But it sure tasted good. This recipe is based on a Hershey's recipe, and it tastes a bit like cake and a bit like shortbread.

I did end up trying the glaze on the cake later, but I'm not sure if it was an improvement. The glaze had a bit too much shortening for my taste, so it had a bit of a waxy texture, and I think the cake was just fine without it.

Chocolate Chip Pound Cake
Serves 8-10

Cake
1/2 c. butter, softened
4 oz. cream cheese, softened
3/4 c. sugar
2 eggs
1 tsp. vanilla extract
1 c. flour
1 tsp. baking powder
1 c. chocolate chips

Glaze (optional)
2/3 c. chocolate chips
2 Tbsp. shortening

1. Preheat oven to 325 degrees. Grease and flour a 9x5 loaf pan.

2. Combine butter, cream cheese, and sugar until light and fluffy. Add eggs and vanilla, and beat well.

3. Blend in flour and baking powder, and then stir in 1 c. chocolate chips.

4. Pour batter into prepared pan. Bake 45-50 minutes, or until cake pulls away from sides of pan.

5. Cool 10 minutes, and then remove cake from pan and cool complete on a wire rack.

6. If making glaze, combine 2/3 c. chocolate chips and shortening in a small saucepan. Cook over low heat until chocolate chips are melted, stirring frequently. Poor glaze over top of cake, allowing it to run down the sides. Cool before serving.

Tuesday, September 7, 2010

Chocolate Chip Cookie Bars

Happy fall-ish! We've had lovely weather here for the past few weeks, and it couldn't have been more well timed.

The hubby and I spent the weekend celebrating the wedding of one of my college roommates, Sarah, who traveled all the way to Fargo from Alaska for her nuptials (bringing some of her wedding party with her). It was a multiday celebration, and the weather cooperated beautifully. The weekend ended with the most unique and entertaining wedding I've ever been to. (I'm a fan of anyone serving me food during a wedding ceremony.) Congrats to supercouple Sarah and Doyle!

Labor Day dawned cool and rainy, and although I wanted nothing more than to stay inside and bake cookies all day, we were playing catch-up and running errands. So instead, I whipped up a small pan of cookie bars to tide us over. This is an adaptation of a good ol' Nestle Tollhouse recipe, and these bars are less like chocolate chip bars and more just like a pan cookie. They're perfect and yummy and they disappear quickly. (I have no idea why Nestle claims this makes two dozen bars. In our house it makes 9.)

Chocolate Chip Cookie Bars
Makes 9-12

1/2 c. butter, softened
3/4 c. brown sugar
1 tsp. vanilla extract
1 egg
1/2 tsp. baking soda
1/2 tsp. salt
1 c. plus 2 Tbsp. flour
1 1/3 c. chocolate chips

1. Preheat oven to 350 degrees. Grease a 9" square baking pan.

I'm lazy and unprepared. I sprayed an 8" square pan with cooking spray, and everything turned out OK. I'm having pan issues these days. But more about that in a future post.

2. Combine butter and brown sugar until creamy. Add vanilla and egg, and mix well.

There should be additional pictures here. But the hubby was uploading wedding pictures to Facebook and he wouldn't let me have the memory card. He's mean. I still let him eat bars.

3. Stir in baking powder and salt, and add flour and combine. Stir in chocolate chips.

4. Pour mixture into prepared pan and spread mixture evenly.

This might require the use of your hands. Which you might have to lick off afterward. It's torture, I say.

5. Bake 25-30 minutes, or until bars are golden and center is set. Let cool before cutting into squares.


Sunday, August 22, 2010

Chocolate Lover's Bundt Cake

The little man had a daycare picnic this week, and we were supposed to bring a dessert. Which was convenient, because if there's anything the little man loves, it's dessert.

This tried-and-true Betty Crocker recipe is perfect for picnics because it travels well, doesn't need to be refrigerated, and sure is purty. It's a cinch to make -- just to be sure to grease that ol' Bundt pan very well, and get in all the nooks and crannies.

Chocolate Lover's Bundt Cake
Serves 16

Cake
1 pkg. butter-recipe chocolate cake mix
1/2 c. chocolate milk
1/3 c. butter or margarine, melted
3 eggs
16 oz. sour cream
1 pkg. chocolate instant pudding mix
2 c. chocolate chips

Glaze
3/4 c. chocolate chips
3 Tbsp. butter or margarine
3 Tbsp. light corn syrup
1 1/2 tsp. water

1. Preheat oven to 350 degrees. Grease and flour a 12-cup Bundt pan.

I read a tip once about how if you're making a chocolate cake, you can grease and flour the pan using cocoa instead of flour, to avoid any unsightly flour streaks on the lovely, brown surface of your cake. I tried this. Cocoa just doesn't seem to sweep around the pan like flour does, so I gave up and switched to flour. Just thought I'd mention that. Carry on.

2. Combine cake mix, chocolate milk, butter, eggs, sour cream, and pudding mix.

Although you can use a mixer for this task, it's just as easy to grab a whisk and stir everything together. That allows you to multitask and talk on the phone while baking your cake. Note that this sequence of events does not, however, allow you to photograph the cake-mixing process. My apologies.

3. Stir in chocolate chips, and spoon batter evenly into Bundt pan.

4. Bake cake for 55 to 65 minutes, or until the trusty toothpick comes out clean. Cool in the pan for 10 minutes, and then invert the pan onto a cooling rack or serving plate, and remove cake from pan. Cool for 2 hours.

5. To make glaze, heat chocolate chips, butter, corn syrup, and water in a saucepan over low heat. Stir frequently until mixture is smooth, and then pour over the cake.
Feel free to store this baby, covered, at room temperature. And while it's heavenly when it's all nice and warm, it's even better the next day!

Giveaway winner

According to random.org, the winner of the $40 csnstores.com gift card is ... #10, Faith! Congratulations, and thanks to those who entered!

Thursday, August 12, 2010

Fun product reviews, and CSN Stores giveaway!

I recently had the opportunity to review a few products, thanks to the Foodbuzz Tastemaker program.

Marx Foods Palm Leaf Plates
First, and by far my favorite, was the Marx Foods Palm Leaf Plates.

The plates produced by this friendly (and earth-friendly) company are made of naturally discarded materials, and are both disposable and biodegradable. Note that I work for a company that used to supply disposable, biodegradable dishware in our kitchenettes, so I consider myself an expert on these typically second-rate disposable dishware options.

But these plates are fabulous. They're incredibly sturdy, so much so that I actually felt guilty disposing of them. And they have higher, rounded edges that really help keep food in its place. Even nachos.

Admittedly, they're a bit weird-looking. It almost looks like you're eating off balsa wood plates. But I highly recommend them for your next gathering. They're sturdy, unique, and definitely a conversation piece.

Eggo Real Fruit Pizza
I received an incredibly elaborate package one evening, complete with huge box, dry ice, and the works. Inside was ... two boxes of Eggo Real Fruit Pizza. (It probably would have been more cost-effective and environmentally friendly to issue a few coupons.) The pizzas come in two flavors: strawberry granola and mixed berry granola. And they can be either nuked in the microwave or baked in the oven. They look pretty healthy, with a whole-grain crust, and a yogurt, granola, and fruit topping. I'm sorry, dear Eggo people, but it didn't work for me. The prevailing flavor was the yogurt, and otherwise it was just kind of dry and chewy. (P.S. I still love your toaster waffles.)

Buitoni Premium Frozen Meals
We received a coupon to try one of the new varieties of Buitoni Premium Frozen Meals, from the folks who've been making refrigerated pastas and sauces for years. We tried the Braised Beef & Sausage Ravioli. The meal was incredibly simple to make, with both the pasta and sauce cooking in just minutes (perfect for a weeknight). The pasta was nice and thick and flavorful, although I wasn't terribly wild about the filling. The hubby thought his was quite good, though. We'll definitely try this again in another variety.

CSN Stores giveaway!
I was recently contacted by Jess from CSN Stores about sponsoring a giveaway for a $40 gift certificate toward anything from dining room furniture to children's toys and games on csnstores.com or any of its more than 200 sites.

What would you purchase with your $40? Perhaps some new Le Creuset?

A lunch bag or three to send the kiddies back to school in style?

Some stylin' new dishes for the pets?

TO ENTER: Simply leave a comment telling me what you would like to buy with your $40 gift certificate. The deadline is Friday, August 20. (Please include a name, as well; anonymous entries will not be counted. Yes, Mom, I'm talking to you.)

Please note that the giveaway is open only to residents of the U.S. or Canada, and that additional shipping charges or international fees might apply for Canadian addresses.

Happy shopping!

Tuesday, July 27, 2010

Chipotle Tabasco-Marinated Pork

One of my favorite kitchen ingredients is chipotle Tabasco sauce. The hubby and I discovered it a few years ago, and it's smoky and spicy, but still calm enough to use as even a dipping sauce (we sprinkle it on our tacos sometimes).

This is an adaptation of a Tabasco marinade recipe, and it combines the smoky, spicy goodness of chipotle Tabasco with the sweeteness of citrus juice. Like a mojo marinade with some extra kick.

I love this with pork, but I think it would be equally good with chicken, or even shrimp, if I ate shrimp. The Tabasco folks recommend setting aside some of this marinade to serve as a dipping sauce at the table. Which would be good, although I still like the heat of the sauce straight from the bottle.

Chipotle Tabasco-Marinated Pork
Serves 4

1/2 c. olive oil
1/4 c. minced garlic
1/2 c. orange juice (preferably fresh-squeezed)
1/4 c. lime juice (preferably fresh-squeezed)
1/4 c. Tabasco chipotle pepper sauce
1 tsp. salt
1 tsp. ground cumin
1 1/2 lbs. boneless pork

1. Combine olive oil, garlic, juices, pepper sauce, salt, and cumin. Poor over pork and place in a covered dish resealable bag. Refrigerate for 4 hours.

2. Grill pork over medium heat until cooked to desired doneness (which, in my case, was slightly overdone, because I'm not used to our new grill). Let rest before serving.

Saturday, July 24, 2010

Jack's Super Ham and Cheese Pinwheels

This is my little Superman. Who, at 10 months, is not so little.

Faster than a speeding Fisher Price animal train, Jack manages to scamper his way all over the house, investigating every inch and climbing everything possible. How does this little man of steel keep up his constant supply of energy? He eats. He eats a lot.

A few months ago, I told Jack's teachers at daycare that, because Jack had been through food allergy tests, I felt confident that they could let him try pretty much any food. I was expecting to hear that Jack had branched from his level-1 squash to maybe something wild and crazy, like level-2 pears and blueberries. But instead, he moved to real food, cut in tiny pieces.

And he loved it. Overnight, he started eating chicken and tomatoes with pasta. Meatloaf. Chicken quesadillas with black beans. Chili. The hubby and I decided that instead of making special meals for the little man, we'd feed him bites of whatever we were eating, so he could be introduced to those flavors early on. So he's already comfortable now eating things like Cajun chicken kabobs with potatoes and tomatoes, brisket, bratwurst (with mustard!), grilled zucchini and red pepper, and chicken lo mein (which Jack thinks is the best food EVER).

Obviously, ensuring that the little man eats his veggies is a top priority for us. We've been making a lot of soups and stews with plenty of veggies, but we also need some quicker meal ideas. These pinwheels hit the spot, and they have plenty of veggies mixed in with low-fat cream cheese.

Jack's Super Ham and Cheese Pinwheels
Makes 2 Jack-sized servings

1 Tbsp. low-fat cream cheese
1/2 carrot, grated
2 Tbsp. minced cucumber
2 Tbsp. minced tomato
1 small tortilla (about 6-7")
2 Tbsp. shredded cheese
1-2 slices ham

Jack's suggested accompaniments
Chopped pineapple
Cool water in a sippy cup

1. Mix together cream cheese and grated carrot.

2. Stir in cucumber and tomato.

3. Spread veggie cream cheese mixture on a tortilla.

4. Top with cheese and ham.

5. Roll up tightly, and then cut into slices (and then into bite-sized pieces).

This would probably work better if you refrigerate the pinwheels for an hour or two before slicing, but the little man has no such patience. He has places to go and kitties to chase.