Showing posts with label appetizers. Show all posts

Friday, January 20, 2012

Hibachi Chicken and Steak

The hubby and I love eating at Japanese restaurants, and while the hubby always starts off with some spicy sushi, I save my appetite for the hibachi dishes.

That's pretty easy to do when I don't like sushi. You have now witnessed the full extent of my willpower.

It seems like it should be something that's pretty easy to make at home, so we decided to give it a try. This came pretty darn close for us, although it still might be missing something. Maybe some sake? Extra oil? Spatulas flipping through the air and volcanic onions? We'll have to give those a shot.  

Hibachi Chicken and Steak
Serves 4-6

For the chicken:
1 pound boneless, skinless chicken, cut it bite-sized pieces 
Salt and pepper 
1 tablespoon vegetable or canola oil 
1 tablespoon soy sauce 
1 tablespoon butter 
1-2 tablespoons stir-fry or teriyaki sauce (I used a spicy apricot sauce, sort of like General Tso's) 

For the steak:
1 pound sirloin, cut in bite-sized pieces 
Salt, pepper, and Montreal Steak seasoning 
1 tablespoon vegetable or canola oil 
1 tablespoon soy sauce 
1 tablespoon butter 

1. Heat 1 tablespoon oil in a large skillet or wok over medium-high heat.

2. Add chicken, and sprinkle with salt and pepper. Cook until chicken is starting to brown on both sides, about 3-4 minutes.

3. Add 1 tablespoon soy sauce and 1 tablespoon butter. Cook until chicken is cooked through, about 2-4 minutes.


4. Add stir-fry or teriyaki sauce and toss chicken to coat.


5. Meanwhile, heat remaining oil in another skillet or wok over medium-high to high heat. (You can go a little hotter with the sirloin, because you don't have to worry about cooking it all the way through like you do the chicken.)

6. Add sirloin, and sprinkle with salt, pepper, and steak seasoning. Cook until sirloin starts to brown on all sides.


7. Stir in 1 tablespoon soy sauce and 1 tablespoon butter. If you're feeling adventurous, go ahead and toss in some mushrooms.
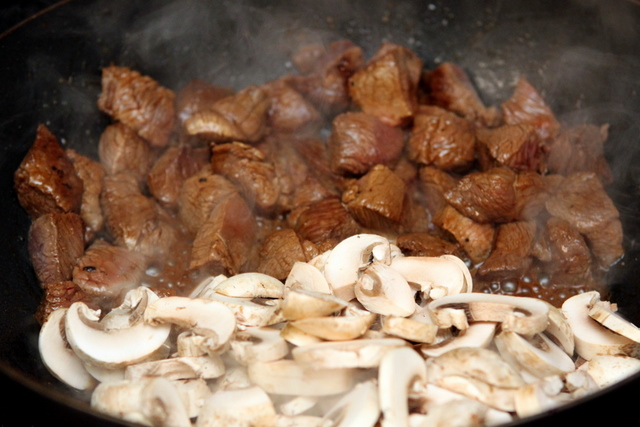


8. Cook until sirloin is cooked through to desired doneness.


Saturday, December 3, 2011

Spinach, Artichoke, and Roasted Red Pepper Dip

The hubster and I were lucky enough to host a Thanksgiving potluck this year, which I love doing. We invite both sides of our immediate family, so we're the lucky ones who get to spend the holiday with all our favorite people. And we get the best of all food worlds. My dad's hamkey gravy. My mother-in-law's stuffing and pie. My sisters'-in-law cookie salad and sweet potatoes.

The hubby signed us up for mashed potatoes and corn. I said, "Wow, fun. Thanks." So he told me to make an appetizer, too.

This is my take on a Paula Deen recipe, the photos of which I've been drooling over for months. Plus, you can make this ahead of time and bake it right before your guests arrive, so it's a great recipe for entertaining.

I like regular spinach and artichoke dip, but this recipe has a little more zing and character because of the roasted red peppers and a little spice. My little brother really, really liked this one, and said it tasted like something you'd order in a restaurant.

That actually wasn't quite true. We ordered spinach and artichoke dip in a restaurant a few days later, and when I asked if it was as good as mine, both my brother and the hubby responded with a resounding, "No!" My brother said, "This is something nice and warm to dip the chips in. But yours actually had flavor." So there you go.

Spinach, Artichoke, and Roasted Red Pepper Dip
Makes about 1 1/2 cups

1 tablespoon butter
1/2 cup chopped onion
2 cloves garlic, minced
1 6-ounce jar marinated artichoke hearts, drained and roughly chopped
1/4 cup chopped roasted red peppers
5 ounces baby spinach
1/4 cup half and half
3 ounces cream cheese, cubed and softened
1/4 cup sour cream
Dash of freshly grated nutmeg
1/4 cup shredded pepper jack cheese
1/2 teaspoon salt
1/4 teaspoon cayenne pepper
1/4 cup shredded Italian cheese blend
Toasted baguette, pita crisps, or crackers, for serving

1. Preheat oven to 425 degrees F. Spray a 2-cup ovenproof dish with cooking spray.

2. In a medium saucepan, heat butter over medium heat. Add onion and garlic, and cook until tender, about 7-10 minutes.

3. Add artichoke hearts and roasted red peppers. Cook about 2 minutes.

4. Add half the spinach, and cook until it wilts slightly, about 1-2 minutes.

5. Add remaining spinach. Cook until spinach is completely wilted, about 4-6 minutes.

6. Transfer mixture to a strainer and press lightly to release any excess liquid. Set aside.

7. In the same saucepan, heat the half and half over medium heat. Stir in cream cheese, sour cream, and nutmeg. Cook until cream cheese is melted and mixture is smooth.

8. Add spinach mixture, pepper jack cheese, salt, and cayenne, stirring to combine. Pour mixture into baking dish.

At this point, if you're making the dip ahead of time, slightly cool the mixture, cover it, and refrigerate it for up to 24 hours. Let the mixture come to room temperature before moving on to the next step.

9. Sprinkle the dip with the Italian cheese.

10. Bake 20-25 minutes, or until bubbly. Serve with baguettes, pita crisps, or crackers.

And then go get a manicure. Quickly. Go!

(I'm happy to report that my nails are now a lovely shade of Gettin' Miss Piggy With It red.)

Saturday, October 22, 2011

Mini Mummy Dogs

I saw this recipe recently in a Pillsbury cooking magazine, and I fell in love with these little guys immediately. They're a perfect Halloween appetizer or snack, and not actually as tricky to make as I'd feared. (Never having wrapped a mummy in bandages before, wrapping them in dough sounded downright terrifying.)

Mini Mummy Dogs
Makes about 3 1/2 dozen

1 8-ounce can refrigerated flaky dough sheet (crescent dough)
1 16-ounce package miniature smoked sausages
Ketchup or mustard

1. Preheat oven to 375 degrees. Line two baking sheets with parchment paper.

2. Roll out dough sheet to a 14-inch by 11-inch rectangle. (This is a bit sticky.) Then cut in half vertically to make two 7-inch by 11-inch rectangles. (I find a pizza cutter works best for this.) Cut cross-wise to create 44 7-inch by 1/2-inch strips.

3. Use paper towels to dry the sausages, so the dough adheres to them more easily.

4. Wrap one strip of dough around each sausage to create a mummy effect. Press firmly at the ends to secure the dough.

There's no perfect method for this, and my mummies had a lot of variety. But try to keep a little bit of space open for the mummy's eyes, which will be dabbed on with ketchup or mustard.

Having been a history major and a classical studies minor in college, I can say with near-certainty that this wasn't a common practice in the ancient Egyptian mummification process.

5. Place the mummies on the baking sheets, about 2 inches apart, so they brown evenly.

6. Bake 15-20 minutes, or until dough is golden.

7. Dab on some eyes using ketchup or mustard, and serve warm with preferred dipping sauce.

Saturday, October 15, 2011

Bacon-Wrapped Li'l Smokies

This little snack/appetizer/side dish is a meat-lover's dream. These little guys are like pigs in a blanket, except that the blanket, too, is made of pig. (Speaking of meat-lovers' dreams ...)

You could serve these as an appetizer, along with a mustard sauce or barbecue sauce for dipping. They're perfect for entertaining, because they taste great even at room temperature.

I prefer them with brunch-type meal, alongside maybe a slice of quiche and a pastry or some fruit. I love brunch in general, and it only gets better with some pig-wrapped pig. (Oh, wait, I used all-beef smoked sausages.)

Just a note that you don't want to use thick-cut bacon here. It's ... I can't believe I'm saying this ... too bacony.

Bacon-Wrapped Li'l Smokies
Makes about 40 sausages

1 pound bacon, sliced in half
1 pound miniature smoked sausages
2 tablespoons brown sugar

1. Preheat the oven to 400 degrees F. Line a large, rimmed baking sheet with foil, and place a baking rack on top.

2. Wrap each sausage with half a slice of bacon.

3. Place seam side down on baking rack and sprinkle sausages with brown sugar.

You might notice that my baking rack is missing here. That is a mistake I shan't repeat.

4. Bake 30-40 minutes, or until bacon is cooked to desired doneness.

Tuesday, October 11, 2011

Oven-Fried Chicken Fingers with Tangy Dipping Sauce

I've been doing a lot of baking lately to put together some of our families' favorites recipes, and I've been trying to balance out all that decadence with some lighter meals. Luckily, I have a wealth of cookbooks and cooking magazines at my disposal to give me ideas, such as this one from Cuisine at Home.

This recipe makes some genuinely crispy, oven-baked chicken fingers, and my little brother loved them. Of course, he drenched his with the homemade sauce, which tastes like a sweeter buffalo wing sauce.

Note that these are a bit time-consuming. Had I read through the recipe thoroughly, my dinner guests wouldn't have been subjected to those two extra episodes of Mickey Mouse Clubhouse while waiting for their food. (Of course, I also doubled the recipe.)

Oven-Fried Chicken Fingers with Tangy Dipping Sauce
Makes 4 servings

Chicken fingers
3 boneless, skinless chicken breasts (about 1 pound, total)
3/4 cup flour
1/2 teaspoon kosher salt
1/2 teaspoon pepper
1/2 teaspoon paprika
1 cup panko bread crumbs
2 egg whites
1/2 cup buttermilk
1/4 teaspoon Tabasco sauce
3 tablespoons canola oil

Dipping sauce
1/4 cup apple juice
1/4 cup cider vinegar
1/4 cup ketchup
1 tablespoon honey
1 teaspoon Worcestershire sauce
1/2 teaspoon kosher salt
1/2 teaspoon pepper
1/2 teaspoon dry mustard
Juice of 1/2 lemon
Pinch of celery seed
Pinch of crushed red pepper flakes
1 tablespoon butter

1. Preheat oven to 450 degrees. Slice each chicken breast in four strips, lengthwise.

2. Combine flour, 1/2 teaspoon salt, 1/2 teaspoon pepper, and paprika in a dish.

3. Dredge chicken fingers in the flour mixture and place on a wire rack.

4. Add panko to remaining flour mixture.

5. Whip egg whites to soft peaks in a bowl, using a hand mixer. (I tried a whisk, and after a few agonizing minutes, I switched to the mixer.) Whisk in buttermilk and Tabasco.

6. Dip each floured strip in the egg white mixture, and then in the pank and flour mixture. Return strips to rack.

7. Heat oil in a large baking sheet for 5 minutes in the oven.

8. Arrange chicken in a single layer on the hot baking sheet. (This starts crisping up the bottom of the chicken right away, so it doesn't get soggy.) Roast for 10-15 minutes, flip strips over, and roast an additional 10-15 minutes, until chicken is crispy and cooked through.

9. Meanwhile, simmer all sauce ingredients except butter over medium-low in a saucepan for about 10 minutes. Remove the pan from heat and swirl in the butter. Serve sauce warm with the chicken.

Thursday, October 6, 2011

Spicy Garlic Dipping Oil

I've recently declared my newfound love for take 'n' bake bread, which isn't perfect, but has become a lifesaver in a town devoid of a bakery. Or even a grocery store with a real bread section. But what to do with all that tasty, fresh-baked goodness? Just what you'd do in a restaurant -- dip it in some equally tasty dipping oil.

You can buy ready-made dipping oil, but it's so easy to make at home, and you can add whatever you want. I like this combination, which is garlicky and slightly spicy.

Spicy Garlic Dipping Oil
Serves 4-6

1/2 cup extra-virgin olive oil
4 cloves garlic, smashed
3/4 teaspoon crushed red pepper flakes
1/2 teaspooon dried oregano
1/4 teaspoon freshly ground black pepper
Crusty bread, for dipping


1. In a small pan or skillet, heat oil, garlic, red pepper flakes, oregano, and pepper over medium heat, until bubbly and fragrant.

2. Remove from heat and cool.

3. Remove garlic, and then spoon into serving dishes and serve with warm bread.

Wednesday, April 20, 2011

Guacamole

And I'm back! Although still busy and stressed and scared to mess up my kitchen for fear no one will want to buy our house because it looks like people actually live here.

But back to food. As often happens with me, I was reading a book the other day that inspired a food craving. Nothing strange, just some characters in my book sitting around, eating chips and guacamole. And boy howdy, I had to get me some.

This recipe is a spin on the guacamole served at Bar Abilene in Minneapolis, which I visited with a few friends during a girls' weekend out far too many years ago. (Why haven't we done this again???) The guacamole is all mashed together right at the table, so it's fresh and chunky and yummy. And you have just enough time to perfect it before cinco de mayo!

Guacamole
Serves 4

Pico de gallo
5 tomatoes, seeded and diced
¼ white onion, diced
1 serrano chile, minced (I removed the seeds)
2 Tbsp. chopped cilantro
2 Tbsp. freshly squeezed lime juice
¼ tsp. black pepper
½ tsp. kosher salt

Guacamole
3 ripe avocados, flesh removed
6 cloves roasted garlic (drizzled with olive oil, wrapped in foil, and roasted at 350 degrees for 30 minutes)

1/2 c. pico de gallo
1 Tbsp. chopped cilantro
Juice of 1 lime
1 tsp. kosher salt
½ Tbsp. Worcestershire sauce
15 dashes green or chipotle Tabasco


1. Combine all pico de gallo ingredients in a bowl.

2. Mash the avocado and roasted garlic together in a bowl.

3. Mix in 1/2 c. pico de gallo and remaining guacamole ingredients. Serve with chips.

Tuesday, March 8, 2011

Chinese Crab Cakes

I suffer from extreme indecisiveness, which is one reason why I'm thrilled when the hubby picks up a cookbook and asks me to make a particular recipe. In this case, the hubby pointed to a picture of some Chinese crab cakes in a small cookbook with no apparent author, and said, "These look good."

Very well, then.

Not only was this my first time making crab cakes, but this was my first time cooking with lump crabmeat. This was an adventure for me, because according to the unnamed author of this cookbook, I should attempt to save myself some cash and choose refrigerated, special grade crabmeat for this recipe, which is cheaper than lump crabmeat and already flaked.

Now, crabs aren't exactly indigenous to North Dakota. So ... I don't really have much of a choice. My options were the canned crabmeat or the vacuum-packed, refrigerated, "exclusive" lump crabmeat. With the $1 per pound difference, well, I went for the good stuff. (I had pictured myself returning home with a plastic container full of fresh crabmeat. But Barefoot Contessa, I ain't.)

So in addition to being a recipe that I've never tried, it was quite the spendy endeavor. And did I mention that I don't care for seafood?

Luckily, the crab cakes turned out wonderfully. The hubby loved them. The little man loved them. I deemed my taste to be surprisingly yummy for something that includes seafood ... not overly fishy, and the sesame oil is a standout. Go team!

Chinese Crab Cakes
Makes 4 servings (2 cakes each)

1 lb. fresh or canned pasteurized lump crabmeat
1/2 c. plus 1/3 c. panko bread crumbs, divided
2 eggs
2 green onions, chopped
1 Tbsp. dark sesame oil
1 Tbsp. grated fresh ginger
1 Tbsp. Chinese hot mustard
2 Tbsp. canola oil, divided
1/2 c. sweet and sour sauce, for dipping (optional)

1. Combine crabmeat, 1/2 c. panko, eggs, green onions, sesame oil, ginger, and mustard in large bowl. Mix well, using a fork.

While you're doing this, you might also want to sift through the crabmeat for any shells. Now, my hoity-toity packaging said "virtually shell-free," but that's just not good enough for me.

2. Shape mixture into 8 patties about 1/2" thick. (This is about 1/3 c. of mixture.)

3. Heat 1 Tbsp. oil over medium heat in a large nonstick skillet.

4. Place remaining 1/3 c. or so of panko on a plate. Dip each crab cake lightly in panko to coat.


The cakes were very fragile at this point, but adding the panko to the outside not only makes the finished cakes crispier, but also makes the uncooked cakes easier to handle.

5. Add 4 crab cakes to skillet and cook 3-4 minutes per side, until golden brown. (I had to crank up the heat to medium-high to get them as golden as the hubby wanted them.) Repeat with remaining cakes. Serve warm with sweet and sour sauce, if desired.

Monday, February 7, 2011

Italian Ham Bites

The hubby is morally opposed to the concept of Super Bowl parties -- something about wanting to watch the game, yadda, yadda -- but we did have my brother and the hubby's sister over for supper and to watch the big game. (Because they actually watch the big game.)

I used to make these lovely little appetizers/snacks quite frequently, way back when the hubby and I used to entertain on a regular basis. I would spend weeks preparing menus of perfectly matched appetizers, entrees, sides, and desserts.

But man, I've lost my touch. Our food theme this year was obviously something along the lines of "Things that taste good and hopefully provide some leftovers for the week." We had some Mexican. Some Cajun. And these adorable (and low-fat!) little Italian nibbles.

This is an adaptation of a Betty Crocker recipe, and aside from the taste (and the low-fat-ness!), the best thing about these is that you can easily make them ahead of time. In fact, these little guys need to sit in the fridge for at least a few hours before you slice 'em.

You can use any kind of deli meat with these, and I've tried several varieties, but the ham is still my favorite. Black Forest, if you've got it.

Italian Ham Bites
Makes 25 appetizers

5 slices deli ham
3 Tbsp. flavored, reduced-fat spreadable cheese
Fresh basil leaves
5 strips roasted red pepper, patted dry
5 pieces string cheese

1. Place ham on a work surface and pat dry.

Patting the ingredients dry is a common theme here. If your ham has too much moisture, the spreadable cheese won't stick. And if the ham and peppers have too much moisture, everything will be kind of soggy and slimy. We here at Angel in the Kitchen are not fans of soggy and slimy food.

2. If necessary, trim ham to be the same width as the string cheese, and about 4 or so inches high.

You don't want the bites from the ends of the rolls to have no string cheese, and you also don't want everything to be too hammy. We here at Angel in the Kitchen are not fans of too hammy.

3. Spread ham with 1 1/2 to 2 tsp. spreadable cheese.

I sometimes use flavored cream cheese, like garden herb. This time I used a few wedges of Laughing Cow garlic and herb cheese.

We here at Angel in the Kitchen are fans of Laughing Cow. And laughing cows. Okay, I'll stop.

4. Add a few basil leaves, or one ginormous basil leaf. Place a row of pepper strips across the bottom edge of the ham, and place a piece of string cheese above the peppers. Like so.


5. Starting at the bottom, roll everything up securely.

6. Repeat these steps for each roll.

I obviously made more than 5 rolls. Just making sure you're paying attention.

7. Wrap rolls in plastic wrap and refrigerate at least 2 hours or overnight.

8. Unwrap rolls and place seam side down. Cut each roll into 5 pieces. Pierce with toothpicks if you want to be all fancy-pants. (These were for me, and I don't need no stinkin' toothpicks.)

Friday, December 31, 2010

Vanilla and Cinnamon Roasted Almonds

After successfully cloning the hubby's favorite knoephla soup, I've decided to continue my recipe clone attempts. If I never have to leave the house for my favorite foods, I will have successfully attempted my quest to become a hermit.

Or at least I'll never be stuck without my favorites during a blizzard. (There was a 100-vehicle pile-up on the interstate near Fargo yesterday. Really.)

One of my favorite snacks is the cinnamon-roasted almonds that you can buy at state fairs and street fairs and craft fairs and pretty much any kind of fair. They're so yummy, but pretty pricey, and there's no reason we shouldn't be able to eat them anytime we want.

This is a Taste of Home recipe that got rave reviews online, so I decided to try it. Just a disclaimer: This isn't exactly like the cinnamon-roasted almonds at the fair, because the coating isn't as thick or crunchy. They do, however, have a stronger vanilla flavor that comes through when you're not distracted by all that candy coating.

I hope four cups gets me through the weekend.

Vanilla and Cinnamon Roasted Almonds
Makes 16 servings

2 egg whites
6 tsp. vanilla extract
4 c. whole, unblanched almonds
1/3 c. sugar
1/3 c. brown sugar
1 tsp. salt
1/2 tsp. ground cinnamon

1. Preheat oven to 300 degrees and grease two 15" x 10" baking pans. (I just spread parchment paper on the bottoms. I don't like getting messy.)

2. In a large bowl, beat egg whites until frothy. Stir in vanilla extract.

3. Add almonds and stir gently to coat. Combine the sugars, salt, and cinnamon, add to the nut mixture, and stir gently to coat.

4. Spread evenly onto pans. Bake about 30 minutes or until amonds are crisp, stirring once during the baking time.

5. Cool and store in an airtight container.

Saturday, July 24, 2010

Jack's Super Ham and Cheese Pinwheels

This is my little Superman. Who, at 10 months, is not so little.

Faster than a speeding Fisher Price animal train, Jack manages to scamper his way all over the house, investigating every inch and climbing everything possible. How does this little man of steel keep up his constant supply of energy? He eats. He eats a lot.

A few months ago, I told Jack's teachers at daycare that, because Jack had been through food allergy tests, I felt confident that they could let him try pretty much any food. I was expecting to hear that Jack had branched from his level-1 squash to maybe something wild and crazy, like level-2 pears and blueberries. But instead, he moved to real food, cut in tiny pieces.

And he loved it. Overnight, he started eating chicken and tomatoes with pasta. Meatloaf. Chicken quesadillas with black beans. Chili. The hubby and I decided that instead of making special meals for the little man, we'd feed him bites of whatever we were eating, so he could be introduced to those flavors early on. So he's already comfortable now eating things like Cajun chicken kabobs with potatoes and tomatoes, brisket, bratwurst (with mustard!), grilled zucchini and red pepper, and chicken lo mein (which Jack thinks is the best food EVER).

Obviously, ensuring that the little man eats his veggies is a top priority for us. We've been making a lot of soups and stews with plenty of veggies, but we also need some quicker meal ideas. These pinwheels hit the spot, and they have plenty of veggies mixed in with low-fat cream cheese.

Jack's Super Ham and Cheese Pinwheels
Makes 2 Jack-sized servings

1 Tbsp. low-fat cream cheese
1/2 carrot, grated
2 Tbsp. minced cucumber
2 Tbsp. minced tomato
1 small tortilla (about 6-7")
2 Tbsp. shredded cheese
1-2 slices ham

Jack's suggested accompaniments
Chopped pineapple
Cool water in a sippy cup

1. Mix together cream cheese and grated carrot.

2. Stir in cucumber and tomato.

3. Spread veggie cream cheese mixture on a tortilla.

4. Top with cheese and ham.

5. Roll up tightly, and then cut into slices (and then into bite-sized pieces).

This would probably work better if you refrigerate the pinwheels for an hour or two before slicing, but the little man has no such patience. He has places to go and kitties to chase.