Showing posts with label snacks. Show all posts

Thursday, December 1, 2011

Pizza on a Stick

We're lucky in that our little man has been a wonderful eater so far, for a 2-year-old. Sure, he requests inordinate amounts of ketchup and occasionally dips his sandwiches in his milk, but he loves to try new foods, enjoys his vegetables, and usually eats most of what we put in front of him.

And I finally (finally!) got him to eat homemade cookies recently.

My next obstacle? Pizza. He'll eat a few bites here and there on rare occasions (or when dipped in jalapeno cheese dip), but on the whole, my little guy rejects the notion of pizza. Which is weird. He loves lasagna. He loves sandwiches. Isn't pizza a little like an open-faced lasagna sandwich?

So this is my latest attempt: Pizza on a stick. I saw this idea in Food Network magazine when they ran a feature on state fair foods. Apparently toddlers, like fair-goers, appreciate any food that is served on sticks. So it seemed like it was worth a try.

And did it work, you might be asking? Yes, indeed. Jack thought the pizza sauce was ketchup and went through three bowls' worth, but he gobbled down his pizza ... until it fell off the stick.

Pizza on a Stick
Makes 8 sticks

1 tube refrigerated pizza dough
Flour, for dusting
1 cup pizza sauce
1 1/2 cups shredded mozzarella cheese
1/2 cup grated Parmesan cheese
3/4 cup chopped toppings, such as pepperoni, olives, and mushrooms
8 popsicle sticks or lollipop sticks
Extra-virgin olive oil, for brushing
Dash of garlic powder
Dash of oregano
Extra pizza sauce, for dipping

1. Preheat oven to 425 degrees F. Line a baking sheet with parchment paper.

2. Roll out pizza dough on lightly floured surface to about 12" by 16".

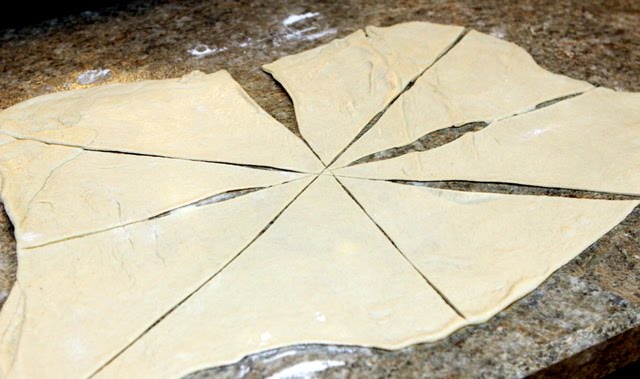
3. Cut in fourths, and then cut each quarter in half diagonally to make 8 triangles.
4. Brush each triangle with pizza sauce, leaving a 1/2" border around the perimeter.

5. Sprinkle with cheese and add toppings.

6. Slightly fold in the two far corners of each triangle, and then roll up the dough from the long side first, sort of like a burrito or egg roll. Press gently to seal.

7. Lay each roll on the baking sheet, and carefully insert popsicle or lollipop sticks.

8. Brush rolls with olive oil and sprinkle lightly with garlic powder, oregano, and Parmesan cheese. Add any remaining toppings, as well.

9. Bake until golden, about 20 minutes. Serve with heated pizza sauce, for dipping.

Sunday, September 25, 2011

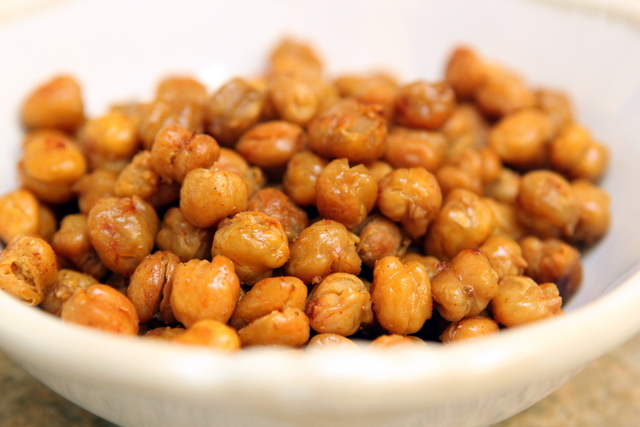
Crispy Roasted Chickpeas

Roasted chickpeas have become quite the fad in the past several months, and I've seem them with all manner of seasonings. They always look fantastic, but I've had little luck with the recipe.

But I kept trying, because I figured I had to be doing something wrong. On this fateful attempt, whilst transferring my chickpeas to dry, I noticed the skin peeling off some of the chickpeas.

Chickpeas have skin?

I know! I was surprised, too. I'm usually just dumping them into a pot of soup, so I don't handle them much. But as I peeled away the skin, out popped what appeared to be a shiny, new chickpea -- with a harder, nuttier texture.

And hurray, crispy roasted chickpeas!

You can use any seasoning blend that you prefer on these. I opted for a milder mixture this time around, but I think I'll go with something zestier next time, like a Cajun or Creole blend.

Crispy Roasted Chickpeas
Makes about 1 cup

Chickpeas
1 15-ounce can chickpeas (garbanzo beans)
2 tablespoons extra-virgin olive oil
Seasoning blend, to taste
Kosher salt, for sprinkling (I used a smoked chipotle salt)

Seasoning blend
1 teaspoon smoked sweet paprika
1/8 teaspoon ground cumin
1/8 teaspoon ground cinnamon
1/8 teaspoon cayenne pepper

1. Preheat oven to 400 degrees F. Combine seasoning blend ingredients.

2. Rinse and drain chickpeas.

You're welcome for this helpful photo of how to drain chickpeas. I'm practicing with all these new lenses that the hubby keeps putting on the camera.

3. Remove skins from chickpeas, if you have the time and inclination. For most, you simply have to sort of squeeze the chickpea, and it pops right out of its skin.

The skins creep me out, in a haunted-house-"guess-what's-in-the-bowl"-game sort of way.

4. Lay the chickpeas on a few paper towels, and blot them with another paper towel to dry. It was such a nice, bright, sunny day in my kitchen that does not yet have blinds put on the windows, so I let my chickpeas soak up some rays to dry.

5. Place the chickpeas on a baking sheet and drizzle with olive oil. Toss with your hands to ensure the oil is evenly distributed.

6. Roast for 30-40 minutes, stirring once, until chickpeas are brown and crispy.

7. Sprinkle immediately with seasoning blend and salt. Then serve 'em up!

These are addictive, so it shouldn't be any problem to eat them in one sitting. If you have extras, store tightly covered. But they don't seem to keep well for more than a couple of days.

Wednesday, April 20, 2011

Guacamole

And I'm back! Although still busy and stressed and scared to mess up my kitchen for fear no one will want to buy our house because it looks like people actually live here.

But back to food. As often happens with me, I was reading a book the other day that inspired a food craving. Nothing strange, just some characters in my book sitting around, eating chips and guacamole. And boy howdy, I had to get me some.

This recipe is a spin on the guacamole served at Bar Abilene in Minneapolis, which I visited with a few friends during a girls' weekend out far too many years ago. (Why haven't we done this again???) The guacamole is all mashed together right at the table, so it's fresh and chunky and yummy. And you have just enough time to perfect it before cinco de mayo!

Guacamole
Serves 4

Pico de gallo
5 tomatoes, seeded and diced
¼ white onion, diced
1 serrano chile, minced (I removed the seeds)
2 Tbsp. chopped cilantro
2 Tbsp. freshly squeezed lime juice
¼ tsp. black pepper
½ tsp. kosher salt

Guacamole
3 ripe avocados, flesh removed
6 cloves roasted garlic (drizzled with olive oil, wrapped in foil, and roasted at 350 degrees for 30 minutes)

1/2 c. pico de gallo
1 Tbsp. chopped cilantro
Juice of 1 lime
1 tsp. kosher salt
½ Tbsp. Worcestershire sauce
15 dashes green or chipotle Tabasco


1. Combine all pico de gallo ingredients in a bowl.

2. Mash the avocado and roasted garlic together in a bowl.

3. Mix in 1/2 c. pico de gallo and remaining guacamole ingredients. Serve with chips.

Monday, February 7, 2011

Italian Ham Bites

The hubby is morally opposed to the concept of Super Bowl parties -- something about wanting to watch the game, yadda, yadda -- but we did have my brother and the hubby's sister over for supper and to watch the big game. (Because they actually watch the big game.)

I used to make these lovely little appetizers/snacks quite frequently, way back when the hubby and I used to entertain on a regular basis. I would spend weeks preparing menus of perfectly matched appetizers, entrees, sides, and desserts.

But man, I've lost my touch. Our food theme this year was obviously something along the lines of "Things that taste good and hopefully provide some leftovers for the week." We had some Mexican. Some Cajun. And these adorable (and low-fat!) little Italian nibbles.

This is an adaptation of a Betty Crocker recipe, and aside from the taste (and the low-fat-ness!), the best thing about these is that you can easily make them ahead of time. In fact, these little guys need to sit in the fridge for at least a few hours before you slice 'em.

You can use any kind of deli meat with these, and I've tried several varieties, but the ham is still my favorite. Black Forest, if you've got it.

Italian Ham Bites
Makes 25 appetizers

5 slices deli ham
3 Tbsp. flavored, reduced-fat spreadable cheese
Fresh basil leaves
5 strips roasted red pepper, patted dry
5 pieces string cheese

1. Place ham on a work surface and pat dry.

Patting the ingredients dry is a common theme here. If your ham has too much moisture, the spreadable cheese won't stick. And if the ham and peppers have too much moisture, everything will be kind of soggy and slimy. We here at Angel in the Kitchen are not fans of soggy and slimy food.

2. If necessary, trim ham to be the same width as the string cheese, and about 4 or so inches high.

You don't want the bites from the ends of the rolls to have no string cheese, and you also don't want everything to be too hammy. We here at Angel in the Kitchen are not fans of too hammy.

3. Spread ham with 1 1/2 to 2 tsp. spreadable cheese.

I sometimes use flavored cream cheese, like garden herb. This time I used a few wedges of Laughing Cow garlic and herb cheese.

We here at Angel in the Kitchen are fans of Laughing Cow. And laughing cows. Okay, I'll stop.

4. Add a few basil leaves, or one ginormous basil leaf. Place a row of pepper strips across the bottom edge of the ham, and place a piece of string cheese above the peppers. Like so.


5. Starting at the bottom, roll everything up securely.

6. Repeat these steps for each roll.

I obviously made more than 5 rolls. Just making sure you're paying attention.

7. Wrap rolls in plastic wrap and refrigerate at least 2 hours or overnight.

8. Unwrap rolls and place seam side down. Cut each roll into 5 pieces. Pierce with toothpicks if you want to be all fancy-pants. (These were for me, and I don't need no stinkin' toothpicks.)

Friday, December 31, 2010

Vanilla and Cinnamon Roasted Almonds

After successfully cloning the hubby's favorite knoephla soup, I've decided to continue my recipe clone attempts. If I never have to leave the house for my favorite foods, I will have successfully attempted my quest to become a hermit.

Or at least I'll never be stuck without my favorites during a blizzard. (There was a 100-vehicle pile-up on the interstate near Fargo yesterday. Really.)

One of my favorite snacks is the cinnamon-roasted almonds that you can buy at state fairs and street fairs and craft fairs and pretty much any kind of fair. They're so yummy, but pretty pricey, and there's no reason we shouldn't be able to eat them anytime we want.

This is a Taste of Home recipe that got rave reviews online, so I decided to try it. Just a disclaimer: This isn't exactly like the cinnamon-roasted almonds at the fair, because the coating isn't as thick or crunchy. They do, however, have a stronger vanilla flavor that comes through when you're not distracted by all that candy coating.

I hope four cups gets me through the weekend.

Vanilla and Cinnamon Roasted Almonds
Makes 16 servings

2 egg whites
6 tsp. vanilla extract
4 c. whole, unblanched almonds
1/3 c. sugar
1/3 c. brown sugar
1 tsp. salt
1/2 tsp. ground cinnamon

1. Preheat oven to 300 degrees and grease two 15" x 10" baking pans. (I just spread parchment paper on the bottoms. I don't like getting messy.)

2. In a large bowl, beat egg whites until frothy. Stir in vanilla extract.

3. Add almonds and stir gently to coat. Combine the sugars, salt, and cinnamon, add to the nut mixture, and stir gently to coat.

4. Spread evenly onto pans. Bake about 30 minutes or until amonds are crisp, stirring once during the baking time.

5. Cool and store in an airtight container.