Showing posts with label breakfasts. Show all posts

Thursday, December 20, 2012

Snickerdoodle Bread

Snickerdoodle cookies are such a holiday favorite of mine that I can't bear to save them just for the holidays, so I was pretty excited to stumble upon this recipe for snickerdoodle bread. The recipe was a cinch and made the house smell heavenly.

I made four mini loaves and two extra-mini loaves with this recipe, and actually only managed to snag a few slices before the entire stash disappeared. My mother, the main culprit behind the disappearing bread, claimed that it tasted even better after it sat tightly wrapped for a day or two.


Snickerdoodle Bread
Makes 5 mini loaves or 2 large loaves

Bread
  • 2 1/2 cups flour
  • 2 teaspoons baking powder
  • 1 cup butter, softened
  • 2 cups sugar
  • 1/2 teaspoon salt
  • 2 teaspoons cinnamon
  • 3 eggs
  • 2 teaspoons vanilla extract
  • 1 cup sour cream
  • 1 1/2 cups (1 package) cinnamon chips
  • 2 tablespoons flour
Topping
  • 2 tablesopons sugar
  • 2 teaspoons cinnamon
  1. Preheat oven to 350 degrees F. Grease 5 mini loaf pans (about 5 3/4“ by 3 1/4” by 2 1/4").
  2. In a medium bowl, combine 2 1/2 cups flour and baking powder.
  3. In a separate bowl, use a mixer to cream butter, 2 cups sugar, salt and 2 teaspoons cinnamon until fluffy, about 2 minutes.
  4. Add eggs, one at a time, mixing well after each addition. Add vanilla and sour cream and mix to combine.
  5. Add flour mixture, stirring until just combined.
  6. Coat the cinnamon chips with 2 tablespoons flour and stir into batter.
  7. Spoon batter into pans (don’t fill more than 2/3 full.)
  8. Combine topping ingredients and sprinkle over the top of the batter in the pans.
  9. Bake 35-40 minutes, or until a toothpick inserted in the center of the loaf comes out clean. (If you're making large loaves, increase the baking time to 60-70 minutes.)
  10. Let cool 5 minutes before removing from pans. When fully cool, wrap tightly in plastic wrap to store.
  11.  

Thursday, February 2, 2012

Low-Fat Lemon Pound Cake

My apologies for the lapse in posts these days. To say there's a lot going on would be an understatement. And when I'm stressed, I take comfort in food. Especially sweet food.

But hey, at least this one is lower in fat!

This is a Cook's Country recipe that hits just the right citrusy note without being too overpowering with the lemon. And while it's not quite as moist as its full-fat relation, it's nothing that a small dollop of fat-free Cool Whip can't fix.
Low-Fat Lemon Pound Cake
Serves 8-10

For the cake:
1 1/2 cups flour
1/2 teaspoon baking powder
1/4 teaspoon salt
1/3 cup light or low-fat sour cream
1 1/2 tablespoons grated lemon zest
1 1/2 tablespoons freshly squeezed lemon juice
1/2 teaspoon vanilla extract
1 cup sugar
5 tablespoons butter, softened
1 tablespoon shortening
3 eggs, at room temperature

For the glaze:
2 tablespoons powdered sugar
1 teaspoon lemon juice

1. Unload your dishwasher. This is one of those 5-bowl recipes, and you'll appreciate the head start.

2. Preheat oven to 300 degrees F, and make sure that the oven rack is positioned in the middle so the cake bakes evenly. Grease and flour an 8 1/2" x 4 1/2" loaf pan.

3. In a small bowl, combine the flour, baking powder, and salt.


4. In another small bowl, whisk together the sour cream, lemon juice, and vanilla.


5. In yet another small bowl, combine the sugar and lemon zest.


6. Using an electric mixer, beat butter, shortening, and the sugar mixture about 2 minutes. Add eggs, one at a time, and mix until combined.

7. Reduce mixer speed to low, and add one-third of the flour mixture, followed by half the sour cream mixture. Repeat, and then add the last of the flour mixture. Mix on low until smooth, for about 30 seconds.

8. Pour batter into loaf pan and tap pan against the counter several times.


9. Bake until cake is golden brown and a toothpick comes out clean, about 60-70 minutes. Cool cake in pan for 10 minutes, then remove from pack and cool on rack for a few hours.


10. When the cake is cool, combine powdered sugar and lemon juice in a bowl until smooth. Pour glaze over cake and let set 10 minutes before serving. (I actually think it tastes better if it's refrigerated before serving.)


Thursday, December 8, 2011

Quick and Easy Caramel Rolls

This Betty Crocker recipe has been a longtime favorite of mine, when I'm craving some warm, homemade caramel rolls, but I don't have the time to deal with actual dough. And I love the uber-creamy caramel.

No, these aren't the best caramel rolls I've ever had in my life. But they're still quite good, and they're definitely the best homemade caramel rolls I've had that only take a few minutes to throw together. I recommend serving alongside some bacon, as I recommend serving almost anything.

Quick and Easy Caramel Rolls
Makes 8 rolls

1/2 cup brown sugar
1/2 cup cream (either whipping cream or heavy cream)
2 tablespoons sugar
1 teaspoon ground cinnamon
1 11-ounce can refrigerated soft breadsticks

1. Preheat oven to 350 degrees F.

2. Combine brown sugar and cream in an 8-inch round pan. (I use a silicone spatula so I don't scratch the pan's coating.)

3. Combine sugar and cinnamon.

4. Unroll breadstick dough.

(I put these on waxed paper for easier cleanup.)

5. Sprinkle with cinnamon-sugar mixture.

6. Roll up dough from the short end, separate into rolls at the perforations, and place in pan.

7. Bake 20-25 minutes, or until golden.

8. Cool 1 minute, and then invert onto a plate and serve warm.

Tuesday, November 8, 2011

Sticky Bun Bites

A few months ago, I explained away an absence in my posts with the justification that it's possible that the SD card that contained many of my photographs had been temporarily misplaced -- some might say "lost" -- and that if anyone found it, to please contact us.

The other week, my brother received a message from the school secretary in a nearby town, after someone had turned in the card at the school office. (Note that my brother was not in possession of the card when it was ... misplaced.) My brother is a fairly recognizable -- some might say "notorious" -- figure in these parts, so the secretary recognized him in a couple of the pictures. So essentially, my brother got a message that said, "There's an SD card here at the school, and it has some photos of football, you, and Mickey Mouse."

Thank you, nameless student with the eagle eyes who spotted our SD card in the gravel parking lot and then had the moral fortitude to actually turn in the card. The Short family vacation photos have found their way home!

And so have my recipe photos. (And why didn't the secretary mention these?)

This one such recipe, from Pillsbury. I made these one Sunday morning to feed my parents before they hit the road for the day, and the little man loved them, as well. He likes to eat these out of a paper cup in the car. A Mickey Mouse paper cup, if possible.

These harden up pretty quickly if you leave them uncovered, but they soften considerably if you store them in an airtight container. I actually liked these better the next day -- they're soft inside, and the outside tastes more like toffee than caramel.

Sticky Bun Bites
Makes 6 servings

1/4 cup butter, melted
Shortening, for greasing pan
1/4 cup brown sugar
2 tablespoons corn syrup
1 tablespoons sugar
1/2 teaspoon ground cinnamon
1 12-ounce tube Pillsbury Grands! Jr. Golden Layers biscuits

1. Preheat oven to 375 degrees F. Grease 12 regular-sized muffin cups with shortening.

2. In a small bowl, combine butter, brown sugar, and corn syrup. Divide mixture among muffin cups (a little less than a tablespoon in each).

3. Combine sugar and cinnamon in a resealable bag.

4. Separate dough into 10 biscuits, and cut each biscuit into 6 pieces.

5. Place biscuit pieces in bag with cinnamon and sugar, seal, and shake to coat. Place 5 biscuit pieces in each muffin cup.

6. Bake 15-20 minutes, or until golden brown.

7. Cool 1 minute before inverting onto waxed paper and removing pan. Serve immediately, and store leftovers in a storage container.

Tuesday, November 1, 2011

Apple Turnovers

Apple turnovers are one of my favorite pastries, but it seems like it's tough to find a great one. (Although I still more than willingly eat the not-so-great ones.) So many of them have canned pie filling, which I don't particularly care for, or they leave kind of a funny feeling on the roof of your mouth, which probably means they've been sitting on the shelf for too long.

Or maybe I need to find a better bakery.

The good news is that apple turnovers are quite simple to make at home using store-bought puff pastry. And you can customize the filling to your tastes, just like I did mine. (And the little man did his, although more about that later.)

I think the best apples to use for this filling are apples that aren't terrible sweet, or too tart. (Or at least use a few of each to balance the other out.) Use the same type of apples that you'd use for an apple pie, because that's essentially what these are -- mini pies. I highly recommend the apples that grow on my parents' tree, if you can manage to get ahold of them. (I have connections.)

Apple Turnovers
Makes 9 turnovers

1 1/2 pounds apples (about 4 large apples)
1/4 cup water
1 teaspoon lemon juice
1/4 cup brown sugar
1/4 cup sugar
2 tablespoons flour
1/4 teaspoon ground cinnamon
Dash of freshly ground nutmeg
1/2 tablespoon butter
1 package puff pastry (16-18 ounces)
1 egg, beaten
1/2 cup powdered sugar
A few teaspoons milk


1. Preheat oven to 350 degrees F. Line two baking sheets with parchment paper.

2. Peel, core, and cut apples into 1" pieces.

3. Place apples in a saucepan with water, lemon juice, sugars, flour, cinnamon, and nutmeg. Bring to a boil, stirring occasionally, until sugar dissolves. Cover, and reduce heat to medium-low. Simmer until apples are very tender, about 15 minutes.

4. Remove apples from heat and stir in butter. Slightly mash apples into smaller pieces. Cool completely.

5. Stack puff pastry sheets together and roll into a 15" square. Cut into 9 even squares.

Correction: Cut into 9 uneven trapezoids.

6. Divide filling amongst the squares.

Wait a minute. Which of these things is not like the others ... what happened? Let's check the instant replay.

Jack decided to go the route of a makeshift pain au chocolate. Which worked pretty well, by the way.

7. Lightly brush edges of squares with beaten egg. Fold half of pastry square over to form a triangle. Use a fork to crimp the folded edges to seal them shut. Brush triangles with beaten egg.

Sealing them is important, but I sort of overfilled mine and had trouble keeping the filling contained. But my turnovers were fine. They didn't explode like, say, pizza rolls.

8. Using a sharp knife, cut three small slits in the top of each turnover, in case the turnovers just need to let out some steam.

9. Bake 15 minutes on two separate racks, and then switch each pan to the opposite rack. Bake an additional 15 minutes, or until turnovers are golden.

10. Let turnovers cool slightly. Combine powdered sugar and milk to desired consistency, and then drizzle icing over turnovers.

Saturday, October 15, 2011

Bacon-Wrapped Li'l Smokies

This little snack/appetizer/side dish is a meat-lover's dream. These little guys are like pigs in a blanket, except that the blanket, too, is made of pig. (Speaking of meat-lovers' dreams ...)

You could serve these as an appetizer, along with a mustard sauce or barbecue sauce for dipping. They're perfect for entertaining, because they taste great even at room temperature.

I prefer them with brunch-type meal, alongside maybe a slice of quiche and a pastry or some fruit. I love brunch in general, and it only gets better with some pig-wrapped pig. (Oh, wait, I used all-beef smoked sausages.)

Just a note that you don't want to use thick-cut bacon here. It's ... I can't believe I'm saying this ... too bacony.

Bacon-Wrapped Li'l Smokies
Makes about 40 sausages

1 pound bacon, sliced in half
1 pound miniature smoked sausages
2 tablespoons brown sugar

1. Preheat the oven to 400 degrees F. Line a large, rimmed baking sheet with foil, and place a baking rack on top.

2. Wrap each sausage with half a slice of bacon.

3. Place seam side down on baking rack and sprinkle sausages with brown sugar.

You might notice that my baking rack is missing here. That is a mistake I shan't repeat.

4. Bake 30-40 minutes, or until bacon is cooked to desired doneness.

Saturday, August 13, 2011

Double-Chocolate Zucchini Bread

I got an unexpected delivery of zucchini from my mother-in-law the other day, and I was caught totally off-guard. Is it that time of year already? Not wanting this precious produce to go to waste, I tried something that I've never made before: zucchini bread.

I'll be the first to admit that I'm not a fan of zucchini bread. Or banana bread. Or anything of that ilk. I don't know if it's the texture or the spices used with them, but they've just never really been my thing.

But if you add chocolate, well, that's a completely different story.

This zucchini bread, based on a Food Network Kitchens recipe, is studded with dark chocolate chips, and also has some cocoa in the batter. The cocoa isn't overwhelming ... it still has a bit of zucchini-bread flavor, but actually has a taste and texture that's more like cake than bread.

And did I mention the chocolate chips?

This bread is tasty on its own, but would be incredible topped with some whipped cream. Or cream cheese. And maybe some more chocolate chips. I deserve a reward. I hit the treadmill today. For 10 whole minutes, too.

Double-Chocolate Zucchini Bread
Makes 2 loaves

2 1/2 c. flour
1/4 c. unsweetened cocoa
1 tsp. baking soda
1/2 tsp. ground cinnamon
1 c. butter, softened
1 1/2 c. sugar
1/4 c. vegetable oil
2 eggs, at room temperature
1 tsp. vanilla extract
1/2 c. buttermilk, at room temperature
2 c. shredded, unpeeled zucchini (8 oz.)
6 oz. dark chocolate chips

1. Preheat oven to 350 degrees. Grease and flour two 9"x5" loaf pans.

2. Whisk the flour, cocoa, baking soda, and cinnamon in a medium bowl.

3. Using a mixer, beat the butter and sugar on medium-high spped until light and fluffy, about 4 minutes.

4. While mixing, drizzle in the oil and beat until incorporated. Beat in the eggs, one at a time, mixing well after each addition.

5. Add the vanilla to the buttermilk.

6. Slowly mix 1/3 of the flour mixture into the butter mixture, and then 1/2 the buttermilk mixture. Mix in another 1/3 of the flour mixture, the remaining buttermilk, and then the last of the flour mixture.

7. Fold zucchini and chocolate chips into the batter.

8. Divide the batter between the two pans.

9. Bake until a toothpick in the center of the bread comes out clean, about 45 minutes for a glass pan and 55 minutes for a metal pan. (I tried one of each.)

10. Cool in pans on rack before removing loaves from pans.


Sunday, March 6, 2011

Ricotta-Orange Pound Cake

I received a lovely loaf pan from my parents for the holidays, and was bound and determined to give it a try this weekend. The recipe I chose was one by Giada de Laurentiis that was featured in Food Network magazine.

I've made a few pound cakes in my illustrious non-career as an amatuer cook, but never one this perfectly moist. The orange zest gives the pound cake a bright flavor without being overwhelming, as lemon pound cake can sometimes be. While it certainly doesn't need it, I think this cake would be even more wonderful with a dollop of whipped cream.

My mother said the same thing. Of course, she thinks everything can be improved by a dollop (or six) of whipped cream.

Ricotta-Orange Pound Cake
Serves 10-12

1 1/2 sticks butter, at room temperature
1 1/2 c cake flour*
2 1/2 tsp baking powder
1 tsp kosher salt
1 1/2 c whole-milk ricotta cheese
1 1/2 c plus 1 Tbsp sugar
3 large eggs
1 tsp vanilla extract
1 orange, zested
2 Tbsp amaretto**
Powdered sugar, for dusting

*I didn't have cake flour on hand, but you can easily substitute every 1/2 cup of cake flour with 1 Tbsp cornstarch and nearly 1/2 cup of all-purpose flour. The easiest way to get the correct measurement is to put 1 Tbsp cornstarch in a 1/2 cup measuring cup, and then fill that to the top with all-purpose flour.

**I might actually have some amaretto, but we break into the liquor cabinet so rarely that it's become quite the trek to get there. (Up the stool, across the counter, over the fridge, etc.) My almond extract, however, was three feet away, so I used about 1/4 to 1/2 a teaspoon of that, instead.

1. Preheat the oven to 350 degrees F. Grease a 9-by-5-by-3-inch loaf pan with butter or shortening.

2. In a medium bowl, combine the flour, baking powder, and salt. Stir to blend.

3. Using a mixer, cream the butter, ricotta, and sugar until light and fluffy, about 3 minutes. With the mixer running, add the eggs, one at a time. Add the vanilla, orange zest, and amaretto or almond extract until combined. Add the dry ingredients, a small amount at a time, until just incorporated.

4. Pour batter into prepared pan and bake until a toothpick comes out clean and the cake pulls away from the sides of the pan, 50 to 55 minutes. Let cool in pan 10 minutes, then transfer to a rack to cool completely. Dust with powdered sugar.

Sunday, September 19, 2010

Chocolate Chip Pound Cake

I've decided that my Christmas list this year is going to include some new baking pans, because despite having a kitchen full of pots, pans, and gadgets, I don't seem to have some of the basics that my recipes have been calling for lately. Such as a standard loaf pan.

I agonize over pan sizes. I have no eye for measurements, so I have to get out the tape measure every time a recipe doesn't use my own standard pan terminology. For example, "the bar pan" means a 9x13 pan. The "brownie pan" means an 8" square pan. "The pan you use for homemade pizza" means the 11x15 sheet pan.

And in my world, a loaf pan is a loaf pan. But apparently this isn't the case, which is why my chocolate chip pound cake sort of resembled unsliced chocolate chip biscotti. But it sure tasted good. This recipe is based on a Hershey's recipe, and it tastes a bit like cake and a bit like shortbread.

I did end up trying the glaze on the cake later, but I'm not sure if it was an improvement. The glaze had a bit too much shortening for my taste, so it had a bit of a waxy texture, and I think the cake was just fine without it.

Chocolate Chip Pound Cake
Serves 8-10

Cake
1/2 c. butter, softened
4 oz. cream cheese, softened
3/4 c. sugar
2 eggs
1 tsp. vanilla extract
1 c. flour
1 tsp. baking powder
1 c. chocolate chips

Glaze (optional)
2/3 c. chocolate chips
2 Tbsp. shortening

1. Preheat oven to 325 degrees. Grease and flour a 9x5 loaf pan.

2. Combine butter, cream cheese, and sugar until light and fluffy. Add eggs and vanilla, and beat well.

3. Blend in flour and baking powder, and then stir in 1 c. chocolate chips.

4. Pour batter into prepared pan. Bake 45-50 minutes, or until cake pulls away from sides of pan.

5. Cool 10 minutes, and then remove cake from pan and cool complete on a wire rack.

6. If making glaze, combine 2/3 c. chocolate chips and shortening in a small saucepan. Cook over low heat until chocolate chips are melted, stirring frequently. Poor glaze over top of cake, allowing it to run down the sides. Cool before serving.

Sunday, December 6, 2009

Deconstructed Denver Omelet

A friend of mine half-joked the other day that I've just been phoning it in on my blog, and you know, he's right. I haven't been terribly active lately, and when I do cook something new, it's usually a very quick meal. I start each week with great intentions and a meal plan, but it sort of flies out the window within a few days.

There's a part of me that feels like I should apologize. And yet, I'm not really sorry. My time at home with the little man is rapidly dwindling. When I go back to work after the holidays, I want to look back on these past few months with longing, not regret.

That is why, even though I have a meal planned for each evening, I usually end up just phoning it in. The little man wakes up from his afternoon nap around 4 or so, and eats a leisurely supper. And then, well rested, well fed, and with clean pants, he is ready to par-tay, Jack-baby style. I then have to decide between A.) Putting him in his swing for an hour or so while I prepare supper, or B.) Scrapping my original meal plan and throwing something together at the last minute so Jack and I can play with the puppies. Or dance to Christmas tunes. Or see who can smile at the ceiling fan the longest. (I always lose.)

I always choose B. Which makes the little man pretty happy.

Can you blame me? This is the smile that will get him out of many hours of detention someday.

This meal was my standby supper last week, because we had oodles of ham. And eggs are my friend.

I've always been the type to eat breakfast for any meal of the day, but I've probably single-handedly upped the average number of eggs consumed per person this year. First off, my doctor suggested I eat a lot of eggs a few months before the hubby and I attempted our in-vitro. And I take doctors' orders very seriously. Also, while I didn't get terribly sick during my pregnancy, I also couldn't bear the thought of most foods. Eggs were the only food I could regularly eat, so I typically had them for two meals a day. Sometimes with bacon. And my cholesterol is stellar.

This skillet contains the typical components of a Denver omelet. However, I was hungry for eggs over-easy, which I like to mix all up with hash browns, so I just threw everything in together. That's how it all ends up eventually anyway, right? Right.

All quantities are to your liking.

1. Heat a skillet to medium-high and add a tablespoon or two of butter. Add the hash browns immediately (I used about a cup or so). Sprinkle the hash browns with pepper and Lawry's season salt.

Butter and season salt are a hash brown's best friends.

2. Cook the hash browns to desired doneness. I like mine with some crust, but still soft enough to mash together with my eggs. It took about 5 minutes.

3. In the same skillet, throw in some diced ham, onion, and green bell pepper. I used about a half-cup of ham, 1/4 a large onion, and half a large green pepper.

4. Cook until ham starts to brown, and veggies are crisp-tender -- about 2 or 3 minutes. Then mix everything together.

5. In a separate skillet, fry eggs (I made two) until cooked to desired doneness.

6. Top hash brown mixture with some cheese, and then eggs.
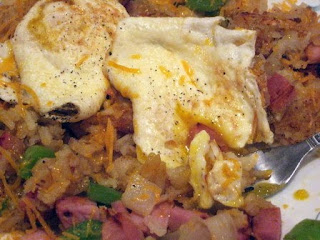
7. Wash your six dishes and go spend time with your family.

Sunday, August 23, 2009

Cheddar-Garlic Biscuits

After the hubby and I slaved away on our big meal for lunch yesterday (OK, so it was actually a pretty simple meal), we spent the rest of the day cleaning and organizing the garage. Organization makes me happy. A clean garage makes the hubby happy. Everybody wins.

I'm spending today inside, doing laundry and cleaning out the basement. (Does anyone have need of a 4-foot stuffed Pepe Le Pew? Anyone? Bueller?) The hubby and I were going to finish our garage project, but the hubby got called away to do bales at his ma's ranch.

I'm not allowed to do bales, even when I am not heavy with child. The hubby and his sisters grew up tossing 80-pound bales of hay. I was town folk; I can barely lift a rake. When I go with for baling, my official job is to stay in the kitchen where I belong and feed people. Again, everybody wins.

But I stayed home today, and I'm taking a quick break from my projects to make a pot of fiesta beef soup. I thought it might go well with the leftover cheddar-garlic biscuits from lunch yesterday.

These biscuits are supposedly a knock-off of the cheddar biscuits you get at Red Lobster, and I love them. They're actually very easy to make -- no rolling out the dough! -- and they turned out fabulously. Everyone thought the biscuits tasted just like the real thing. The trick seems to be the garlicky melted butter that's brushed over the biscuits when they come out of the oven. I have a feeling I'll be asked to make these on a regular basis.

Cheddar-Garlic Biscuits
Makes 1 dozen

2 1/2 c. Bisquick
4 Tbsp. cold butter
1 heaping c. shredded cheddar cheese
3/4 c. cold whole milk
1/4 tsp. garlic powder

Topping
2 Tbsp. butter
1/2 tsp. garlic powder
1/4 tsp. dried parsley flakes
Pinch of salt

1. Preheat oven to 400 degrees.

2. Combine Bisquick and 4 Tbsp. butter in a medium bowl using a pastry cutter. The butter should be about the size of small peas.

3. Add cheese, milk, and 1/4 tsp. garlic powder. Mix by hand just until ingredients are combined.


4. Using an ice cream scoop, drop portions (about 1/4 c. each) onto a baking sheet.

5. Bake 15-17 minutes, or until biscuits are golden.

6. Combine 2 Tbsp. butter, 1/2 tsp. garlic powder, parsley flakes, and salt in a small saucepan over medium-low heat.

7. Brush melted butter over the tops of biscuits (use all the butter mixture).

Mmm ... biscuits ... Charlie wants some biscuits ...


Friday, July 3, 2009

Blueberry Crumb Cake

The hubby and I are heading out of town for the Fourth of July weekend. It's our usual plan to make a swing out to his family's ranch, and then spend most of the Fourth with my family.

The Fourth of July has always been a big deal for my family, mainly because my dad is obsessed with fireworks. He's been dropping outrageous sums of money and putting on a lovely show for us for as long as I remember.

And my little brother has taken things a step further. Cory started created his own pyrotechnic displays when he was in junior high -- complicated concoctions of fireworks and fuse glued to plywood, with everything timed perfectly. He also went through about an eight-year phase where he re-enacted famous war battles with using tanks, smoke bombs, firecrackers, and army men. He used to watch a lot of Patton.

We're the neighborhood pests this time of year. We're typically the last ones lighting fireworks, right up until that midnight deadline, or so our friendly neighborhood sheriff's deputy is keen on reminding us. We've started a few fires in our time (a ditch, the neighbor's tree). One on particularly windy Fourth, we rained hundreds of tiny parachutes all over our neighbor's house and yard. And there was once incident involving a rocket, a neighbor, and her toilet that I shan't repeat.

Somehow, no one has ever gotten upset with us, and we always clean up our messes.

I'll be the first to admit that we're a bit more concerned with fun than we are safety. My dad makes his own rocket launchers out of PVC pipe. We have shooting contests. We sometimes get hurt. For example, one of us took a chaser to the neck last year. (Note that I've been informed that this was a Roman candle. Which, I'm sure, changes everything.)

In other words, don't be like us. Have a fun AND safe Fourth of July.

And make something yummy for breakfast. Like this blueberry crumb cake, from Barefoot Contessa at Home. I love Ina Garten. She's my favorite. She would never start her own shirt on fire with a champagne party popper.

Blueberry Crumb Cake
Serves 6-8

Streusel
1/4 c. sugar
1/3 c. brown sugar
1 tsp. ground cinnamon
1/8 tsp. ground nutmeg
1 stick butter, melted
1 1/3 c. flour

Cake
6 Tbsp. butter, at room temperature
3/4 c. sugar
2 extra-large eggs, at room temperature
1 tsp. vanilla extract
1/2 tsp. grated lemon zest
2/3 c. sour cream
1 1/4 c. flour
1 tsp. baking powder
1/4 tsp. baking soda
1/2 tsp, kosher salt
1 c. fresh blueberries

1. Preheat oven to 350 degrees. Grease and flour a 9" round cake pan.

2. For streusel, combine sugars, cinnamon, and nutmet in a bowl. Stir in melted butter and then flour until well combined. Set aside.

3. For cake, combine butter and sugar using stand mixer. Beat on high speed 4-5 minutes.

4. Reduce speed to low and add eggs, one at a time, and then vanilla and sour cream.

5. In a separate bowl, sift together flour, baking powder, baking soda, and salt.

See how nice and fine it gets?

6. With the mixer speed still on low, add flour mixture just until batter is combined.

7. Stop mixer and use a spatula to ensure ingredients are thoroughly combined. Gently fold in blueberries.

8. Pour batter in prepared pan, smoothing with a knife.

9. Top with streusel, crumbling by hand.

Mmm ... streusel ...

10. Bake 40-50 minutes, or until a toothpick comes out clean.

11. Cool completely, then slice and serve. Optionally, top with powdered sugar or whipped cream.

Sunday, February 22, 2009

Buttermilk Pancakes

My brother, Cory, is staying with us this weekend, which is always a treat. He’s fun to cook for, the dogs love to pounce on him, and he and the hubby play some serious Wii.

We spent the evening out with friends last night and slept in this morning. The hubby announced that he’d be making supper, which meant lunch was my call. So brunch it was -- pancakes, sausage, eggs, and toast.

I’m embarrassed to admit such a thing, but I know next to nothing about making pancakes. I’m not really a pancake person, and when the occasional mood strikes me, there are plenty of pancake haven-type restaurants to fulfill my needs. With a lovely omelet on the side.

But for the past few weeks, I’ve been able to think of little else but pancakes. I crave them morning, noon, and night. This is also embarrassing to admit. But hey, I’m sure it happens to the best of us.

Although I freely admit my pancake ignorance, I do know that what makes them taste so wonderfully and deliciously tangy is the buttermilk. The buttermilk pancake recipe I chose is printed in The 150 Best American Recipes, and is incredibly simple and basic. Although the batter was a thicker, gloppier batter, so while you could pour it out onto the griddle, it didn’t exactly spread into perfect circles as I’d had planned. And my pancakes were decidedly less golden than I imagined.

In fact, the hubby came to check on me and said, "Uh, WHAT are you making?"

Enter Cory. While he’s exceptionally skilled at making microwave popcorn and Red Baron French bread pizzas, I figured that was the extent of his culinary expertise. But no. He put me on toast duty, and masterfully took over at the griddle. He managed to spread out the batter more artfully than I had, and cranked the griddle temperature up quite a bit.

He’s a genius. I taught him everything he knows. Except the pancake thing. I have NO idea where that came from.

Buttermilk Pancakes
Serves 2-3

1 c. flour
½ tsp. baking soda
¼ tsp. salt
1 egg
1 c. buttermilk
2 Tbsp. butter, melted
Butter and maple syrup, for serving

1. Combine flour, baking soda, and salt in a medium bowl. Add egg and buttermilk. Using a fork or whisk, stir ingredients just until a lumpy batter forms and all the flour is incorporated. Add melted butter and quickly mix, just until butter is incorporated.

2. Heat an electric griddle or a skillet on the stovetop. (Cory put the electric griddle between 350 and 400 degrees). The griddle or skillet is ready when a droplet of water bounces on the surface.

3. Brush griddle or skillet with 1 tsp. butter or oil. Using a large spoon or ladle, pour out about ¼ c. batter. Spread batter lightly with back of spoon or spatula.

4. When bubbles begin to appear on the surface, flip the pancake and continue cooking a minute or so.

5. Serve with butter and syrup. The hubby likes his positively swimming in syrup.

Or, if you’re weird like Cory, top with peanut butter.

AND syrup.

And occasionally whipped cream. I think he gets this from our mother.

*Note: If you're craving something a bit more savory, check out the jambalaya on Pocket Jacks. And I am a much better speller than I'm given credit for.