
I made barbecued pork sammiches for a shower this week, so I updated that post with some new pics. I had some, er, technical difficulties with the original photos. (I don't know my camera well enough to know what to do with a lack of light. I should learn this. I'm sure I'll get right on that.)
Also, following the lead of my pal Jay at Pocket Jacks, I added a "follow this blog" gadget on the right side of my blog. Now you, too, can become a follower! All the cool kids are doing it. Well, three of them, anyway.
Saturday, January 31, 2009
Fiesta Beef Soup
It’s been another interesting week with more bed rest and doctor’s recommendations to take it easy, so we dined on more restaurant fare than usual, along with plenty of leftovers. (Did I say the pureed potato-leek soup made four servings? Yeah, I meant 22.)
And for the past few days, I’ve had the strangest craving.
I went to a small, private college that required first- and second-year students to live on campus, and to have a meal plan at the campus cafeteria. Being the po’ college kids that we were, we ate there most of the time, because it was free. (I’m sure this was built into my tuition somehow, so I’ve probably been paying for that meal plan for the past eight years and will be for two more.) Anyway, the cafeteria there made this really awesome kind of soup. It wasn’t quite chili, it wasn’t quite taco soup, but it was somewhere in the middle and had no beans. I don’t even remember what it was called. But I LOVED it.
Strangely Good Soup Day was the only day when I didn’t fill myself full of Lucky Charms.
And oh my, I just realized how much I overpaid to eat Lucky Charms three times a day for two years.
But back to the soup. I had no concept of cooking back in college, so I had no idea what was in this soup. All I know is that I was really hungry for it this week. So this is my attempt to re-create it, cooking both on the fly and with a shortage of some key ingredients.
And it tasted heavenly, it did.
You can certainly add a can of beans to give the soup a bit more substance. Or any other veggies that you care for. You could also reduce the amount of hamburger; not surprisingly, mine was more generous with the beef than the cafeteria version I remember.
But I was just hungry for the basic beef soup, with some cheese and tortilla chips. And I think I’ll tinker with this a bit and turn it into a yummy beef enchilada sauce at some point. Olé!
Fiesta Beef Soup
Serves 4
1 lb. lean hamburger
¼ c. minced onion
Salt and pepper
1 tsp. garlic salt
2-3 c. beef broth (I ran low, so I used 2 c. beef broth, and a few beef buillion cubes)
1 15-oz. can tomato sauce
2 tsp. chili powder
2 tsp. cumin or taco seasoning (I used 1 tsp. of each because I ran out of cumin)
¼ tsp. crushed red pepper flakes
Assorted toppings, such as cheese, tortilla chips, crackers, onion, olives, sour cream, etc.
1. Brown hamburger and onion over medium-high heat, seasoning with salt, pepper, and garlic salt.
I apologize for the lack of photos. They were inadvertently deleted from the camera. By someone who lives in this house. And who isn’t me. But I’m not one to point fingers.
2. Add the broth, tomato sauce, and seasonings.
3. Bring to a boil, and then simmer over medium-low heat for about 10 minutes.Serve with your choice of toppings.

Monday, January 26, 2009
Chewy-Gooey Bars
The hubby and I were both hungry for chocolate tonight, but I’m too sleepy to stay awake and bake cookies, so we made a quick pan of bars. Bars are a Midwestern staple. Everyone’s got bar recipes up their sleeves, and this one is the hubby’s.
On par with “pizza” and “chili,” we just call these “bars” (or sometimes “Jenni’s bars” if we’re feeling especially descriptive). But we needed something a bit more illuminating for the blog. So now these aren’t just regular old bars; they’re chewy-gooey bars. (Or was it gooey-chewy? Crap.)
The hubby makes these bars perfectly; compared to him, I’m a hack. I use a pastry blender to mix the crumbly dough, because that’s faster than using a fork. I always set aside too much crumble for the topping. Because I like-a the crumble-a. And I don’t individually position each chocolate chip, so you get a precisely even number of chocolate chips per bite. Yessiree, life's a gamble with my method; you never know how many chocolate chips you’ll get.
They usually turn out in spite of all this.
Chewy-Gooey Bars
Serves 16
Crust
1 c. brown sugar
1 tsp. salt
½ tsp. baking soda
1½ c. quick oats
1¼ c. flour
1 egg
½ c. butter (1 stick)
1 12-oz. bag semisweet chocolate chips
1 14-oz. can sweetened condensed milk
1. Preheat oven to 350 degrees.
2. In a medium bowl, combine brown sugar, salt, soda, oats, and flour. Add egg and butter, and combine mixture using a pastry blender or two forks.
 3. Press about 2/3 the mixture in a 9x13 pan.
4. Sprinkle chocolate chips over the top, and then drizzle sweetened condensed milk over chips. 5. Sprinkle with reserved crust mixture.
6. Bake for 25-30 minutes, or until crust is golden. Let cool slightly before cutting.
Pureed Potato-Leek Soup
I love baked potato soup, and I indulge when we’re eating out, but I generally don’t make a lot of heavier soups at home. The hubby and I aren’t fans of cream soups or chowders; I’m definitely a broth soup kind of gal. But I saw this recipe in a Rachael Ray cookbook and wanted to try it, because it’s more of a broth-based potato soup. So you can save your calories for the toppings – which are the best part, anyway.
This recipe calls for leeks, which are kind of like green onions on steroids. I found this bunch of leeks at my local grocery store.
This recipe calls for leeks, which are kind of like green onions on steroids. I found this bunch of leeks at my local grocery store.
 They cost $12. I went back to the store to ask if they REALLY cost $12. Because I could buy a whole lotta green onions for $12. The nice people at the store agreed and gave me $8 back. Mama always said, don’t buy no $12 leeks. (This is a lie. My mother never said anything even remotely like that.) In other words, try for the leeks, if you can. But if leeks aren't available or are prohibitively expensive, you could probably use a combination of green onions and yellow onions and still get a similar flavor.
If you've never worked with leeks, they're such fun, in a very dirty sort of way. To prepare the leeks, you’ve first got to trim them of their tops and bottoms – which is most of the leek. (I hope you didn’t pay by the pound.) Then slice each in half, lengthwise. Now you can see the many layers that make up the leek. When the leeks grow, dirt gets caught in all these layers.
 You want to remove this before cooking your leeks. I would assume, anyway; maybe you like a little dirt in your soup.
To me, the easiest way to do this is to chop up your leeks, drop them in a big bowl of water, and swish them around so the dirt falls out and settles on the bottom of the bowl. (By the way, aren’t these coolest bowls ever? I got them from my mom for Christmas. I love them. And they’re made of 100% recycled material, so I’m a better person, now, too.)
Then you can remove the leeks from the bowl and let them dry a bit on paper towels before using them.
Despite my Fun with Leeks, the hubby was not at all interested in the soup. He said that I might as well serve him … well, it’s something I would never, ever do in a bowl. I didn’t take it personally. I just brought home some spicy tuna rolls to keep him happy. It worked; he volunteered for camera duty.
Pureed Potato-Leek Soup
Serves 4
8 slices bacon, chopped
3 leeks, chopped and cleaned
5 cloves garlic, minced
8 sprigs fresh thyme, leaves stripped
1 Tbsp. paprika
Salt and pepper
4 lbs. potatoes (preferably russets), peeled and chopped
6 c. chicken broth
Dash of Tabasco
1 c. shredded sharp cheddar cheese
4 green onions, chopped
Crackers
1. In a large pot, heat bacon over medium-high heat until crispy. Remove with a slotted spoon to a plate lined with a paper towel. 2. Add leeks and garlic to the pot.
 Ooh, action shot.
3. Cook until tender, about 4 minutes. Yes, I accidentally left a few pieces of bacon in there. I was in a hurry.
4. Add the thyme, paprika, and some salt and pepper. Add the potatoes and broth. Turn heat to high and bring soup to a boil. Reduce heat to medium and simmer until the potatoes are fork-tender, about 8-10 minutes. 5. Use an immersion blender to puree the soup, or transfer the soup to a blender or food processor and puree.
6. Add hot sauce, and then add salt and pepper to taste. (I added a LOT of salt, especially since my broth didn’t have any.)
7. Serve with cheese, green onions, reserved bacon, and crackers. Mmm … bacon …
Sunday, January 25, 2009
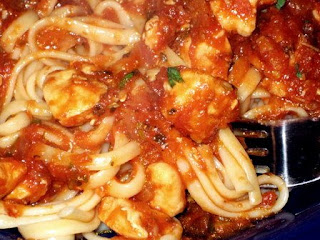
Rosemary Chicken Marinara
I still have fresh rosemary left over from my marinated mozzarella, and I relish using up any fresh herbs – especially in the winter, when I don’t have pots of them sitting on my deck.
This sauce is an adaptation of a Giada De Laurentiis recipe. I prefer to use my own marinara, but you can also use your favorite jarred marinara, and whip this up in no time. (Or make your marinara ahead of time and freeze it.)
The recipe also uses shallots which, if you’re not familiar, are kind of like a cross between garlic and an onion. But if you substitute garlic and onion for the shallot, it’s not the same flavor. (I've tried.) If you can get your mitts on some shallots for this recipe, it’s worth it. (They’ve been available for years in my little supermarket in Fargo.)
I can’t even describe how much I love this sauce. Every time I make it, I think it can’t possibly be as good as I remember. Then I taste it and think I'm amazing all over again. It's like a special occasion when we have this meal. The hubby and I even ate at the dining room table. With PLACEMATS. We's fancy.
Rosemary Chicken Marinara
Serves 4
2 Tbsp. olive oil
1½ lbs. boneless, skinless chicken breast, chopped
Salt and pepper
½ c. shallots, minced (about 3 medium shallots)
1 Tbsp. garlic, minced (about 2 cloves)
2/3 c. dry white wine
2 tsp. chopped fresh rosemary leaves
3½ c. marinara sauce
Pinch of crushed red pepper flakes
Additional salt, to taste
1 lb. linguine (or other long pasta), cooked according to package directions
1. Heat oil in a pot over medium to medium-high heat. Add chicken. Season with salt and pepper and cook until golden, about 10 minutes.
2. Add shallots and garlic. Saute until tender, about 2 minutes.
 3. Add the wine to deglaze the pan, scraping up any bits stuck to the bottom.
 4. Add rosemary and mix well.
5. Add marinara and crushed red pepper flakes, and bring sauce to a simmer. Reduce heat to medium-low and simmer, covered, 10 minutes. Add more salt as necessary.
 6. Serve over cooked linguine.
Saturday, January 24, 2009
Baked Steak Burritos
I’m back! Thank you for bearing with me. It has been a week of medical procedures, bed rest, and takeout. I’ll explain one of these days. Really.
I was relentlessly spoiled by the hubby this week. Hungry for steak? He came home with gigantic New York strips (and peanut butter cup blizzards). Had an urge for pulled pork? He came home with Famous Dave’s. Even yesterday, when I was actually up and at ‘em, he fed my Old Chicago Double Deckeroni craving. He’s good peeps, the hubby.
And now my pants hurt me.
In other news, I missed my kitchen, and I think it missed me. I also missed my knives. They were away from home for professional sharpening, and I’m just not myself without my Wusthof, ya know?
Today, I’m on my feet, my knives are back home where they belong, and I am hungry for Mexican food. Baked steak burritos are an old standby; I think the original recipe appeared in a Pillsbury cookbook years ago. I’ve made countless changes to the recipe to make it bit healthier (relatively speaking) and to suit our own tastes.
The hubby adores these little buggers. He went through a phase where he requested these every few weeks and kept encouraging me to make more, more, more! Surely I could fit more than eight in a pan! (He was right.) You can throw in anything else that you like in your burritos, such as rice or other veggies. And you can certainly substitute another meat for the steak. (But then you have to change the name of the recipe.)
I like to get all my ingredients ready, and then line up my tortillas in an assembly line. And then nab whomever I can find to help. It’s a pretty quick meal that even works on a weeknight, if you’ve got some chips and salsa to snack on until the burritos are done.
Baked Steak Burritos
Makes 10 burritos (1-2 per person)
3 Tbsp. butter or margarine
1 packet taco seasoning (I prefer spicy)
1½ lb. steak, cut in small pieces
1 16-oz. can refried beans (I use fat-free)
10 soft taco-sized flour tortillas
3 c. shredded cheese, divided in half (I usually use cheddar and/or Colby-Jack)
3 green onions, finely chopped
1 can enchilada sauce (I’ve only got a 10-oz. can on me, although I prefer larger; use either mild or hot, depending on your preference)
Assorted toppings, such as lettuce, tomato, onion, olives, sour cream, etc.
1. Preheat oven to 400 degrees. Spray a 9x13 baking dish with cooking spray.
2. Melt butter in a large skillet over medium to medium-high heat. Stir in taco seasoning. Add beef. Cook about 15 minutes, stirring occasionally, until beef is cooked and tender.
 You can periodically add a bit of water if the mixture gets too dry. I typically add about 1/3 cup water or so to make things saucier. I’m a saucy gal.
It kind of reminds me of Gravy Train at this point. But try not to think about that.
3. Heat refried beans in microwave or in saucepan.
4. Heat each tortilla in the microwave for 10 seconds. Lay tortillas on flat surface. Spread each tortilla with refried beans. Divide beef, green onions, and 1 1/2 c. cheese amongst tortillas. 5. Fold burritos. First fold in the sides.
 Then fold over the front.
 And fold over the back.
 6. Place burritos, seam-side down, in baking dish. (I can fit two rows of five if I snuggle 'em in nicely.) Top with enchilada sauce and remaining cheese.
 7. Bake about 15 minutes, or until cheese is melted and burritos are heated through.
8. Serve with desired toppings.
Sunday, January 18, 2009
Marinated Mozzarella
The hubby and I have had a bit of a strange weekend, with an even stranger week coming up. We’ve got a few medical procedures going on, and I’ll be out of commission for part of the week. Out of commission in that I can’t be up and around cooking, but I’ll still be awake and hungry on the couch.
So we’re trying to make a few meals ahead, and also provide plenty of snack options for me. (We have to keep me fed. The hubby’s convinced I have two sides, Jekyll and Hyde. When I’m hungry, the Evil Pook Bear makes her appearance.)
One of the snacks that I prepared this morning is marinated mozzarella, which is one of my favorite recipes ever. (Yes, EVER.) This is based on a Taste of Home recipe, which I found years ago, and I’ve made it dozens of times. For myself. For parties. For friends. For friends’ parties. It’s so simple and yummy, and yet makes an incredibly elegant appetizer.
And lord knows, if it’s good enough for me to nosh on while lounging in my jammies on the couch, it should be good enough for your next dinner party.
Marinated Mozzarella
Makes 16-20 appetizer servings
1 lb. mozzarella cheese, cut in 1” cubes
7 oz. roasted red peppers, drained and chopped (about 3-4 peppers)
6 sprigs fresh thyme
2 cloves garlic, minced
1 c. extra-virgin olive oil (you can substitute vegetable oil for half the olive oil)
2 Tbsp. minced fresh rosemary
2 tsp. dried Italian seasoning
¼-½ tsp. crushed red pepper flakes
1. In a jar, storage container, resealable bag, or other airtight container, layer 1/3 the cheese, peppers, thyme and garlic.
 2. Repeat layers twice more.
3. In a small bowl, combine oil, rosemary, Italian seasoning, and red pepper flakes. Poor over the cheese.
 4. Refrigerate 8 hours or overnight, turning container every few hours.
5. Remove from refrigerator a half-hour before serving. Serve with crackers and bread cubes.

Thursday, January 15, 2009
Rigatoni with Steak Sauce
I’m supposed to be eating more red meat these days, so of course, steak is the first thing that comes to mind. However, it’s a bit too chilly to be grilling. And I actually did consider it.
But the first thing I had to do when I got home from work tonight was to mount a rescue mission. Our puppy Charlie was stuck in a snow pile in the middle of the backyard, and somebody had to climb out and save him. (He’s lacking in survival instinct.) I saved Charlie, but lost a shoe. And then I got my hand stuck to the door handle. And I still can’t feel my pinkie finger. And it was just time to go inside and stay there.
So we made rigatoni with steak sauce, instead. I had some steak thawed, and some marinara sauce in the freezer. This is based on a Giada De Laurentiis recipe. You cook the steak, and then simmer the marinara with veggies, wine, and broth.
This is a pretty economical use of steak, and I used rib-eye. I simmered the steak in the sauce for a while both to make the steak more tender and to flavor the sauce, and because of the simmering, I think any more tender cut of steak would work.
And now I’m full and sleepy. Is frostbite an excuse to get out of dish duty?
Rigatoni with Steak Sauce
Makes 2 generous servings
2 Tbsp. olive oil
12 oz. steak
Salt and pepper
Steak seasoning (preferably Montreal Steak Seasoning by McCormick)
½ large yellow onion, halved and thinly sliced
1 carrot, peeled and thinly sliced
2 cloves garlic, minced
¼ tsp. dried oregano
1/3 c. red wine
1 c. marinara sauce
½ c. beef broth
8 oz. rigatoni, cooked according to package directions
1. Heat oil in a large skillet over medium-high heat. Add steak, and season generously with salt, pepper, and steak seasoning. Cook for about 3-5 minutes on each side, or until there is a crust on the outside, and the inside is pink.

Remove from pan and set aside.
2. Reduce heat to medium. Add onion and carrots, and cook about 5-7 minutes, or until onions are translucent and starting to caramelize. Add garlic and oregano and cook 1 minute.
 3. Add wine and cook 1 minute. Stir in marinara and broth. Cover and reduce heat to medium-low.
4. Cut steak into bite-size pieces, discarding any extra fat. Add steak to sauce. Cover and continue simmering about 10 minutes.
 5. Toss sauce with pasta.
Wednesday, January 14, 2009
Cajun Chicken Sammiches
I was hungry for hot sammiches this evening, so the hubby stopped on his way home from work to buy some nice, fresh bread for me. He kindly parked his warm car in the parking lot, walked aaaall the way into the store, bought my bread, walked aaaall the way back out again, and then came home.
Big deal, you say? It’s 19 degrees below zero. With the wind, it feels like it’s 37 degrees below zero.
He’s a good guy, the hubby. So I made him a sammich, too.
I love chicken sandwiches, but I don’t like the usual grilled chicken variety. They’re unwieldy; you take one bite and the whole piece of chicken falls out. Very inelegant. And, as we all know, I’m quite refined. I’ve won awards. One, anyway. If Most Poised in the 1984 Little Miss North Dakota pageant counts.
The solution? Chop your chicken first.
I also cooked my chicken in a cast iron pan so I could keep chopping my chicken with a metal spatula as it cooked. Plus, I felt like a professional cook in a real sandwich shop. Yup, I was slingin’ chicken like a pro.
Cajun Chicken Sammiches
Makes 2 generous servings
½ Tbsp. vegetable oil
1 whole or 2 split boneless chicken breasts, chopped in small, thin pieces
Salt and pepper, to taste
2 Tbsp. Cajun seasoning or blackening spice
2 Tbsp. Worcestershire sauce
1 Tbsp. soy sauce
½ small yellow onion, chopped
4 oz. button mushrooms, stemmed and chopped
½ green pepper, chopped
Crusty bread or rolls
Thinly sliced pepperjack cheese
1. Heat oil in a large skillet (cast iron, if you’ve got it).
2. Add chicken to pan. Sprinkle with salt and pepper, Cajun seasoning, Worcestershire sauce, and soy sauce.

3. Saute until partially cooked, stirring often. Add onions and saute onion golden.

4. When chicken is cooked through, add mushrooms and peppers, and saute until tender.

5. Serve chicken in French bread or rolls, topped with cheese.


Sunday, January 11, 2009
Wonton Soup
I enjoy eating the wonton soup that I get from restaurants, but the wontons are usually pretty bland. Which is a shame, because the wontons are kind of the center of flavor in the soup. I decided to make my own wonton soup this evening, using my potsticker filling in the wontons.
The hubby agreed to help me this evening; he’s the fastest potsticker-filler this side of San Francisco. This is a totally unsubstantiated claim. But he still comes in handy.
I did have some concerns about whether the hubby would like wonton soup; we don't like many of the same soups. And while he was folding the wontons, he was casually yammering about my wasting good wonton wrappers on something other than potstickers. He’s all about the potstickers. In the end, the hubby took his wontons out of the soup and ate them on their own. But as he said, “We’re allowed to be different.”
Wonton Soup
Makes 8 servings
8 c. chicken broth
¼ c. scallions, finely chopped
¼ tsp. crushed red pepper flakes
30 wonton wrappers
Wonton filling
8 oz. ground pork (I prefer reduced-fat)
½ c. finely chopped napa cabbage or coleslaw mix
2 green onions, finely chopped
½ tsp. grated gingerroot
1 clove garlic, finely minced
¼-½ tsp. crushed red pepper flakes
1½ tsp. cornstarch
1½ tsp. soy sauce
1½ tsp. dry sherry
½ tsp. sesame oil
1. In a large pot, bring broth, scallions, and crushed red pepper flakes to a boil. Reduce heat and simmer.
I-should-completely-know-better tip of the day: Don’t leave your chicken broth in the garage when it’s really, really cold out.

 It’s all hearts and flowers in my world, baby.
5. Repeat with remaining wonton wrappers. Add wontons to soup and increase heat to medium. Cook wontons in broth until they start to float and filling is cooked through, about 7-10 minutes.

The hubby agreed to help me this evening; he’s the fastest potsticker-filler this side of San Francisco. This is a totally unsubstantiated claim. But he still comes in handy.
I did have some concerns about whether the hubby would like wonton soup; we don't like many of the same soups. And while he was folding the wontons, he was casually yammering about my wasting good wonton wrappers on something other than potstickers. He’s all about the potstickers. In the end, the hubby took his wontons out of the soup and ate them on their own. But as he said, “We’re allowed to be different.”
Wonton Soup
Makes 8 servings
8 c. chicken broth
¼ c. scallions, finely chopped
¼ tsp. crushed red pepper flakes
30 wonton wrappers
Wonton filling
8 oz. ground pork (I prefer reduced-fat)
½ c. finely chopped napa cabbage or coleslaw mix
2 green onions, finely chopped
½ tsp. grated gingerroot
1 clove garlic, finely minced
¼-½ tsp. crushed red pepper flakes
1½ tsp. cornstarch
1½ tsp. soy sauce
1½ tsp. dry sherry
½ tsp. sesame oil
1. In a large pot, bring broth, scallions, and crushed red pepper flakes to a boil. Reduce heat and simmer.
I-should-completely-know-better tip of the day: Don’t leave your chicken broth in the garage when it’s really, really cold out.

2. Combine filling ingredients in a small bowl.
3. Place a few wonton wrappers on your work surface. Using a teaspoon or melon baller, place small portions of the meat mixture in the center of each wonton wrapper. Using your fingers or a small brush, wet two perpendicular sides of each wrapper. Fold from corner to corner, sealing. (This is all described in the Potstickers posting. With photos!)
4. With the wontons laying flat as a triangle with the point facing upward, wet the two opposite points with water and fold them inward. It should look like the wonton is giving itself a hug.
 It’s all hearts and flowers in my world, baby.
5. Repeat with remaining wonton wrappers. Add wontons to soup and increase heat to medium. Cook wontons in broth until they start to float and filling is cooked through, about 7-10 minutes.

Asian Pork Strips
I’m making some wonton soup for supper this evening, but I wanted something a bit more substantial to go with it. (I’m not the type of person who can live on soup and soup alone.) Plus, wontons are difficult to slip to the dogs under the table. I can’t just think of myself, you know.
This is a Kikkoman recipe with just a few minor tweaks. Despite the Tabasco, it’s not too spicy, just savory and flavorful. It’s great as an appetizer or small plate dish. Or as a snack for those who just like to sit around and eat meat on a stick. There’s no judgment here.
Asian Pork Strips
Makes 4-6 appetizer servings
1 lb. pork loin, ½” thick, cut in ¼” strips
½ c. soy sauce
¼ c. minced scallions
1 Tbsp. sugar
1 Tbsp. toasted sesame seeds
3 Tbsp. water
1 ½ tsp. minced or grated fresh ginger
1 clove garlic, minced or grated
1 tsp. Tabasco sauce
½ tsp. sesame oil
Wooden or metal skewers
1. Thread pork strips onto skewers and place in a large dish.


 6. Broil about 5 minutes. Remove from oven, flip and brush with remaining marinade, and broil another 5 minutes.

This is a Kikkoman recipe with just a few minor tweaks. Despite the Tabasco, it’s not too spicy, just savory and flavorful. It’s great as an appetizer or small plate dish. Or as a snack for those who just like to sit around and eat meat on a stick. There’s no judgment here.
Asian Pork Strips
Makes 4-6 appetizer servings
1 lb. pork loin, ½” thick, cut in ¼” strips
½ c. soy sauce
¼ c. minced scallions
1 Tbsp. sugar
1 Tbsp. toasted sesame seeds
3 Tbsp. water
1 ½ tsp. minced or grated fresh ginger
1 clove garlic, minced or grated
1 tsp. Tabasco sauce
½ tsp. sesame oil
Wooden or metal skewers
1. Thread pork strips onto skewers and place in a large dish.

2. Mix soy sauce, scallions, sugar, water, ginger, garlic, Tabasco, and sesame oil in a small bowl. Pour mixture over skewers.

3. Let stand 30 minutes, turning skewers occasionally.
4. Preheat broiler to low.
5. Place skewers on rack of broiler pan, reserving marinade. Brush with reserved marinade.
 6. Broil about 5 minutes. Remove from oven, flip and brush with remaining marinade, and broil another 5 minutes.
Snickerdoodles
The hubby and I had a busy weekend away at the ranch, and now that we’re back home, I’m catching up on some work. My computer is taking its time pondering whether to install new software, however, so I whipped up a batch of cookies while it has been thinking.
I deserve cookies when I’m working hard. Plus, there’s a blizzard warning out for tonight and tomorrow. We might need that extra fat layer to stay warm.
Hahahahahaha. I find this amusing. We already have so many layers that we're like a couple of onions. But I digress.
I made snickerdoodles, even though they have no chocolate, and I’m terribly addicted to chocolate cookies. But I do so love my snickerdoodles. If you’ve never had a snickerdoodle, it’s a type of sugar cookie that is rolled in cinnamon and sugar before it's baked, so the cookie gets a kind of crackle-top appearance. The cookies are flat and soft and chewy and magnificent.
Snickerdoodles
Makes about 30-36
1½ c. sugar
1 c. butter-flavored shortening
2 eggs
2 Tbsp. milk
1 tsp. vanilla
2 tsp. cream of tartar
1 tsp. baking soda
¾ tsp. salt
2¾-3 c. flour
Topping
½ c. sugar
2 tsp. ground cinnamon
1. Preheat oven to 400 degrees. (I’ve been asked to implicitly state that after you preheat the oven, you should actually leave it on for the duration of your cookie-baking endeavor. Apparently this has been a problem area for some. I appreciate the feedback.)
2. Combine sugar, shortening, eggs, milk, and vanilla in a mixing bowl. Beat on medium speed until well blended. Add cream of tartar, baking soda, and salt, and combine. Stir in flour. (Start with 2¾ c. and add remaining ¼ c. if dough is too sticky.)
 3. In a small bowl, combine ½ c. sugar and cinnamon.
4. Form dough into balls – about a heaping tablespoon each – and roll in sugar/cinnamon mixture.
 5. Place dough on cookie sheets and flatten slightly with a fork.
 6. Bake 7-8 minutes, and let cookies rest on hot cookie sheet for about 5 minutes before moving to cooling racks.

I deserve cookies when I’m working hard. Plus, there’s a blizzard warning out for tonight and tomorrow. We might need that extra fat layer to stay warm.
Hahahahahaha. I find this amusing. We already have so many layers that we're like a couple of onions. But I digress.
I made snickerdoodles, even though they have no chocolate, and I’m terribly addicted to chocolate cookies. But I do so love my snickerdoodles. If you’ve never had a snickerdoodle, it’s a type of sugar cookie that is rolled in cinnamon and sugar before it's baked, so the cookie gets a kind of crackle-top appearance. The cookies are flat and soft and chewy and magnificent.
Snickerdoodles
Makes about 30-36
1½ c. sugar
1 c. butter-flavored shortening
2 eggs
2 Tbsp. milk
1 tsp. vanilla
2 tsp. cream of tartar
1 tsp. baking soda
¾ tsp. salt
2¾-3 c. flour
Topping
½ c. sugar
2 tsp. ground cinnamon
1. Preheat oven to 400 degrees. (I’ve been asked to implicitly state that after you preheat the oven, you should actually leave it on for the duration of your cookie-baking endeavor. Apparently this has been a problem area for some. I appreciate the feedback.)
2. Combine sugar, shortening, eggs, milk, and vanilla in a mixing bowl. Beat on medium speed until well blended. Add cream of tartar, baking soda, and salt, and combine. Stir in flour. (Start with 2¾ c. and add remaining ¼ c. if dough is too sticky.)
3. In a small bowl, combine ½ c. sugar and cinnamon.4. Form dough into balls – about a heaping tablespoon each – and roll in sugar/cinnamon mixture.
5. Place dough on cookie sheets and flatten slightly with a fork. 6. Bake 7-8 minutes, and let cookies rest on hot cookie sheet for about 5 minutes before moving to cooling racks.
Thursday, January 8, 2009
Yes, it Happens
A few weeks ago, a friend asked me -- probably in jest -- what it is that I eat when I'm not posting to my blog. (As if I'm hiding all the really good stuff.) Most of the time, it's leftovers. Occasionally it's something quick, like omelets or Subway. (Or corndogs.)
But once in a while, it's ... well, let me tell you a little story.
I was really hungry for barbecued chicken this week. My outdoor grill and I are experiencing some separation anxiety. So I decided to make a little summer-type spread for super.
I came home from work and immediately got to work on some garlic mashed potatoes and low-fat slaw with scallions, cilantro, and lime dressing. And then I got started on the chicken.
I rinsed the chicken.
I rubbed the chicken.
I baked the chicken.
I grilled the chicken.
I basted the chicken.
I photographed the chicken.
 I tasted the chicken.
Then I made a peanut butter and jelly sammich.
The End.
Tuesday, January 6, 2009
Korean-Style Beef Bulgogi
I’ve had a horrendous two-day headache that is finally on its way out, and to celebrate, the hubby and I made potstickers this evening. (We watched Kung Fu Panda again recently. That makes me starving for potstickers.) We also did a taste test in what became the Ultimate Battle of the Bulgogi.
I love bulgogi. It’s kinda sweet and kinda hot. You know, like me. (HAHAHAHAHA. Ahem.) I eat bulgogi a lot when the hubby and I go to his favorite sushi restaurant, because I don’t like sushi. And it looks pretty darn simple to make at home.
On to the battle. In the first corner, we have our prepacked creation:
 We found it at the Asian market. It looked fun. And I have nothing against prepackaged foods, as long as they’re tasty and the ingredients are generally recognizable. This marinade includes 100% recognizable ingredients and no preservatives. You slice the steak and marinate it for an hour, then stir-fry or grill.
In the second corner, we have Korean-style beef bulgogi, courtesy of Cuisine at Home. The sauce is boiled until thick, and the beef is grilled and then tossed with the sauce after cooking.
We took one large steak and cut it in half, so we could get an accurate test of the two concoctions. We garnished each the same, as well, so appearances wouldn’t sway our opinions. Then we swallowed our potstickers, cleansed our palates with some milk, and dove in.
Let’s take another look at our contenders, Jim.
Packaged marinade: Homemade sauce:
 The results?
The marinated bulgogi was very tender, tasty, and the sweetness and soy really came through.
The bulgogi with the homemade sauce was chewier, but the sauce was fantastic – sweet, sour, and spicy. (It almost tasted like a General Tso’s sauce.)
The bulgogi with the homemade sauce was declared the winner, but it wasn’t a complete landslide. We decided to use the same sauce next time, but marinate the beef first. Because we really dig us some tender beef.
Korean-Style Beef Bulgogi
Serves 2-3
¾ lb. steak, cut in ¼” strips
½ c. soy sauce
Salt and pepper
Sauce
¼ c. brown sugar
¼ c. rice wine vinegar
2 Tbsp. soy sauce
2 Tbsp. fresh ginger, grated
1 Tbsp. garlic, minced or grated
2 tsp. toasted sesame oil
2 tsp. sambal oelek
1 Tbsp. water
1 tsp. cornstarch
1. Combine beef and soy sauce in a bowl and marinate, refrigerated, for 1 hour.
2. Sprinkle beef with salt and pepper and grill until cooked to desired doneness. 3. In a small saucepan, heat sugar, vinegar, soy sauce, ginger, garlic, sesame oil, and sambal oelek over high heat until mixture comes to a boil. Combine water and cornstarch into a slurry and whisk into sauce mixture. Bring mixture back to a boil and cook 1 minute.
 4. Remove sauce from heat. Combine steak strips with about half the sauce, and use the remainder for dipping.
Subscribe to:
Posts (Atom)


