One of my college roommates, Sarah, has been visiting from Alaska for the past several days. I miss her. She's fun. We went out with friends Saturday night and they kept me laughing past midnight. MIDNIGHT, I say. That's almost unheard of for a pregnant narcoleptic. (You can read about our exploits at Pocket Jacks. Note that I did not observe the seven-drink minimum.)
And last night it was nearly 11 before I hit the hay. On a school night, I might add.
So today, I'm dragging. I'm falling asleep while typing this. But Sarah is forgiven. T'was she who bought me my first-ever cookbook, because I kept talking about how I wanted to learn to cook. Even though it resulted in the then-boyfriend/now-hubby and I making excessive messes in the tiny apartment kitchen, which Sarah often had to clean up. She's good peeps, our Sarah.
Oh, and she also introduced me to the hubby. That popped into my head after the cookbook thing. Heh.
Anyway, we've been eating out so much lately that I really wanted to cook tonight, even though I was falling asleep on my feet. So I marinated some beef for kabobs, and then threw together some veggie lo mein and this refreshing salad. Which I snacked on throughout the meal prep while everything else was cooking.
I apologize for posting two Asian cucumber salads in the same month. I really like cucumbers. I apologize, but I ain't sorry.
Sweet and Sour Cucumber Salad
Serves 4
1 cucumber, peeled and cut in chunks
1/2 red bell pepper, cut in chunks
1/4 c. rice wine vinegar
2 tsp. sugar
1 Tbsp. soy sauce
Toasted sesame seeds (optional)
1. Combine cucumber and pepper in a bowl.
2. Combine vinegar, sugar, and soy sauce. Pour over veggies and toss to coat.
3. Sprinkle with toasted sesame seeds before serving.
Note that the servings will be smaller if you eat most of the salad before the meal.
Kabob recipe to follow. Must ... sleep ...
Tuesday, June 30, 2009
Thursday, June 25, 2009
Marinated Beef Kabobs
The hubby and I have been home only one evening in the past week, so needless to say, we haven't been doing much cooking. And when we have been home, I've had to sit back and put my feet up. Apparently pregnancy, hot temps, and 94% humidity do not a good combination make. From the knees down, I look like Barney Rubble.
OK, maybe it's the neck down.
I do, however, have another recipe from the weekend that I hadn't yet had time to post. My brother Cory helped me put these together for my dad, who loves steak and potatoes and kabobs. So I threw together a marinade first thing in the morning, and Cory helped me get everything else prepared for the kabobs, and then grill them. In the rain. With no barbecue utensils.
We German/Swedes are a hardy lot. We cope.
Marinated Beef Kabobs
Serves 6
2 lbs. beef sirloin, fat trimmed, cubed
4 tsp. steak seasoning (preferably Montreal Steak Seasoning by McCormick)
Marinade
1/2 c. dry red wine
2 Tbsp. balsamic vinegar
2 Tbsp. soy sauce
4 cloves garlic, minced
1 Tbsp. Worcestershire sauce
1 Tbsp. fresh choppped rosemary
1 Tbsp. fresh thyme leaves
Refrigerated potato wedges, preferably rosemary- and garlic-seasoned
Fresh vegetables (we used 2 peppers, 1 large red onion, and 2 zucchini)
Olive oil
Kosher salt
Fresh black pepper
1. Toss the steak with the steak seasoning and place in a large dish. Combine the marinade ingredients and pour over the top of the steak. Cover the dish with plastic wrap and let sit in the refrigerator for 4 to 8 hours.
2. Chop the veggies into bite-sized pieces. Drizzle with olive oil and sprinkle with salt and pepper. Then mix everything up with your hands to make sure all the veggies are coated.
I made Cory do this for me. He even washed his hands.
3. Thread the steak, potatoes, and veggies onto skewers. (If you're using wood skewers, be sure to soak them in water for a half-hour beforehand.)
4. Grill over medium heat, until cooked to desired doneness, about 10-12 minutes.
Mom even ate one with her portabello salad! O, happy day.
Tuesday, June 23, 2009
Grilled Portabello Salad
The hubby and I stayed with my family for a long weekend, and we celebrated a kind of combination Mother's Day/Father's Day because we didn't get a chance to spend much time with Mom on Mother's Day.
Mom isn't a big fan of meat, but she loves grilled portabellos, and she especially requested "those big mushrooms" earlier in the week. I decided to make a sort of salad for her so it wasn't just a pile of mushrooms.
I modeled this salad after a dish that she and I once ate at a restaurant in Boston. We had been shopping and site-seeing all day, and just wanted to relax in the hotel restaurant instead of going out. Unfortunately, the hotel restaurant served seafood almost exclusively. Which I don't eat. So I ordered a garden salad and a portabello mushroom appetizer. It was absolutely delicious. Mom even let me eat of it.
That appetizer version also had smoked mozzarella, which was a lovely addition. Mom is iffy on the cheese, so I left it out here. But I highly recommend adding a slice on top of the mushroom and let it melt, like you would a cheeseburger.
Grilled Portabello Salad
Makes 2 small servings or 4 appetizers
4 portabello mushroom caps, wiped clean
4 Tbsp. olive oil
1 tsp. fresh rosemary, chopped
1 tsp. fresh thyme, chopped
Kosher salt
Fresh black pepper
6 Tbsp. balsamic vinegar, divided
4 plum tomatoes, chopped
1 clove garlic, minced
1 tsp. fresh basil, chopped
2 c. arugula, or more if desired
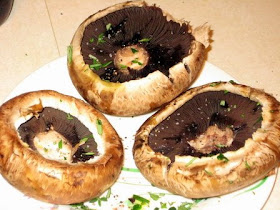
1. Remove stems from portabellos, if necessary. Brush tops and bottoms of caps with olive oil, and sprinkle with rosemary, thyme, salt, and pepper.
You want to be more liberal with the oil than I was in this picture. Mom is anti-oil.
2. Grill portabellos over medium heat until they become tender and juicy, about 8-10 minutes. (I actually cooked mine on the upper rack to prevent burning.)
3. Meanwhile, combine chopped tomatoes with garlic and basil. Drizzle with 2 Tbsp. balsamic vinegar, and sprinkle with salt and pepper.
4. For each portabello, spread 1/2 c. or so of arugula on a plate. Top with 1/4 the tomato mixture. Add portabello, cap size up, and drizzle each portabello with 1 Tbsp. balsamic vinegar.
Friday, June 19, 2009
Mojo Pork Tacos
I had a short week at work, and then headed out of town to visit my grandparents, and my aunt and uncle from Oregon. I got back in town just in time to greet my little brother, Cory, who is staying with us for a few days. And then the hubby and I are leaving town to stay with my family for a long weekend.
That's a lot of family time. Good thing I like 'em.
Even though it's been a busy day and we leave in the morning, I wanted to make something quick and yummy instead of grabbing takeout. I saw this recipe in Cuisine at Home and thought it was such an interesting technique for tacos that I had to try it.
I didn't follow the recipe exactly, because I was in a hurry and didn't have everything on hand. But it was very yummy -- the pork had some tang and kick, and cooking the tortilla with the beans and cheese made it almost quesadilla-like. We will definitely be making these again.
Mojo Pork Tacos
Serves 4
Marinade
1 Tbsp. orange juice (preferably fresh)
2 Tbsp. vegetable oil
2 Tbsp. lime juice (preferably fresh)
4 cloves garlic, minced
1 1/2 tsp. dried oregano (Mexican, if you've got it)
1/2 tsp. kosher salt
1/4 tsp. black pepper
1/4 tsp. crushed red pepper flakes
2 lb. pork loin or tenderloin
8 6" flour tortillas
1 16-oz. can low-fat refried beans
2 c. shredded Monterey Jack cheese
Chopped lettuce and tomato (optional)
1. Combine marinade ingredients in a small bowl.
I love using fresh citrus juice. My friend Sally gave me this juicer-thing Christmas.
It's one of my favorite kitchen gadgets ever. It makes juicing fun! I bought one for oranges, too. Sally is good people.
2. Butterfly your pork, if desired. (This basically means to cut it horizontally most of the way through, so it opens like a book.) Add pork and marinade to a resealable bag and refrigerate 2-4 hours.
You really don't want to go any longer. The acid in the citrus juice will actually start to cook the pork. YOU want to cook the pork.
3. Grill pork over medium-high heat until cooked to desired doneness, about 10-15 minutes. Let rest.
4. Meanwhile, top each tortilla with a few tablespoons each of refried beans and cheese.
5. Heat a dry skillet over medium heat and cook each tortilla until the cheese is melted.
You can also do this on the grill. But it was really hot out. I wilt in the sun.
6. Slice pork into thin, bite-sized pieces.
7. Top each tortilla with pork, lettuce, and tomato. Fold over and serve.
Monday, June 15, 2009
Beer-Marinated Steak Sandwiches
The hubby and I both love a good steak sammich, and the marinade for this recipe has been tempting me since the first time I saw it in a Better Homes and Gardens cookbook. It's a combination of dark beer, steak sauce, garlic, mustard, yadda, yadda, yadda. Lots of good stuff. AND topped with smoked cheese.
I ran home during lunch today to throw this together, and I couldn't get over how fabulous the marinade smelled. I assume the flavor can differ greatly, depending on which type of steak sauce you use. The hubby and I have always been A-1 types (Bold & Spicy, although I used regular A-1 because a half-cup of Bold & Spicy did indeed seem rather bold). The taste of the steak sauce really came through, so be sure to use one of your favorites.
For the beer, I used an imported stout, which I also managed to spray all over myself when I first opened it.
Ain't nothin' classier than a visibly pregnant woman who comes back from lunch reeking of strong beer.
All in all the hubby and I were very impressed with these sandwiches (although we'll choose a chewier bread next time). They taste like something you'd get in a pub, alongside a nice, cold brew.
Suggested pairings: Coke Zero, cran-apple juice. We're currently a dry household. Baby doesn't like cold brews.
Beer-Marinated Steak Sandwiches
Serves 4
Marinade
3/4 c. stout (dark beer)
1/2 c. steak sauce
2 Tbsp. stone-ground mustard
1 Tbsp. Worcestershire sauce
2 cloves garlic, minced
1 tsp. cracked black pepper
Several dashes hot pepper sauce
1 1/4 lbs. steak
1 medium onion, thinly sliced and separated into rings
1 green bell pepper, cut in thin strips
4 chewy rolls
4 oz. thinly sliced smoked cheddar cheese
1. Combine marinade ingredients in a bowl. Set aside 2 Tbsp. and reserve in refrigerator.
2. Trim fat from steaks and score both sides in a diagonal pattern.
This means to make shallow cuts across the surface of the meat, so the marinade gets in there better. Basically, cut lines about 1" apart across the steak, and then back again in the other direction.
3. Pour marinade over steak and let sit, refrigerated, 4-8 hours.
4. Grill steak to desired doneness, about 10-20 minutes. Let sit about five minutes before slicing into thin strips.
5. Meanwhile, cook onions and peppers over medium-high heat in a non-stick skillet. When peppers soften and onions begin to caramelize, add reserved marinade. Cook 1-2 minutes longer.
The recipe said to grill these in foil packets, but I don't have much luck with foil packets. I burn that which I cannot see.
6. Slice rolls, and add steak, veggies, and cheese.
7. Fervently wish sandwiches were easier to photograph because man, this doesn't do it justice. But I was too hungry to keep trying.
Saturday, June 13, 2009
Chocolate Fudge Layer Cake
The hubby and I cooked ahead last weekend, so we had plenty of leftovers for the week. Which was a good thing, because it was a busy week. And when it wasn't busy, I was feeling too lazy to do anything more strenuous than whip up an omelet. It happens to everyone, right? (Right??)
I have, however, been craving cake like mad for the past few weeks. And Grape Nuts. Which is odd, because I don't really like cake. Or Grape Nuts.
My problem isn't with cake, per se, so much as is it frosting. I only like whipped cream frosting or ganache; I hate thick, goopy, sugary frostings. (But give me a cold yellow cake with whipped cream on top and I'm a very happy camper.) And I don't like chocolate cake unless it has chunks of chocolate in it. This all goes back to my Liking Chocolate But Not Chocolate-Flavored Things issue.
I know I'm strange; no need to point this out.
But back to the cake craving. It was particular: I needed either a yummy yellow cake with whipped cream (which the hubby doesn't like), or something rich and fudgy with good frosting. Lo and behold, I stumbled upon a picture of this recipe in a magazine and was mesmerized. This is a Kraft recipe that starts with a boxed cake mix and ends with a ganache-like frosting made of whipped topping and melted chocolate.
The hubby was off fishing today with our pal Kipp, so I baked the cake this morning and let it sit in the fridge all day long, so I'd have someone to share it with when the boys returned. My only complaint with the recipe is that the frosting is rather difficult to spread on a layer cake (because it's thinner and drippy, like ganache.) But it sets up so well and tastes so good that it's forgiven.
Chocolate Fudge Layer Cake
Serves 16-18
1 pkg. (8 squares) semisweet baking chocolate, divided
1 pkg. chocolate cake mix (2-layer size)
1 3.9-oz. pkg. Jell-O chocolate-flavored instant pudding and pie filling
4 eggs
1 c. sour cream
1/2 c. vegetable oil
1/2 c. water
1 8-oz. carton frozen whipped topping (do not thaw)
Additional whipped topping or whipped cream, for serving (optional)
1. Preheat oven to 350 degrees. Grease two 9" round baking pans.
2. Chop two of the chocolate squares and set aside. I went about this big with mine.
And no, there's no real frame of reference. The chunks could be three feet tall for all you know.
3. Using a mixer, beat cake mix, pudding mix, eggs, sour cream, oil, and water on low speed until just moistened. Turn speed to medium and beat 2 minutes. Stir in chopped chocolate.
4. Pour cake batter into prepared pans.
5. Bake 30-35 minutes, or until a toothpick comes out clean in the center of the cake.
6. Cool cakes in pans on wire racks for 10 minutes. Loosen cakes from sides of pans and invert onto cooling racks, removing pans. Cool cakes completely.
Charlie wishes he could eat chocolate fudge layer cake. Charlie wishes he could eat everything.
7. Place whipped topping and remaining six squares of chocolate. Microwave 2-3 minutes, stirring every 30 seconds, until chocolate is melted. Combine chocolate and whipped topping thoroughly, then let rest 15 minutes to thicken.
8. Place bottom cake layer on a serving plate. Top with some of the ganache frosting. Add second layer. Cover top and sides with frosting.
9. Store in refrigerator before serving to let frosting set up.
I've never been good at keeping my cake plates perfectly clean of frosting. Oh well, we all have our talents.
10. Cut into big ol' slices. Isn't it tall? And pretty?
And serve with whipped cream.
Sunday, June 7, 2009
Roasted Potato and Black Bean Quesadillas
The hubby and I have had a lovely three-day weekend, the first day of which was spent shopping. Yes, the hubby drove his pregnant wife and his mother-in-law to the Cities, patiently complying with our requests for rest stops and coffee and food stops and just a few more minutes of looking at purses for my mother, please. He's a saint.
For those who aren't familiar, the Cities is the Minneapolis-St. Paul area. When we eastern-NoDak types are looking for some excitement, we head to the Cities. When we're looking for relaxation, we head to the lakes. It's best to remain vague and noncommittal.
We had a productive shopping trip. Our yet-to-be born baby is the proud owner of several new superhero t-shirts. And a pair of blue sneakers. And not much else.
Yesterday was a cool and rainy day, so we spent the time indoors, cleaning the house, resting our sore shopping toes, and making red chileatole soup. Instead of sammiches, we made some roasted potato and black bean quesadillas, which is another quesadilla recipe that I've been making for years.
The recipe is a Betty Crocker, I believe, and incredibly simple to make because it starts with precooked, frozen potatoes. You can buy any frozen roasted potatoes, preferably with garlic (but if not, throw in a bit of minced garlic). I have problems finding my favorite brand, which is Green Giant roasted garlic potatoes with herbs, but I've substituted other varieties without issue.
Roasted Potato and Black Bean Quesadillas
Serves 8
9 oz. frozen roasted garlic potatoes
1 15-oz. can black beans, rinsed and drained
1/3 c. finely diced onion
1 4-oz. can diced green chilies
8 8-10" tortillas
2 c. shredded cheddar cheese
2 c. shredded Monterey Jack cheese
Salsa, for dipping
Sour cream (optional)
1. Microwave potatoes according to package directions. If your package doesn't recommend microwaving (like mine), do it anyway in a covered dish for 3-4 minutes. Rebellion never felt so good.
2. Put potatoes and beans in a food processor and puree until nearly smooth. Add onions and chilies and mix until combined.
It ain't pretty. Yet.
3. Heat a skillet over medium heat. On half of each tortilla, spread about 1/3 c. of the potato mixture and 1/4 c. of each of the cheese.
4. Fold tortilla over and cook in a dry skillet about 3-4 minutes on each side. Cut into wedges and serve with salsa and sour cream. Or soup. Or both.
Wednesday, June 3, 2009
Asian-Grilled Pork
Several years ago, the hubby and I were addicted these premarinated pork tenderloins that you could buy in the meat department. I think we ate them an average of once per week. But they became increasingly hard to find, and the price kept increasing, as well. It became difficult to justify the $8 per pound price tag when I figured I could make something similar at home.
Since then, I've been trying almost every Asian marinade I can get my hands on, hoping to find something as good or better. And I think this one comes as close as anything I've tried, but with some extra kick.
I actually just threw this marinade together at lunch today with no real plan in mind.
I like to marinate things at lunch. I get teased about it. Hey, everyone needs a hobby.
The marinade turned out great. It was very flavorful, and both sweet and a bit spicy. I'd recommend serving the pork with Asian Carrot and Cucumber Salad AND a starchier side dish, maybe some sort of veggie lo mein. I served just the pork and the salad, and as I was eating, I told the hubby I thought I'd still be hungry afterward. He said, "Yes, this is a nice little snack that you've prepared for us."
Thankfully, we still have some pie for dessert. I'm always thankful for pie.
Asian-Grilled Pork
Serves 2-3
1 lb. pork loin or tenderloin
Marinade
1/4 c. soy sauce
2 cloves garlic, minced
1 green onion, thinly sliced
1 tsp. ginger, minced or grated
1 tsp. sambal oelek
1 Tbsp. brown sugar
1/2 tsp. dark sesame oil
1. Trim pork and butterfly, if desired.
I like to butterfly my pork so it doesn't char on the outside before it's cooked through on the inside.
2. Combine marinade ingredients in a small bowl and stir well.
3. Place pork in a resealable bag and add marinate. Refrigerate at least 4 hours or overnight.
4. Grill over medium heat, basting with marinade the first few minutes.
5. Grill pork about 10-12 minutes, or until cooked to desired doneness. Let rest a few minutes before serving. (The pork, not you.)
Asian Carrot and Cucumber Salad
I'm always on the lookout for easy and tasty side dishes to go with our weeknight suppers, and finding keepers is a constant challenge. (I fall back on Velveeta Shells & Cheese far too often. Mmm ... Velveeta Shells & Cheese ...)
Tonight I was making some Asian grilled pork, and I found this side dish in Cooking Light to go with it. The salad is light, refreshing, and flavorful, and also extremely low-cal (47 calories per serving!). It's tangy and has a bit of kick from the cayenne, but not overwhelmingly so.
However, the hubby -- excellent recipe troubleshooter that he is -- suggested a few changes, so I'm including the modified recipe. For example, the original recipe included a much higher carrot-to-cucumber ratio than we'd prefer. (I love cucumbers and they were great with this dressing; the hubby says matchsticked carrots are nearly impossible to eat with a fork, so they shouldn't be the main component.)
In other words, do as I say, not as I do.
I don't think the salad will keep terribly well if you have leftovers. I recommend waiting until everyone else has eaten their fill, and then nabbing all the remaining cucumbers out of it.
Asian Carrot and Cucumber Salad
Serves 6-8
3 Tbsp. soy sauce
2 Tbsp. rice wine vinegar
2 tsp. canola oil
2 tsp. dark sesame oil
1 tsp. sugar
1/2 tsp. garlic, minced
1/4 tsp. cayenne pepper
5 oz. matchsticked carrots (half the usual supermarket-sized bag)
3 c. cucumbers, peeled and chopped
1 tsp. toasted sunflower seeds
1. Combine first 7 ingredients in a large bowl.
2. Add the carrots and cucumber, and toss well to coat.
3. Sprinkle with sesame seeds before serving.